
ADR (Freddie Mac)
Verified against source (1)
ADR Servicer User Guide (PDF, rev. 2025-03-17)
Servicers use ADR to see the foreclosures and bankruptcies on the Freddie Mac loans they service: where each case stands in its state workflow, which holds are in place, and which documents the attorney has filed. Servicers in the Direct Title pilot also order and manage titles here.
This guide is for servicer users and the Security Administrators who manage them. Attorneys reporting on cases should read the attorney guide; case management vendors should read the integration guide. For an overview, see ADR on Quandis Learn or the ADR program page.
What you can see and change in ADR depends on your role.
| Role | What it’s for |
|---|---|
| Security Administrator | The only role that can manage users: add, activate, deactivate, unlock, re-certify, and grant or revoke organization access. |
| Servicer | View the loans associated with your company in ADR. |
Getting your first account
Section titled “Getting your first account”If your company is new to ADR, email adr.support@quandis.com to request an initial administrator account. Include:
- Administrator name
- Administrator email address
- Complete company address
- Phone and fax numbers
- The Freddie Mac Servicer IDs associated with your company
That administrator can then manage the other users in your organization.
Managing users
Section titled “Managing users”All user management happens in the Users panel of your organization’s summary page. To get there, choose Contacts > Organizations and click your organization’s name. If your company has more than one organization, each one is listed separately.
Most user actions follow the same pattern: select one or more users, then pick an action from the panel’s options menu and click Okay to confirm.
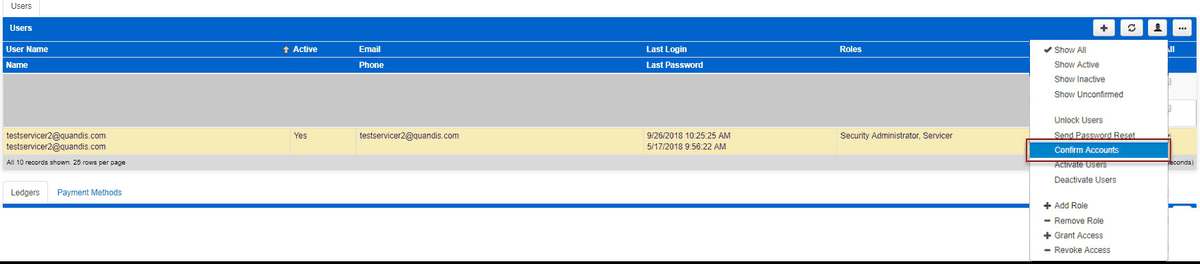
To select a user, click the user’s row to highlight it, or check the box in the All column. You can select several users at once to deactivate, unlock, or reset passwords in bulk.
Add a user
Section titled “Add a user”- Go to Contacts > Organizations and click your organization’s name.
- In the Users panel, click +.
- In the Register panel, enter First Name, Last Name, Email Address, and the System Roles to grant, then click Register. You return to the Users panel.
- Select the new user and choose Activate Users from the options menu. Click Okay. Active users show Yes in the Active column.
- With the user still selected, choose Send Password Reset and click Okay. The user receives an email with instructions for setting a password.
Add or remove a role
Section titled “Add or remove a role”- Find the user in the Users panel and select the row.
- Choose Add Role or Remove Role from the options menu.
- Choose the role from the Role list and click Save.
Deactivate, unlock, or reset a password
Section titled “Deactivate, unlock, or reset a password”| To | Choose from the options menu | Result |
|---|---|---|
| Deactivate users | Deactivate Users | The Active column shows No. |
| Unlock users | Unlock Users | The users can sign in again. |
| Reset passwords | Send Password Reset | Each user receives a password reset email. |
Select the users, choose the action, and click Okay in the confirmation dialog.
Give a user access to more than one organization
Section titled “Give a user access to more than one organization”ADR treats each servicer and subservicer as its own organization, with access only to its own loans. Some users need access to several, for example because of subservicing arrangements or acquisitions. Only Security Administrators can grant this access.
To grant access:
- Go to Contacts > Organizations and open the organization the user should be added to.
- In the Users panel, open the person-icon menu and choose Grant Access.
- Choose the user from the list and click Save. The user now appears in that organization’s Users panel.
To revoke access:
- Open the organization from Contacts > Organizations.
- In the Users panel, select the user’s row, then choose Revoke Access from the person-icon menu.
- Click Okay. The user is removed from that organization.
User re-certification
Section titled “User re-certification”Freddie Mac security guidelines require each organization to re-certify its user accounts at least once every six months. Users can’t re-certify their own accounts, so every organization needs at least two Security Administrators.
How you’re notified
Section titled “How you’re notified”- Security Administrators receive a daily email listing users who haven’t signed in to ADR for at least five months.
- If your organization has only one Security Administrator, administrators receive emails with the subject “ADR System User Re-certification – Backup Security Administrator Needed”. To stop them, add the Security Administrator role to another user.
Re-certify users
Section titled “Re-certify users”-
Sign in as a Security Administrator and go to Contacts > Organizations.
-
Open the organization whose users need re-certification.
-
In the Users panel, check the box for each user to re-certify. Select All only if every user needs re-certification, as listed in the notification email.
-
Choose Confirm Accounts from the person-icon menu and click Okay. A confirmation message appears at the top of the page.
-
Each selected user receives an email with a re-certification link. The user opens the link (or pastes it into a browser) and sees a message that the account is confirmed.
To check that re-certification worked, look at the next day’s notification email: re-certified users no longer appear on it.
If an account lapses
Section titled “If an account lapses”A user who isn’t re-certified by the end of the sixth consecutive inactive month is deactivated. To restore access, a Security Administrator activates the user again (steps 4 and 5), then re-certifies the account.
Signing in
Section titled “Signing in”Sign in
Section titled “Sign in”- Go to www.freddiemacadr.com.
- Enter your email address (your user name) and your password.
- Click Sign In. The Home page opens.
Reset your password
Section titled “Reset your password”- Either ask a Security Administrator to send you a password reset, or click Forgot your password? on the sign-in page, enter your email address, and click Reset.
- Follow the instructions in the email you receive.
Password rules
Section titled “Password rules”Passwords are case sensitive and must follow Freddie Mac security guidelines:
- At least 8 characters
- At least one special character:
! @ # $ % ^ & * ( ) - At least one number
- At least one capital letter
- At least one lowercase letter
- Different from your previous 3 passwords
Passwords expire every 90 days. You’ll get reminders before yours expires. If it expires before you reset it, your account is locked, and at your next sign-in you’ll be told to contact your Security Administrator.
Finding a loan
Section titled “Finding a loan”Start from the Loans home page: Home > Loans.
- Quick search: enter the Freddie Mac loan number in the search field and press Enter. Freddie Mac loan numbers are 9 characters and can’t be changed by users.
- Loan search panel: click the down arrow next to the search field, enter the loan number in the Loan field, and click Search.
In the results, click the loan number in the Loan column to open the Loan Summary page.
The Loan Summary page
Section titled “The Loan Summary page”The Loan Summary page has three sections, listed on the left.
Summary
Section titled “Summary”Key loan details. To see more, expand the Loan Summary panel with the arrow and + icons at its top left.
Activity
Section titled “Activity”| Panel | Contents |
|---|---|
| Borrowers | Borrower details (name, address, SSN) and borrower type (primary or secondary). SSNs are fully masked. |
| Loan Data | Loan data information. |
| Related Loans | Any related loans. |
Processes
Section titled “Processes”| Panel | Contents |
|---|---|
| Bankruptcies | Bankruptcies on the loan. Click a case number to open the Bankruptcy Summary. |
| Deficiencies | Deficiencies on the loan. Click a case number to open the Deficiency Summary. |
| Foreclosures | Foreclosure files on the loan. Click the link to open the Foreclosure Summary. |
| Titles | Titles on the loan. Click the link to open the Title Summary. |
| Valuations | Valuations on the loan. |
| Processes | Other processes on the loan. |
Foreclosures
Section titled “Foreclosures”To open a foreclosure, click its Case # in the Foreclosures panel of the Loan Summary page (Processes section). The Foreclosure Summary page has four sections. Click + to expand a panel and − to collapse it.
Summary
Section titled “Summary”- Foreclosure Summary: the foreclosure’s details.
- Loan Summary: the loan the foreclosure belongs to.
Workflow
Section titled “Workflow”The Tasks panel lists every step in the state workflow, each with three dates:
| Date | Meaning |
|---|---|
| Estimated | When the step should be complete, based on the timeline template Freddie Mac sets. |
| Projected | When the attorney firm now expects to complete the step. Used mainly when a step is past its estimated date and still open. |
| Actual | When the step was completed. Firms can only enter today’s date or a past date. |

Click the i icon beside a step to see its history.
The Holds panel shows current, active, and closed holds on the file, such as a bankruptcy filing that pauses the foreclosure.
Documents
Section titled “Documents”Lists the documents associated with the foreclosure.
Processes
Section titled “Processes”- Related Processes: processes associated with the foreclosure.
- Title: titles associated with the foreclosure.
- Valuations: valuations associated with the foreclosure.
Bankruptcies
Section titled “Bankruptcies”To open a bankruptcy, click its Case # in the Bankruptcies panel of the Loan Summary page (Processes section). The Bankruptcy Summary page mirrors the foreclosure page:
| Section | Panels |
|---|---|
| Summary | Bankruptcy Summary (the bankruptcy’s details) and Loan Summary (the loan it belongs to). Click + to expand and − to collapse. |
| Workflow | Tasks (current status of each workflow step, with details) and Holds (current, active, and closed holds). |
| Documents | Documents associated with the bankruptcy. |
| Processes | Related Processes. |
Ordering a loan modification or deed-in-lieu title
Section titled “Ordering a loan modification or deed-in-lieu title”You can order in the application or by dropping a file on an FTP server.
Order in the application
Section titled “Order in the application”-
Sign in to the title application at www.freddiemactitlesense.com.
-
Go to Home > Loans and click the loan number in the Loan column.
-
On the Loan Summary page, open the Titles tab in the Processes section.
-
Click + and choose New Deed In Lieu Title or New Loan Modification Title.

-
Complete the required fields in the New Title form (see the table below). Fill in any other fields you have.
-
Click Save to place the order, or Cancel to leave without ordering.
The new order appears in the Titles tab. From its row you can:
- Click the Case # to open the Title Summary page.
- Open several titles on the same page as flyout tabs.
- Edit the order inline.
- Click the i icon for more information about the title.
Required fields for a new title order
Section titled “Required fields for a new title order”| Field | Description |
|---|---|
| Title | Name or title of the order |
| Template | Product type |
| Product Category | Deed In Lieu, Deed In Lieu w/Signing Service, Loan Modification, or Loan Modification w/Signing Service |
| Assigned Organization | Assigned organization |
| Servicer | Servicer name |
| Servicer Loan ID | Servicer loan ID |
| Original Balance | Original loan amount |
| UPB Amount | Unpaid principal balance |
| Property Address, City, State, Postal Code | Property address |
| Date Opened | Date opened |
| Borrower First Name, Last Name | Borrower name |
| Borrower Phone Number | Required only for products with Signing Service |
| Co-Borrower First Name, Last Name | Required only if Co-Borrower is Yes |
Order by FTP file drop
Section titled “Order by FTP file drop”Drop an Excel (.xlsx) file with the predefined column headers on either Quandis’s FTP server (in your designated folder) or your own internal FTP server. Either way, the order flows the same way:
- You drop the file.
- Quandis imports the file and processes the title order request.
- The title company receives the order.
- The title company sends the title product to the Quandis application and to you.
- You retrieve the product in the application or directly from the title company.
File columns to watch
Section titled “File columns to watch”| Column | Notes |
|---|---|
ServicerLoanID |
Enter as text (see below). |
AgencyLoanID |
Enter as text. |
PostalCode |
Enter as text. |
BorrowersPhoneNumber |
Required when the product type is a Signing Service product (deed in lieu or loan modification). |
Attachment |
Name of the attachment. Required only when the product type is Loan Modification Signing Service. |
Titles
Section titled “Titles”Go to Home > Titles to open the Title home page.
Title dashboard and list
Section titled “Title dashboard and list”The Dashboard panel shows title counts (in the Count column) grouped by the filter you choose. To change the grouping, click the ellipsis (…) on the right of the dashboard, for example to group by Assigned Organization.
Click any group to list its titles in the Titles panel below.
Cancel a title order
Section titled “Cancel a title order”-
Open the Title Summary page for the order.
-
In the Tasks panel, click + New Task.
-
Choose Send Cancel Title Request from the Task list and click Save.
-
In the Task Edit screen, choose a Closed Reason and click Save.

If you decide not to send the cancellation yet, click Cancel. You can reopen the task later to send it.
The request goes to the title vendor, who decides whether to allow the cancellation and whether to charge for it. Contact the vendor directly with billing questions and for their cancellation time frames.
Check whether the cancellation went through
Section titled “Check whether the cancellation went through”Vendors can take up to a day to process cancellations. If you haven’t heard back within 24 hours, contact the vendor directly.
- Approved: the title’s Status is Canceled, Date Closed is filled in, and Closed Reason is CANCEL/NO BILL. You’ll see this in the list on the Title home page, in the Titles tab of the Loan Summary page, and on the Title Summary page.
- Denied: a message saying so appears in the Messages panel of the Title Summary page. Wording varies by vendor, and some include more detail.
Title Summary page
Section titled “Title Summary page”| Panel | What you can do |
|---|---|
| Title, Property, and Loan Summary | View the title, property, and loan details. |
| Activity (Public Records and Transactions) | Add, refresh, filter, and export to CSV or Excel. |
| Workflow (Tasks and Holds) | Add, refresh, filter, and export to CSV or Excel. |
| Messages | Add, refresh, filter, and export to CSV or Excel. |
| Documents | Add a document or folder, or bulk upload; refresh; filter; zip and email; convert to PDF; merge into a single PDF; export to CSV or Excel. The title product appears here once the order is fulfilled. |
| Processes (Related Processes) | Refresh, filter, and export to CSV or Excel. Servicers can’t add related processes. |
Retrieve the title product
Section titled “Retrieve the title product”Open the Title Summary page and click the document link in the Documents panel to download it.
Beneficiary checks
Section titled “Beneficiary checks”Title vendors are expected to produce a beneficiary check (bene-check) for every foreclosure title order in a Trustee Sale Guarantee (TSG) state, within 24 hours of the order. The bene-check appears in the Documents panel alongside the product documents. Labels vary by vendor.
Request a title update
Section titled “Request a title update”You can order updates only after the product has been received, and only on foreclosure products.
-
Open the Title Summary page for the order.
-
In the Tasks panel, click + New Task.
-
Choose Send Update Title Request from the Task list and click Save.
-
Choose an Update Type, enter the Update Instructions (including the good-through date, if any), and click Save.

The Update Type list differs between TSG and non-TSG states. If an update can’t be ordered yet, the Task Edit panel explains why and only Cancel is available. For foreclosure products, you can reopen and save the task once the product arrives.
Delivery time and the update product vary by vendor. For delays or product questions, send the vendor an order inquiry.
Ask the title vendor a question
Section titled “Ask the title vendor a question”- In the Messages panel of the title order, click +.
- Choose Order Inquiry from the Template list first, then edit the subject in the Message field.
- Enter what you want to tell the vendor in the Body. To also send it by email, enter recipients in the To field.
- Click Save.
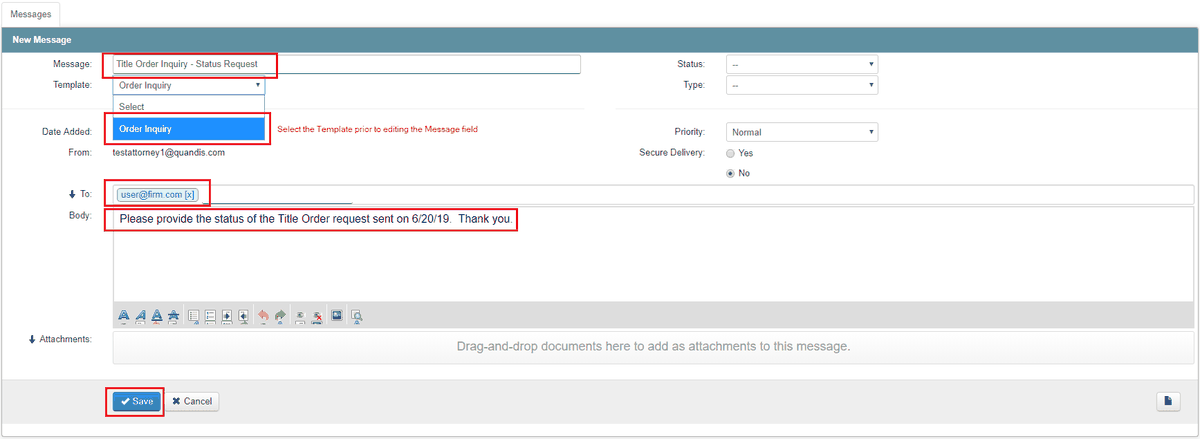
The message appears in the Messages panel and is sent to the vendor. The vendor’s replies appear in the same panel; to read a full message, choose Toggle Detail from the envelope-icon menu.
Exporting lists to Excel or CSV
Section titled “Exporting lists to Excel or CSV”Any list in ADR can be exported, including loans, borrowers, bankruptcies, and foreclosures.
- Open the list, for example Home > Loans, and filter it as needed. Lists show 25 rows per page by default; you can change the row count.
- Choose Export to CSV or Export to Excel from the … menu.
- The file downloads to your browser’s downloads folder.
Reports
Section titled “Reports”Request a report
Section titled “Request a report”-
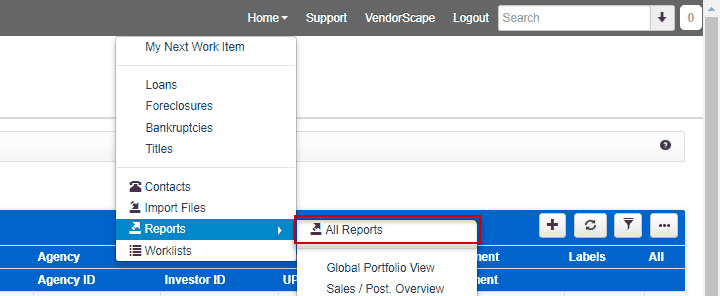
Choose Home > Reports > All Reports.
-
On the Report Request page, click the report you want.
-
Click + to create a new request, and complete the fields:
Field What to enter Label A name for the report. Schedule Run Once; Run Monthly (with the date and time); or Run Weekly (with the day and time). Recipients Your email address is filled in. Add anyone else who should be notified when the report is ready. Filters Optional, and not every report has them. To narrow the report, clear All and choose specific values. -
Click Submit. You return to the Report Request page. When the report is ready, its Delivered date is filled in.
Open a report
Section titled “Open a report”From the Report Request page: click the report’s name. A new tab lists every delivery for that request in the Documents panel: one item per scheduled run, or a single item for a one-time report. Click an item to download it.
From the email: the notification comes from no-reply@quandis.com, with the report name and the date and time it ran in the subject. Click the report link in the email. If you aren’t signed in, sign in first; the report then downloads.
Report definitions
Section titled “Report definitions”ADR – Case Load Next Task Due
Section titled “ADR – Case Load Next Task Due”All active cases assigned to each firm you have access to, with each case’s next task due in the next 365 days.
| Field | Description |
|---|---|
FMLoan |
Freddie Mac loan number |
Servicer |
Servicer assigned to the loan |
ServicerLoan |
Servicer loan number |
SubServicerName |
Subservicer assigned to the loan |
State |
State where the property is located |
AttorneyFirm |
Attorney firm assigned to the case |
AttorneyCaseID |
The firm’s internal case number |
LastTaskCompleted |
Last task (milestone) completed on the case |
NextDueTask |
Next task that needs to be completed |
TaskEstimatedCompletion |
Estimated completion date for the next task |
TaskProjectedCompletion |
Projected completion date for the next task |
State workflows
Section titled “State workflows”Each foreclosure follows the workflow for its state and foreclosure type. These are the steps tracked in the Tasks panel.
| State | Type | Workflow steps |
|---|---|---|
| AK | Non-judicial | File Received → Notice of Default Recorded → Publication/Posting of Sale Completed → Sale Scheduled → Sale Held → Deed Recorded |
| AK | Judicial | File Received → Complaint Filed → Service of Process Completed → Judgment → Sale Scheduled → Sale Held → Certificate of Sale Recorded |
| AL | Non-judicial | File Received → Sale Scheduled → Sale Held → Deed Recorded |
| AL | Judicial | File Received → Complaint Filed → Service of Process Completed → Judgment Filed → Sale Scheduled → Sale Held |
| AR | Non-judicial | File Received → Notice of Default Filed → Sale Scheduled → Sale Held → Deed Recorded |
| AR | Judicial | File Received → Complaint Filed → Service of Process Completed → Court Decree/Judgment → Sale Scheduled → Sale Held |
| AZ | Non-judicial | File Received → Record Notice of Trustee’s Sale → Trustee Sale Scheduled → Sale Held |
| AZ | Judicial | File Received → Complaint Filed → Service of Process Completed → Sale Scheduled → Sale Held → Certificate of Sheriff’s Sale → Deed Issued |
| CA | Judicial | File Received → Complaint Filed → Service of Process Completed → Judgment Entered → Sale Scheduled → Sale Held → Redemption Period Expires → Deed Recorded |
| CA | Non-judicial | File Received → Record Notice of Default → Posting and Publishing of Sale/NOS Mailings → Sale Scheduled → Sale Held → Deed Recorded |
| CO | Non-judicial | File Received → Sale Scheduled/NED Recorded → Notice of Election and Demand Sent to Public Trustee → Court Order Obtained Authorizing Sale → Scheduled Sale Date → Sale Held |
| CT | Judicial | File Received → Service of Process Completed → Complaint Filed → Motion for Judgment of Foreclosure Filed → Foreclosure by Sale Decree Entered → Sale Held → Deed Recorded |
| DC | Non-judicial | File Received → Sale Scheduled → Sale Held → Deed Recorded |
| DC | Judicial | File Received → Complaint Filed → Service of Process Completed → Initial Scheduling Conference → Foreclosure Mediation Program → Status Conference → Motion for Judgment of Foreclosure Filed → Judgment Entered → Sale Scheduled → Sale Held |
| DE | Judicial | File Received → Complaint Filed → Service of Process Completed → Motion for Judgment of Foreclosure Filed → Sale Scheduled → Sale Held → Confirmation of Sale → Deed Recorded |
| FL | Judicial | File Received → Complaint Filed → Service of Process Completed → Motion for Summary Judgment Filed → Judgment Entered → Sale Scheduled Date (tied to Judgment) → Sale Held → Certificate of Title Issued |
| GA | Non-judicial | File Received → Sale Scheduled → First Publication → Mail Notice of Sale to Borrower → Sale Held → Deed Recorded |
| HI | Non-judicial | File Received → Sale Scheduled → Publication and Posting of Sale Completed → Sale Held |
| HI | Judicial | File Received → Complaint Filed → Service of Process Completed → Motion for Summary Judgment and Decree of Foreclosure Filed → Confirmation of Sale → Deed Recorded |
| IA | Judicial | File Received → Complaint Filed → Service of Process Completed → Judgment Entered → Sale Scheduled → Sale Held → Redemption Period Expires/Deed Recorded |
| ID | Non-judicial | File Received → File Notice of Default → Sale Scheduled → Publication/Posting on Property Completed → Sale Held → Deed Recorded |
| IL | Judicial | File Received → Complaint Filed → Service of Process Completed → File Motion for Judgment of Foreclosure → Judgment Entered → Sale Scheduled → Sale Held → Deed Recorded |
| IN | Judicial | File Received → Complaint Filed → Service of Process Completed → Judgment Entered → Sale Scheduled → Sale Held → Deed Recorded |
| KS | Judicial | File Received → Complaint Filed → Service of Process Completed → Judgment Entered → Sale Scheduled → Sale Held |
| KY | Judicial | File Received → Complaint Filed → Service of Process Completed → Judgment and Order of Sale Entered → Sale Scheduled → Sale Held → Confirmation of Sale → Deed Recorded |
| LA | Judicial (executory process) | File Received → Petition for Seizure and Sale of Property Filed → Writ of Seizure and Sale Issued → Sheriff Seized Property → Notice of Sale Publication Started → Foreclosure Sale Held |
| LA | Judicial (ordinary process) | File Received → Complaint Filed → Service of Process Completed → Motion for Default/Summary Judgment Filed (Writ of Fieri Facias) → Sheriff Seized Property → Sale Scheduled → Sale Held → Deed Recorded |
| MA | Judicial | File Received → Complaint Filed → Service of Process Completed → Order of Notice Received from Land Court → Sale Scheduled → Sale Held → Deed Recorded |
| MD | Judicial | File Received → Complaint (Order to Docket) Filed → Service of Process Completed → Sale Scheduled → Sale Held → Motion for Final Ratification of Sale Filed |
| ME | Judicial | File Received → Complaint Filed → Service of Process Completed → Judgment Entered → Period of Redemption Expires → Sale Scheduled → Sale Held → Deed Recorded |
| MI | Judicial | File Received → Complaint Filed → Service of Process Completed → Publication of the Notice of Foreclosure → Sale Scheduled → Sale Held → Confirmation of Sale |
| MI | Non-judicial | File Received → Sale Scheduled → Publication Complete → Sale Held → Deed Recorded |
| MI | Non-judicial (files activated before 7/16/2013) | File Received → First and Second Notice Prepared → Notice Mailed and Pub Sent to Legal Newspaper → Publication Starts → Publication Completed → MCL 600 3208 Mailed to the Borrower → MCL 600 3208 Foreclosure Notice Posted → Sale Scheduled → Sale Held → Deed Recorded |
| MN | Non-judicial | File Received → Notice of Pendency Filed → Sale Scheduled → Sale Held |
| MN | Judicial | File Received → Complaint Filed → Service of Process Completed → Sale Scheduled → Sale Held |
| MO | Non-judicial | File Received → Sale Scheduled → Sale Held → Deed Recorded |
| MS | Judicial | File Received → Complaint Filed → Service of Process Completed → Judgment Entered → Sale Scheduled → Sale Held |
| MS | Non-judicial | File Received → Notice of Default Sent to Borrower → Substitution of Trustee Executed and Recorded → Sale Scheduled → Sale Held → Deed Recorded |
| MT | Non-judicial | File Received → Sale Scheduled → Notice of Trustee’s Sale Served by Certified Mail → Affidavits of Notice of Sale Compliance Filed → Sale Held → Deed Recorded |
| MT | Judicial | File Received → Complaint Filed → Service of Process Completed → Judgment Entered → Sale Scheduled → Sale Held |
| NC | Non-judicial | File Received → Notice of Hearing Filed → Notice of Hearing Service Completed → Foreclosure Hearing Held → Sale Scheduled → Sale Held → Deed Recorded |
| ND | Judicial | File Received → Complaint Filed → Service of Process Completed → Judgment Entered → Sale Scheduled → Sale Held → Deed Recorded |
| NE | Judicial | File Received → Complaint Filed → Service of Process Completed → Sale Scheduled → Sale Held → Confirmation of Sale → Deed Recorded |
| NE | Non-judicial | File Received → Notice of Default Recorded → Sale Scheduled → Foreclosure Sale Held → Deed Recorded |
| NH | Non-judicial | File Received → Sale Scheduled → Sale Held → Deed Recorded |
| NJ | Judicial | File Received → Complaint Filed → Service of Process Completed → Default Filed → Judgment Entered / Writ of Execution → Sale Scheduled → Foreclosure Sale Held → Deed Recorded |
| NM | Judicial | File Received → Complaint Filed → Service of Process Completed → Judgment Entered → Sale Scheduled → Sale Held → Deed Recorded |
| NV | Non-judicial | File Received → Record Notice of Default → Sale Scheduled → Sale Held → Deed Recorded |
| NV | Judicial | File Received → Complaint Filed → Service of Process Completed → Notice of Sheriff’s Sale and Posting of Sale → Sale Held → Deed Recorded |
| NY | Co-op foreclosure | File Received → Title Report Received → Preliminary Title Clear → NOD Letter Mailed → First Publication → Sale Scheduled → Final Title Clear → Sale Held |
| NY | Judicial | File Received → Complaint Filed → Service Complete → Affidavit of Service, Request for Judicial Intervention, and Attorney Affirmation Filed → Mandatory Settlement Conference Completed → Motion to Appoint Referee to Compute Filed → Judgment of Foreclosure and Sale Entered → Sale Scheduled → Sale Held |
| OH | Judicial | File Received → Complaint Filed → Service of Process Completed → Motion for Judgment Filed → Judgment Entered → Sale Scheduled → Sale Held → Order of Confirmation Issued → Deed Recorded |
| OK | Judicial | File Received → Complaint Filed → Service of Process Completed → Judgment Entered → Sale Scheduled → Sale Held → Sale Confirmed → Deed Recorded |
| OR | Judicial | File Received → Complaint Filed → Service of Process Completed → Judgment Entered → Sale Scheduled → Sale Held → Deed Recorded |
| OR | Non-judicial | File Received → Sale Scheduled and Notice of Default Sent → Publication and Posting of Sale Completed → Sale Held → Deed Recorded |
| PA | Judicial | File Received → Complaint Filed → Service of Process Completed → Judgment Entered → Sale Scheduled → Sale Held → Deed Recorded |
| PR | Judicial | File Received → Complaint Filed → Service of Process Completed → Motion for Summary Judgment Filed → Judgment Entered → Writ of Execution → Notice of Sale → Foreclosure Sale Held → Sale Deed Executed |
| RI | Non-judicial | File Received → Expiration of 30 Day Statutory Notice Period → Publish Notice of Foreclosure Sale → Sale Scheduled → Sale Held → Deed Recorded |
| SC | Judicial | File Received → Complaint Filed → Service of Process Completed → Order of Reference Entered and Hearing Scheduled → Judgment Entered → Sale Complete → Redemption Period Expires → Deed Recorded |
| SD | Judicial | File Received → Complaint Filed → Service of Process Completed → Judgment Entered → Sale Scheduled → Sale Held → Redemption Period Expires → Deed Recorded |
| TN | Non-judicial | File Received → Sale Scheduled → Substitution of Trustee Recorded → Sale Held → Deed Recorded |
| TX | Non-judicial | File Received → Post Notice of Sale → File Foreclosure Notice with County Clerk → Sale Scheduled → Sale Held → Deed Recorded |
| TX | Home equity foreclosure | File Received → Application for Expedited Order to Allow Foreclosure Filed → Foreclosure Order and Affidavit → Signed Order Received → Posting to Sale Held → Foreclosure Sale Held |
| UT | Non-judicial | File Received → Expiration of 3 Month Reinstatement Period → Sale Scheduled → Sale Held → Deed Recorded |
| VA | Non-judicial | File Received → Sale Scheduled → Publication and Posting of Sale Completed → Sale Held → Deed Recorded |
| VI | Judicial | File Received → Complaint Filed → Service of Process Completed → Motion for Summary Judgment Filed → Judgment Entered → Writ of Execution → Notice of Sale → Foreclosure Sale Held → Sale Deed Executed |
| VT | Judicial | File Received → Complaint Filed → Service of Process Completed → Motion for Summary Judgment Filed → Judgment Entered → Sale Scheduled → Sale Held → Sale Confirmed → Deed Recorded |
| WA | Non-judicial | File Received → Notice of Sale Recorded → Sale Scheduled → Sale Held → Deed Recorded |
| WA | Judicial | File Received → Complaint Filed → Service of Process Completed → Judgment Entered → Sale Scheduled → Foreclosure Sale Held → Deed Recorded → Redemption Period Expires |
| WI | Judicial | File Received → Complaint Filed → Service of Process Completed → Judgment Entered → Redemption Period Expires → Sale Scheduled → Sale Held → Confirmation of Sale → Deed Recorded |
| WV | Non-judicial | File Received → Schedule Trustee Sale → Notice of Sale Mailed → Sale Held → Deed Recorded |
| WY | Non-judicial | File Received → Sale Scheduled → Sale Held → Certificate of Sale Recorded → Redemption Period Expires |
Bankruptcy workflows
Section titled “Bankruptcy workflows”| Referral | Workflow steps |
|---|---|
| Motion for Relief | File Received → Relief from Stay/Discharge |
| Proof of Claim | File Received → POC Filed → Plan Confirmed |
Getting help
Section titled “Getting help”To request an account for a company new to ADR, email adr.support@quandis.com. For questions about a specific title order, send the vendor an order inquiry.