
Create worklists from any source
Verified against source (12)
qbo4.Import.Bridge/TaskReader.csInstaller/Setup.Import.Bridge.xmlImport/ImportFileTemplate.Popup.xsltImport/ImportFile.BatchApply.xsltDecision/SmartWorklist.Home.xsltdecision/ImportForm.csdecision/ImportFormTemplate.csConfig/ImportForm.configProperties/Settings.settingsapplication/GenericObject.csapplication/AbstractObject.csSecurity/Collection.EditTeam.xslt
Work that’s tracked in spreadsheets gets lost: rows are skipped, two people call the same customer, and no one can say how much is left. QBO worklists fix that by turning each item into a task with an owner, a due date, and a status that everyone can see. This walkthrough covers three ways to fill a worklist, from quickest to most automated: drop a spreadsheet on the dashboard for one-off work, reuse that setup for a file you receive regularly, or query a data warehouse on a schedule. It finishes by routing the work to a team so people simply ask for their next item.
Who it’s for: operations managers and power users who hand out work.
Prerequisites
- Access to the Worklists dashboard, with permission to create import templates and upload files.
- For the data warehouse approach, a warehouse query set up as an operation, as in Launch workflows from a data warehouse query, and access to Import Files > Batch Apply.
Building blocks used
Section titled “Building blocks used”- Worklists: worklist templates, teams, and Next
- Forms: the tasks behind each work item
- Imports: import templates and batch processing
- Templates: repeatability, which keeps one open task per record
- Cases: a process to hold each record’s tasks
How tasks become work items
Section titled “How tasks become work items”Every approach ends the same way. Each row becomes a task built from a task template, and each new task template gets its own worklist template automatically. Each open task becomes an item on a worklist, which a team can work through.
Approach 1: on the fly, from a spreadsheet
Section titled “Approach 1: on the fly, from a spreadsheet”Use this for one-off work: a list a client sent over, or a cleanup project.
1. Prepare the spreadsheet
Section titled “1. Prepare the spreadsheet”Put one item per row, and add a column named Template that holds the name of the task template to create or add to. Every row can use the same value.
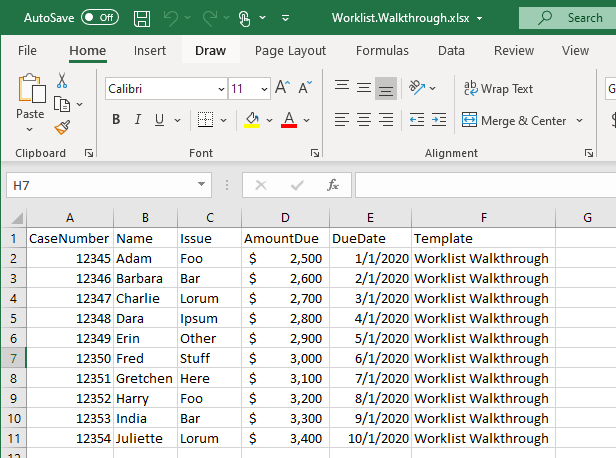
Use letters and numbers in column names. Each column becomes a question on the task, and question names shouldn’t contain spaces, punctuation, or underscores.
2. Drop it on the Worklists dashboard
Section titled “2. Drop it on the Worklists dashboard”From Home > Worklists, drag the spreadsheet onto the dashboard’s Current panel. QBO asks how to import it:
| Prompt | What to enter |
|---|---|
| Select a template | Create a new template the first time. This is the import template, which remembers how to read this kind of file. |
| Worklist | The name of the worklist the items go into, for example Client cleanup: October. It defaults to the file name. |
| New Template | A name for the import template. |
| Applies To | Leave it set to tasks (ImportForm). |
| Import Engine | Leave it set to Task Reader. |
| Preview before import | Check it to see the data before anything is created (available when the template has a preview). |
Choose Submit.
3. Check what QBO created
Section titled “3. Check what QBO created”- A task template named after the
Templatecolumn, with a question for each other column. Date and whole-number columns get date and number formats. - A worklist template for that task template.
- An import template, and an import file that tracks each row.
- A task for each row, left open, on the worklist you named.
Approach 2: from a spreadsheet you receive regularly
Section titled “Approach 2: from a spreadsheet you receive regularly”When the same kind of file arrives every week, reuse the setup from approach 1:
- Drop the new file on the Worklists dashboard.
- In Select a template, choose the import template you created the first time.
- Enter a new Worklist name for this batch, such as Client cleanup: November, or reuse an open worklist’s name to add to it.
QBO finds the existing task template by the Template column and adds questions for any new columns. Naming a worklist per batch lets you track each file’s progress separately.
Approach 3: from a data warehouse
Section titled “Approach 3: from a data warehouse”Use this when the list of work comes from a query, so the worklist refreshes itself. The example is an Insurance Policy Review worklist, with one process per policy and at most one open review task per policy.
1. Make the query available
Section titled “1. Make the query available”Set up the warehouse query as an operation, as in steps 1 to 3 of Launch workflows from a data warehouse query. This example assumes Process/PoliciesToReview returns a PolicyID column.
2. Create the task template
Section titled “2. Create the task template”From Templates > Tasks, add a task template named Insurance Policy Review:
- Applies To: Process.
- Repeatable: One active per parent. However often the job runs, a policy that already has an open review task doesn’t get a second one. Once a review is completed, the next run can open a new one if the policy still qualifies.
Tasks can stand alone, but they’re far more useful attached to a record. Here, a process acts as a folder for each policy and collects its reviews over time.
3. Create a process for each policy
Section titled “3. Create a process for each policy”From Import Files > Batch Apply:
-
Operation: Process / PoliciesToReview, the query.
-
Action: Process / Save, called once per row, with the parameters:
Process=Policy {PolicyID}&SubscriberID=acme.example-Policy-{PolicyID}
{PolicyID} is replaced with each row’s value. SubscriberID is a key you make up that identifies the policy’s process, so later runs find the existing process instead of creating another. A pattern of {source system}-{table}-{key} keeps keys unique.
Choose Query to see the rows and Preview to see the calls, then Apply.
4. Create the tasks
Section titled “4. Create the tasks”On Batch Apply again, keep the same Operation, and set the Action to ImportForm / Pause (tasks), with the parameters:
Template=Insurance Policy Review&Object=Process&ObjectSubscriberID=acme.example-Policy-{PolicyID}&{*}| Parameter | Effect |
|---|---|
Template=Insurance Policy Review |
The task template. |
Object=Process and ObjectSubscriberID=… |
Attaches the task to the process with that key. |
{*} |
Copies every column of the row onto the task. Parameters that aren’t task columns are stored as answers. |
To keep the worklist current, check Schedule on both batches and schedule the processes before the tasks, for example Daily at 5:00am and Daily at 5:30am. Check Audit Trail to track each run as a named batch.
5. Review the worklist
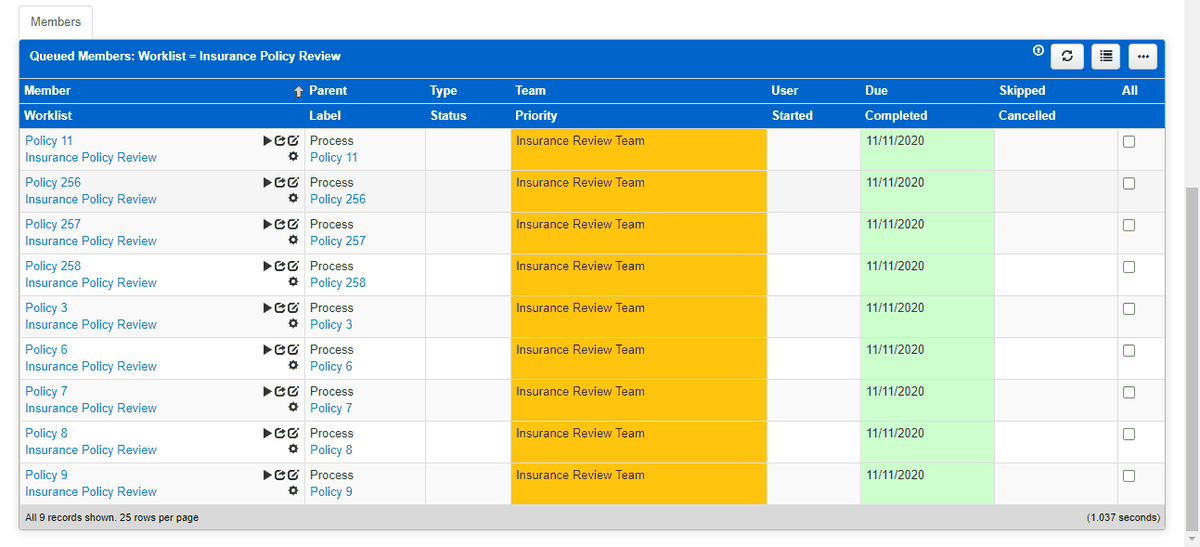
Section titled “5. Review the worklist”From Home > Worklists, open Insurance Policy Review to see the new items. They aren’t assigned to anyone yet.
Route the work to a team
Section titled “Route the work to a team”1. Create a team
Section titled “1. Create a team”A team is a label of people. From Labels, create a label such as Insurance Review Team using a template for people, save it, and add its Members. Each member’s priority on the team decides which work they get first when they belong to several teams.
2. Assign the items to the team
Section titled “2. Assign the items to the team”On the Worklists dashboard, open the worklist, select the items, and Assign them to the team. To route new items automatically, open the worklist template and set Assignment to Team.
Assign work to teams rather than to individual people. QBO hands out the next item to whoever is ready.
3. Work the queue
Section titled “3. Work the queue”Team members can start a specific item from the list with Start (the play icon beside it), which assigns it to them, marks it started, and opens it. Or they choose Next (the play icon in the main menu), and QBO picks the highest-priority item they’re eligible for, assigns it, marks it started, and opens it.
Result
Section titled “Result”Whatever the source, the work is now in one place: each item is a task with an owner, a status, and a due date. A rep logs in, chooses Next, completes the task, and chooses Next again. Managers see what’s queued, started, and done on the dashboard, instead of in a shared spreadsheet.
Next steps
Section titled “Next steps”- Route items by client, region, or value with an assignment matrix. See Worklists.
- Sample completed work for quality review with audit sampling. See Worklists.
- Start a workflow for each record instead of a single task in Launch workflows from a data warehouse query.