
Launch workflows from a data warehouse query
Verified against source (12)
Services/SqlService.csapplication/AbstractObject.csapplication/AbstractCollection.csConfiguration/Service.Edit.xsltApplication/BatchApply.Popup.xsltprocess/ProcessTemplate.csProcess/Process.EditDataWarehouseSnapshot.xsltProcess/Process.Search.xsltDecision/DecisionStepTemplate.Edit.xsltdecision/DecisionStep.csConfig/ImportForm.configExtensions/MatcherContainerExtensions.cs
Many organizations already know which records need attention; the list lives in a data warehouse. In this walkthrough you connect QBO to that warehouse and, every night, turn its list into managed work. Using insurance policies that need a compliance review as the example, each run creates one case (a process) per policy, stores the warehouse fields on it as a snapshot, and starts a Policy Compliance workflow for each policy that’s new. Policies already in review are updated, not duplicated, and the workflow can grow over time without changing anything else.
Who it’s for: power users and administrators connecting QBO to reporting or warehouse databases.
Prerequisites
- A SQL Server data warehouse QBO can reach, and an account QBO can use to read it.
- Your administrator, to add the warehouse’s connection string to the QBO installation.
- Permission to add statements and services to modules (Configuration > Modules), and to create task, workflow, and process templates.
Building blocks used
Section titled “Building blocks used”- API & Architecture: statements, services, and scheduling
- Cases: one process per policy, and the process template that starts the workflow
- Forms: the snapshot task that holds the warehouse fields
- Workflow: the compliance workflow, and a Daily Jobs workflow that runs the query
- Imports: batch processing with an audit trail
1. Add the connection string
Section titled “1. Add the connection string”Ask your administrator to add a named connection string for the warehouse to the QBO installation, for example DataWarehouse:
<add name="DataWarehouse" connectionString="Data Source=warehouse.acme.example;Initial Catalog=datalake;Integrated Security=true;" providerName="System.Data.SqlClient" />Integrated security isn’t required. Any authentication that SQL Server and its client support will work. Grant the account read access to only the tables QBO needs.
2. Write the query as a statement
Section titled “2. Write the query as a statement”Statements are SQL queries stored with a module. Since QBO has no insurance-policy module, this walkthrough uses the general-purpose Process module, where each process acts as a folder for one policy.
From Configuration > Modules, open Process, select the Statements tab, and add a statement:
-
Name:
PoliciesToReview -
Return Type: DataSet
-
Query: any SQL that’s valid in the warehouse, such as:
SELECT * FROM InsurancePolicy WHERE Status = 'Review Needed'
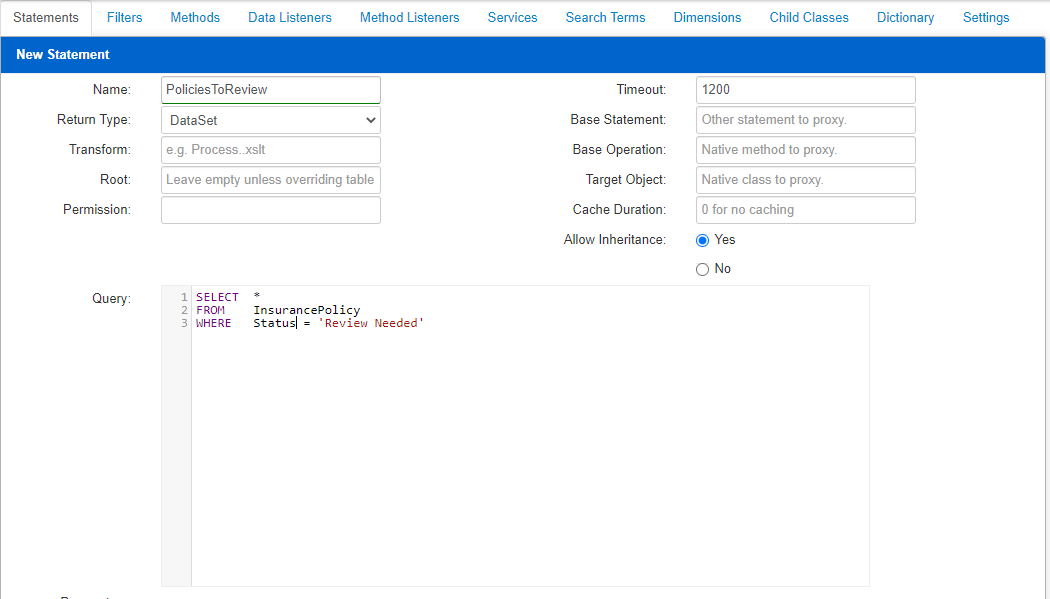
Return a column that identifies each policy, such as PolicyID, and the fields reviewers need.
3. Point the statement at the warehouse with a service
Section titled “3. Point the statement at the warehouse with a service”On its own, a statement runs against the QBO database. A service tells QBO to run it somewhere else. On the same module page, select the Services tab and add a service:
| Setting | Value | Why |
|---|---|---|
| Name | PoliciesToReview |
The operation name. A service takes precedence over a statement with the same name, so Process/PoliciesToReview now runs against the warehouse. |
| Plugin | SqlService | Runs SQL against another database. |
| Return Type | DataSet | The shape of the results. |
| End Point | DataWarehouse:PoliciesToReview |
{connection string}:{statement}. |
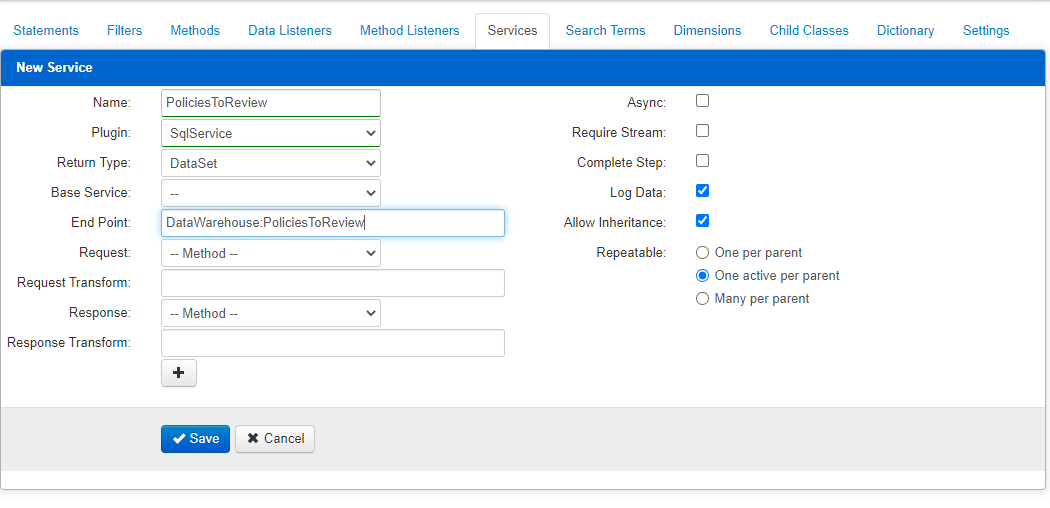
The end point’s statement part can also name a stored procedure in the warehouse.
Test it:
GET /api/process/policiestoreview?Output=Json4. Create the snapshot task
Section titled “4. Create the snapshot task”From Templates > Tasks, add a task template named Policy Snapshot that applies to processes, with Repeatable set to One active per parent. It stores the warehouse fields on each process, so workflows, worklists, and reports can use them without querying the warehouse again. Add a question for each field you want to show on screen; fields without a question are still stored.
5. Create the compliance workflow
Section titled “5. Create the compliance workflow”From Templates > Workflows, add a workflow template named Policy Compliance that applies to processes. Add whatever the review needs: tasks for reviewers, documents, messages, or calls to other systems. You can add steps later without changing anything else in this walkthrough.
6. Create the process template
Section titled “6. Create the process template”From Templates > Processes, add a process template named Policy Compliance. Set Workflow to Template and choose Policy Compliance, so every new process starts the workflow.
Then, on the template’s summary page, open the Subscriptions panel and add a subscription named Policy Compliance. The nightly job refers to the template by this key instead of by its ID, so the configuration still works after you promote it to another environment.
7. Create the Daily Jobs workflow
Section titled “7. Create the Daily Jobs workflow”Scheduled batch work is easiest to manage as a workflow, so you can add jobs and the dependencies between them over time. From Templates > Workflows, add a workflow template named Daily Jobs:
- Applies To: Organization, which suits enterprise-wide work.
- Repeatable: Many per parent or One active per parent. Not One per parent: the schedule starts a new run each day, and with One per parent it would reuse the first day’s completed workflow instead.
Add an Add an Advanced Step:
-
Data Source: Operation, Process / PoliciesToReview, with Batch checked.
-
Action: Process / Save, with the parameters:
SubscriberID=acme.example-Policy-{PolicyID}&Process=Policy {PolicyID}&ProcessTemplateSubscriberID=Policy Compliance&{Forms_PolicySnapshot_*} -
Async, so it runs on an app server.
For each row the query returns, that one save does four things:
| Parameter | Effect |
|---|---|
SubscriberID=acme.example-Policy-{PolicyID} |
Finds the policy’s existing process by this key, or creates one and registers the key. Re-runs update instead of duplicating. |
Process=Policy {PolicyID} |
Names the process. |
ProcessTemplateSubscriberID=Policy Compliance |
Uses the process template with that subscription. A new process starts the Policy Compliance workflow. |
{Forms_PolicySnapshot_*} |
Copies every column to the Policy Snapshot task (the template name with spaces removed). |
8. Schedule it
Section titled “8. Schedule it”From Home > Contacts > Organizations, select your organization and choose Options > Batch Apply:
- Apply to: Selected Items Only.
- Operation: New Workflow, and Workflow Template: Daily Jobs.
- Pick a Queue, check Schedule, and enter a schedule such as
Daily at 5:00am.
Developers can schedule the same thing with a queued call:
POST /api/decision/queue/save ?Template=Daily Jobs &Object=Organization &ObjectID=1 &ScheduleName=Daily at 5:00am &ScheduleLabel=Daily JobsResult
Section titled “Result”Every morning QBO starts a Daily Jobs workflow, which queries the warehouse and saves each policy that needs review. New policies get a process, a snapshot of their warehouse fields, and a Policy Compliance workflow. Policies already in review get a refreshed snapshot and keep their place in the workflow. The compliance team works from QBO, and the warehouse remains the single source for which policies need attention.
Next steps
Section titled “Next steps”- Put the review tasks on a team’s queue in Create worklists from any source.
- Add more nightly jobs to Daily Jobs, with dependencies between them. See Workflow.
- Reuse the warehouse query in documents, messages, and scripts in Reuse one API call across workflows, documents, and pages.