ADR
Attorney Data Reporting
Attorney User Guide
1 Document Revision History
Table of Contents
Some older versions of browsers may have compatibility issues with the ADR system. As you navigate through the system, if you encounter issues such as pages not displaying properly, misaligned images, or trouble with uploading documents, please add www.freddiemacadr.com as a trusted site in your browser’s settings, and this should correct your issues.
0 Locating a Loan
1 Managing Users
- 1.1 Adding Users
- 1.2 Adding a Role to a User
- 1.2.1 Role Definitions
- 1.3 Remove a Role
- 1.4 Deactivate a User
- 1.5 Unlock a User
- 1.6 Reset a User Password
- 1.7 Adding a User to Multiple Organizations
- 2.1 Logging into the System
- 2.2 Resetting Your Password
- 3.1 How to Open a Foreclosure
- 3.2 Loan has an Active Foreclosure
- 3.3 Loan Indicators
- 3.4 Related Processes
- 4.1 Placing an Order on Hold
- 4.2 Reprojecting a Hold
- 4.3 Compete a Hold
- 4.4 Review a Hold
- 5.1 Adding Litigation Detail
- 5.2 Remove Litigation Detail
- 5.3 Update Litigation Detail
- 5.4 View Litigation Detail Revisions
- 5.5 When to Use Litigation Detail
- 6.1 Completing Tasks
- 6.2 Foreclosure Sale Held Task
- 6.3 Reprojecting a task
- 6.4 Reprojecting Foreclosure Sale Held Task
- 6.5 Bulk Updating Tasks
- 8.1 How to Close a Foreclosure File
- 8.1.2 Closing a Foreclosure that has Gone to Sale
- 8.1.3 Removal Reason
- 8.1.4 Deficiency
- 8.1.5 Adding Required Documents
- 8.1.6.1 Required Document List
- 8.1.6.2 Priority Message
- 8.1.6.3 Uploading a Document
- 9.1 Opening a Motion for Relief (MFR) and a Proof of Claim (PoC)
10 Completing Bankruptcy Tasks
- 10.2 Reprojecting a Task
- 12.1 Viewing a Document
- 12.2 Deleting a Document
- 14.1 Managing the Smart Worklist
- 14.1.1 Viewing the Smart Worklist Table
- 14.1.2 Re-Queue Smart Worklist Items
- 14.1.3 Assign Smart Worklist Items
- 14.1.4 Complete an Item in the Smart Worklist
- 14.1.5 Cancel an Item in the Smart Worklist
- 14.1.6 Export the Smart Worklist
- 15.1 Generating a Report
- 15.2 Viewing a Report
- 15.2.1 Report Request Page
- 15.2.2 Email
- 15.3 Report Definitions
- 15.3.1 Hold Report
- 15.3.2 Litigation Detail Report
- 15.3.3 Timeline Completion Report
- 15.3.4 Timeline Exception Report
- 15.3.5 Timeline Summary Report
- 15.3.6 Case Load Next Task Due
- 16.1 Export to Excel (CSV)
- 16.2 Advanced Search Filtering
0 LOCATING A LOAN
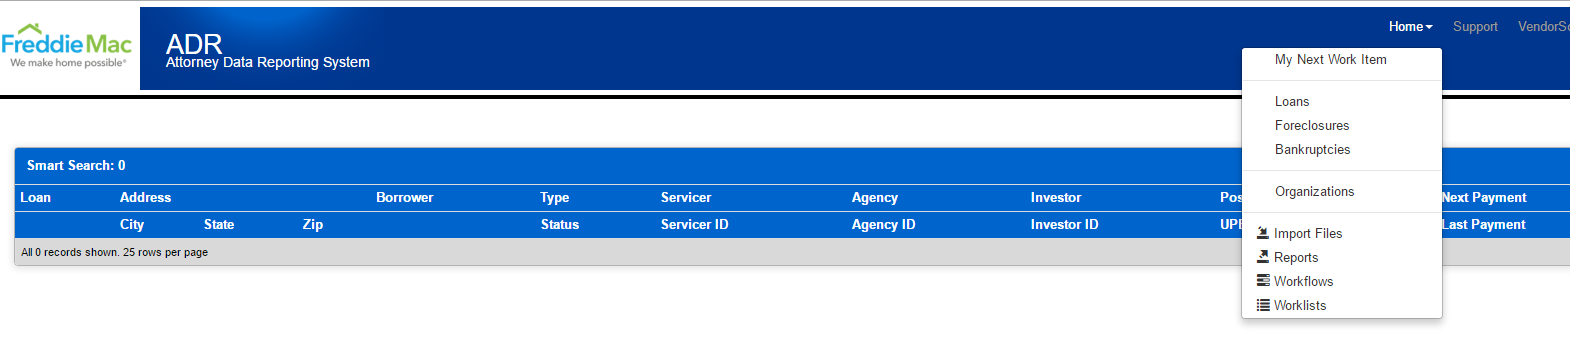
To locate a loan, simply click on “Home” or hover over “Home” and select “Loans” from the dropdown. This will bring you to the Loan Search Dashboard, which will allow you to enter in the 9-digit Freddie Mac loan number in the search field, as highlighted below.
NOTE: The search field will pertain to the specific page that you are on. For example, if you hover over “Home” and select “Foreclosures”, then the search field will return results related to any foreclosure number you enter. If you choose “Bankruptcies” from the dropdown instead of “Foreclosures”, then your search results will return bankruptcy results instead.
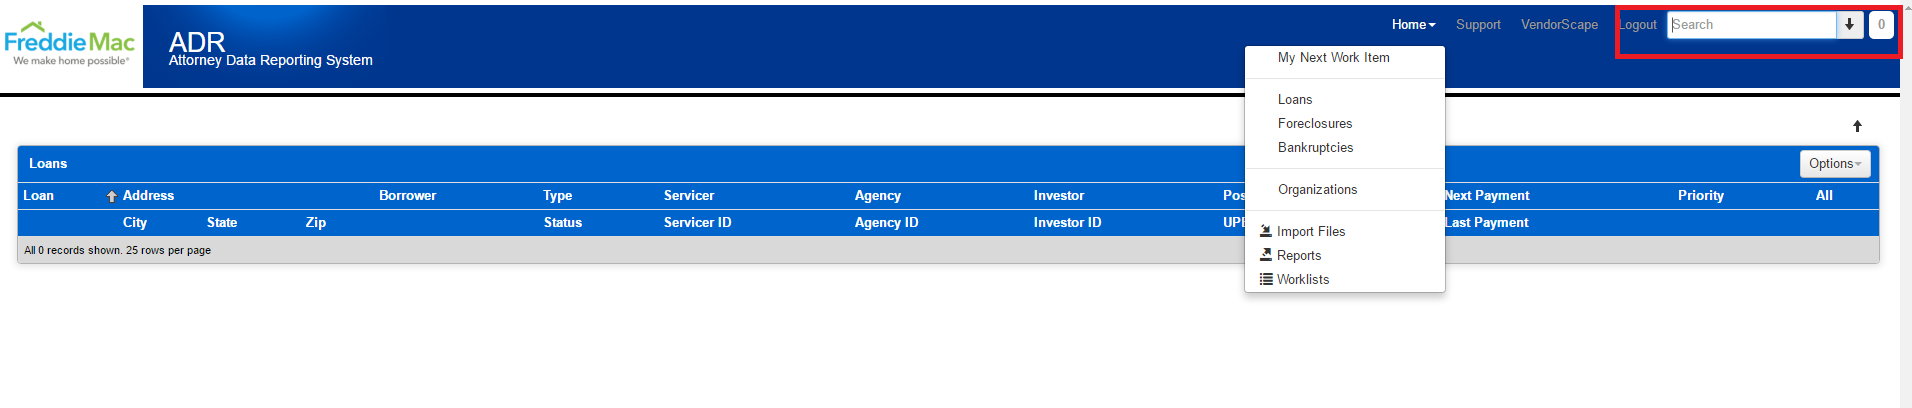
Once you have provided the 9-digit Freddie Mac loan number in the search field, hit your enter key and your results will be provided in the following screen.
1 Managing Users
This section will guide the security administrator on how to Add Users, Add Roles to a User, Remove Roles from a User, De-Activate a User, Unlock a User, Reset a User’s Password, and Add a User to Multiple Organizations.
A user’s ability to view and or edit fields in the system is based on their role.
There are 2 roles: Security Administrator and Servicer.
The Security Administrator Role is the only role that manages users in the system.
The Servicer role is reserved for users who need to view loans associated with their company in the ADR system.
1.1 Adding Users
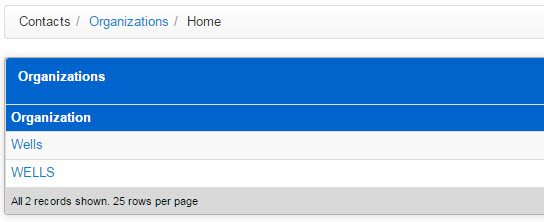
1. Select Organizations from the Contacts drop down.
.

.
2. Click on the Organization name hyperlink. If your company has more than one organization, you will have several listed.
.
3. You are directed to the Organization Summary page.
4. Select Register a User from the Options drop down from within the “Users” panel.
.

.
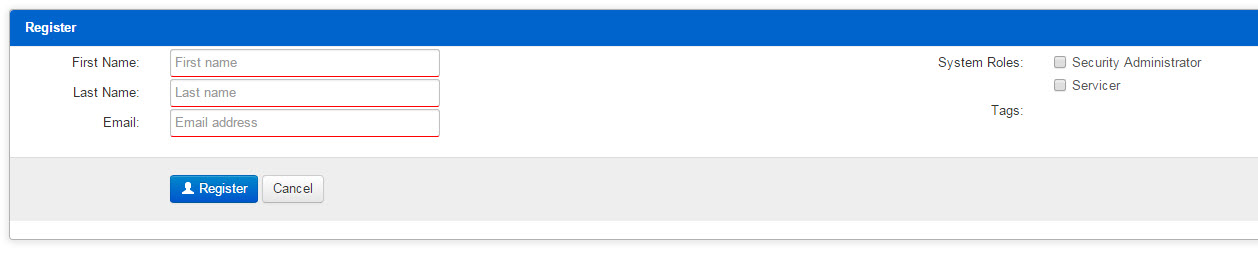
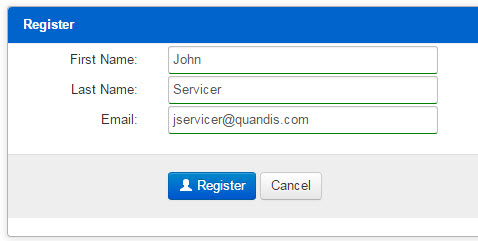
5. Register panel is presented.
.
.
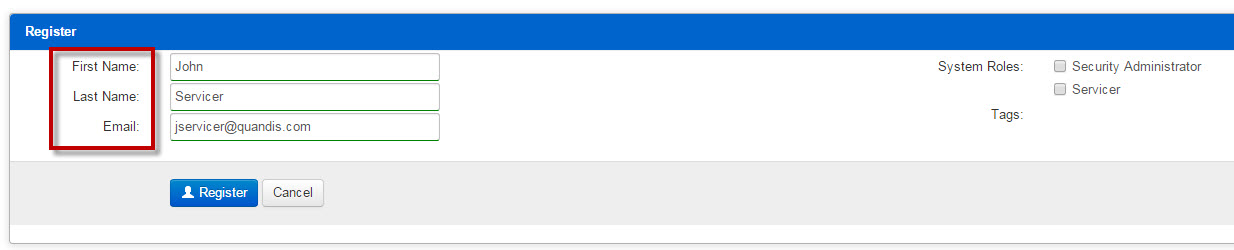
6. Enter user’s First Name, Last Name, and email address.
.
.
7. Check the box next to the system role that is to be granted to the user. In this example, Security Administrator is selected.
.

.
8. Click Register.
.
.
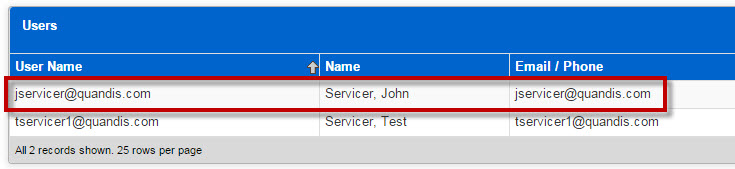
9. You are directed back to the Users panel
.
.
10. To activate the user, click in the user’s row to highlight the row or check the box under the All column.
.

.
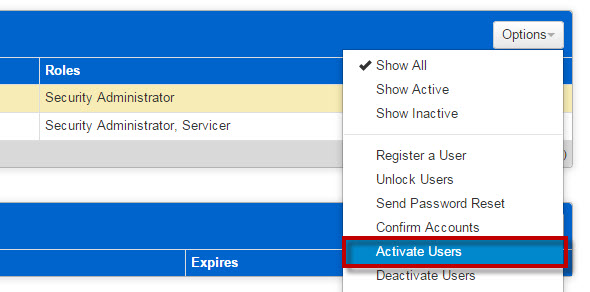
11. Select Activate Users from the Options drop down menu.
.
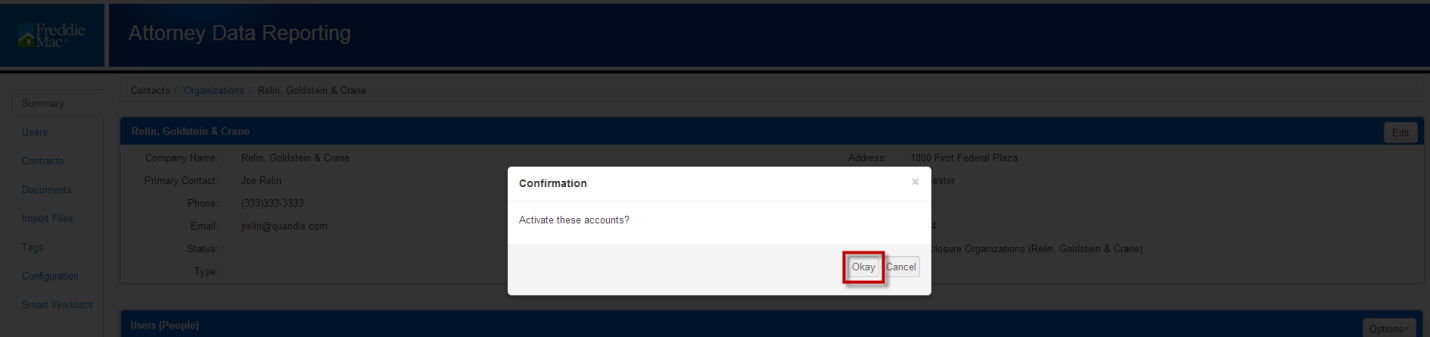
12. Click Okay in the Confirmation dialogue box.
.
.
13. The user is activated. All active users will have a status of “True” in the corresponding “Active” column.
.

.
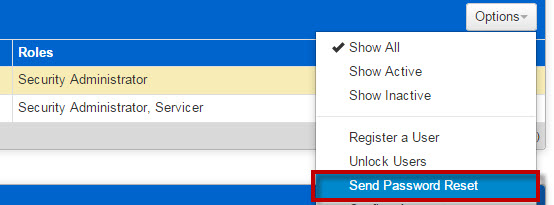
14. Send the user a password reset email by selecting Send Password Reset from the Options drop down.
.
.
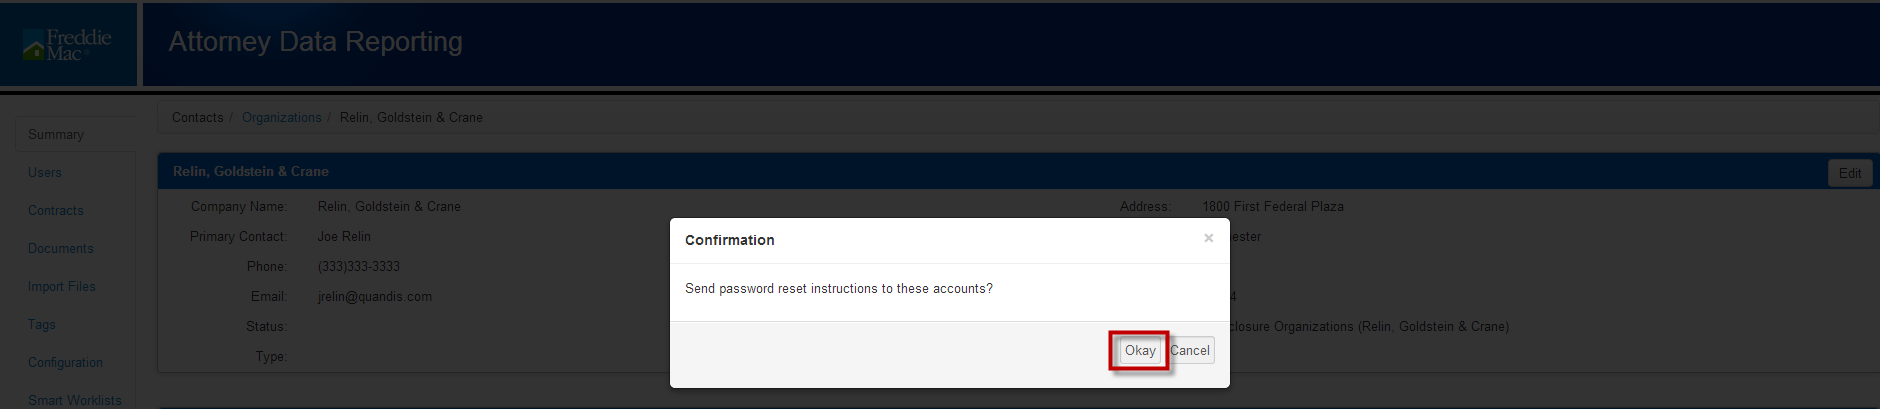
15. Click Okay in the Confirmation dialogue box.
.
.
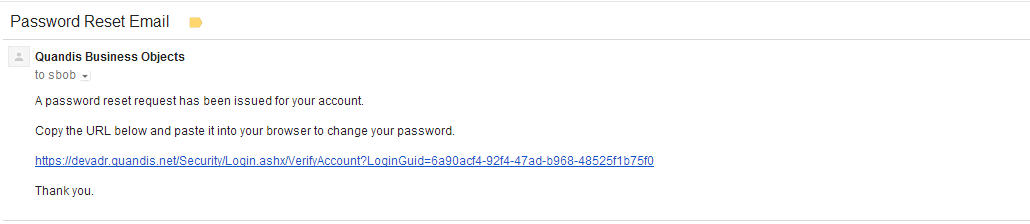
16. The user will receive an email with instructions on how to set their password. Below is a sample of the email that will be received:
.
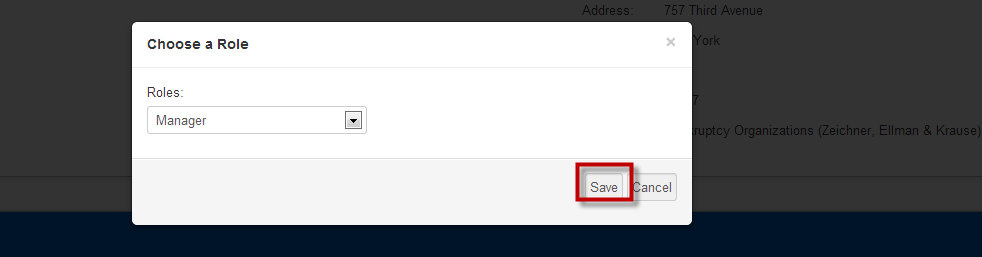
1.2 Adding a Role to a User
- Search for the user that requires a role to be added.
- Click into the row to highlight the user or check the box in the All column.

3. Select Add Role form the Options drop down menu.

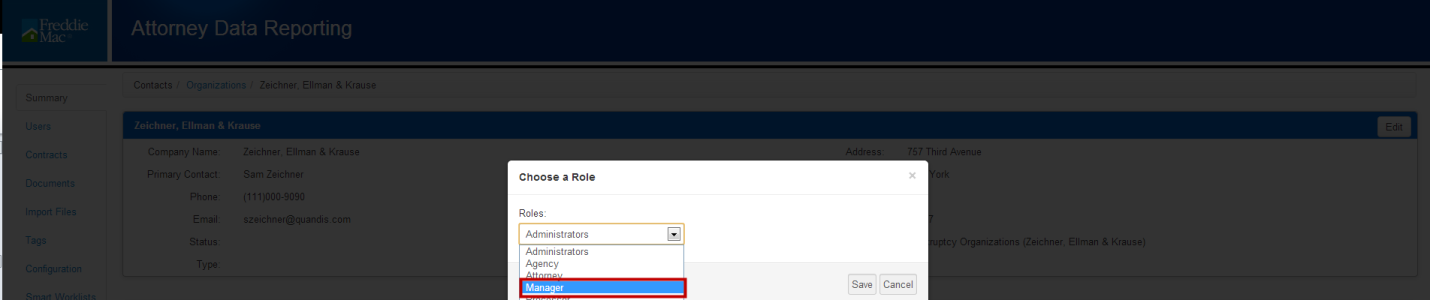
4. Select the role to be added from the Role drop down menu. In this example, the role of manager is added.
5. Click Save.

6. The role has been added. In this example, the Manager role was added to the user.

1.2.1 Role Definitions
| Security Administrator | Administrator | Agency | Attorney | Processor | Manager | View Only | |
| Edit Organization | X | ||||||
| Manage Work Lists | X | X | |||||
| Alter Attorney Information | X | ||||||
| View Dashboard | X | X | All Orders | Assigned orders | Assigned orders | Assigned orders | Assigned orders |
| Add Users | X | X | Internal Users | ||||
| Reset Passwords | X | X | X | Own Password | Own Password | Own Password | Own Password |
| Inactivate a User | X | X | Internal Users | ||||
| Add/Remove Roles | X | X | Internal Users | ||||
| Add Documents to the Organization | X | X | X | ||||
| Generate Reports | X | X | X | X | |||
| FC Summary | X | X | X | X | X | ||
| Complete Tasks | X | X | X | X | |||
| Complete Total Debt | X | X | X | X | |||
| Complete Fees/Costs | X | X | X | X | |||
| Complete Bids | X | X | X | X | |||
| Complete Reinstatement | X | X | X | X | |||
| Complete Pay off | |||||||
| BK Summary | X | X | X | X | |||
| Configuration Templates | X | X | X | X | X | ||
| Create Orders | X | X | X | X | |||
| Create Messages | X | X | X | X | X | ||
| Upload/Delete Documents user uploaded | X | X | X | X | X |
1.3 Remove a Role
- Search for the user that requires a role to be removed.
- Click into the row to highlight the user or check the box in the All column.

3. Select Remove Role from the Options drop down.

4. Select a role to be removed from the role drop down menu. In this example, the role of Manger is going to be removed.

5. Click Save.
6. The role has been removed.

1.4 De-Activate a User
- Search for the user that needs to be deactivated. (More than one user can be deactivated at a time)
- Click into the row to highlight the user.

3. Select Deactivate Users from the Options drop down.
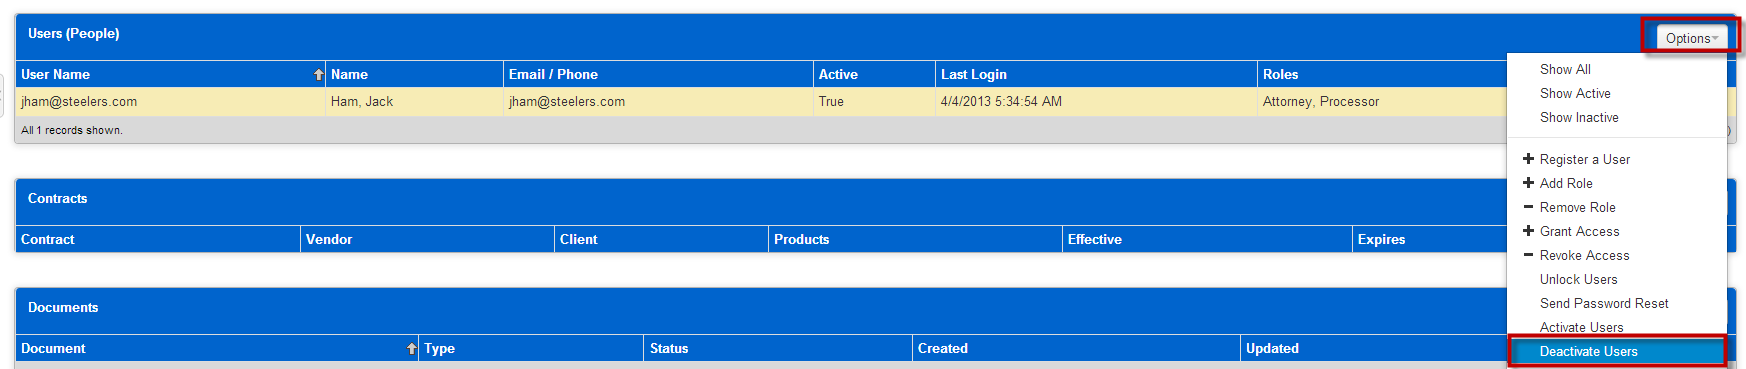
4. Click Okay in the Confirmation dialogue box.

5. The Active column is False.

1.5 Unlock a User
- Search for the user that needs to be unlocked. (More than one user can be unlocked at a time)
- Click into the row to highlight the user.

3. Select Unlock Users from the Options drop down.

4. Click Okay in the confirmation dialogue box.

5. The user has been unlocked.
1.6 Reset a User Password
- Search for the user that requires a password reset. (More than one user can have their password reset at a time)
- Click into the row or its checkbox to highlight the user.

3. Select Send Password Reset from the Options drop down.

4. Click Okay in the Confirmation dialogue box.

5. The user is sent an email to reset password.
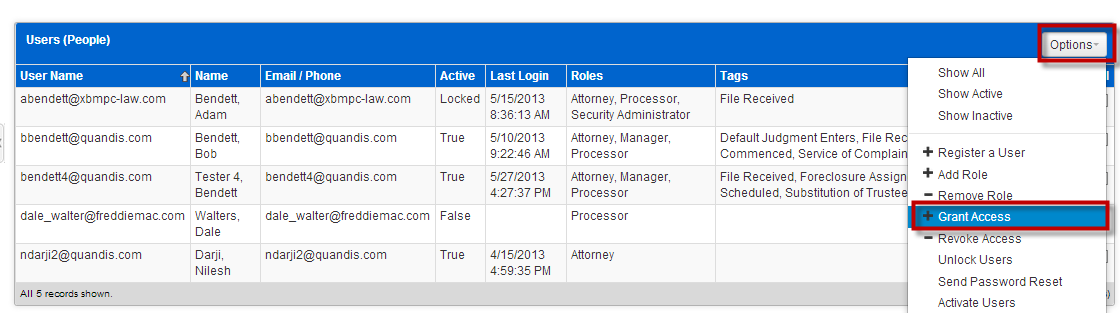
1.7 Adding a User to Multiple Organizations
- If your law firm has several organizations because you do business in several states, you can provide users access to all organizations.
- In this example, the user Bendett1 is a part of the Bendett office in MD
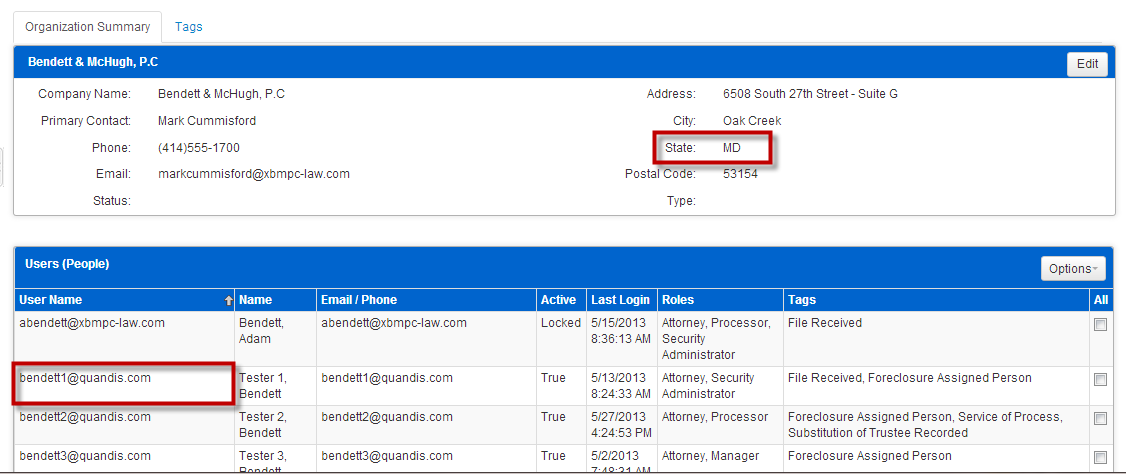
3. But is not a user for the Bendett office in CT and requires access to the CT office.

4. Navigate to the organization the user should be granted access. In this example, access should be given to Bendett1 for the CT office.
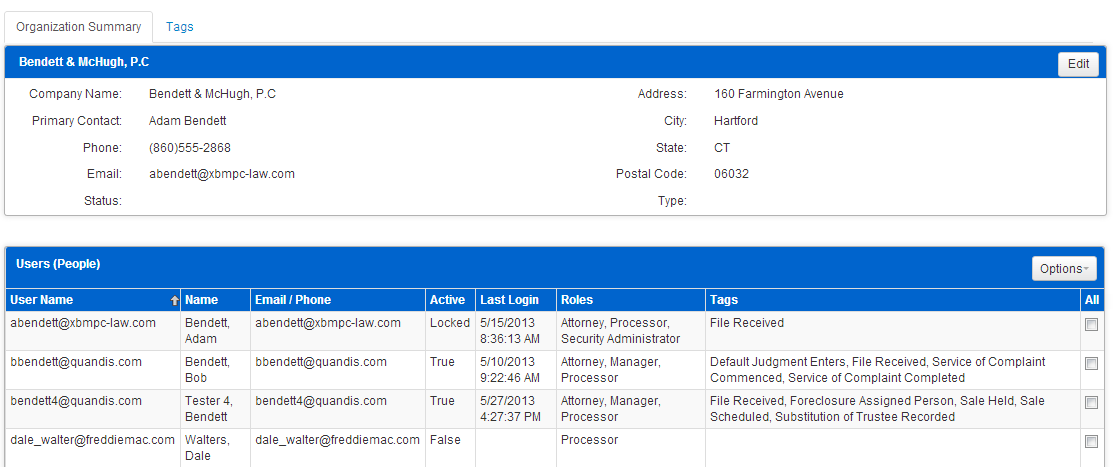
5. Select Grant Access from the Options drop down box.
6. The Grant Access dialogue box opens.
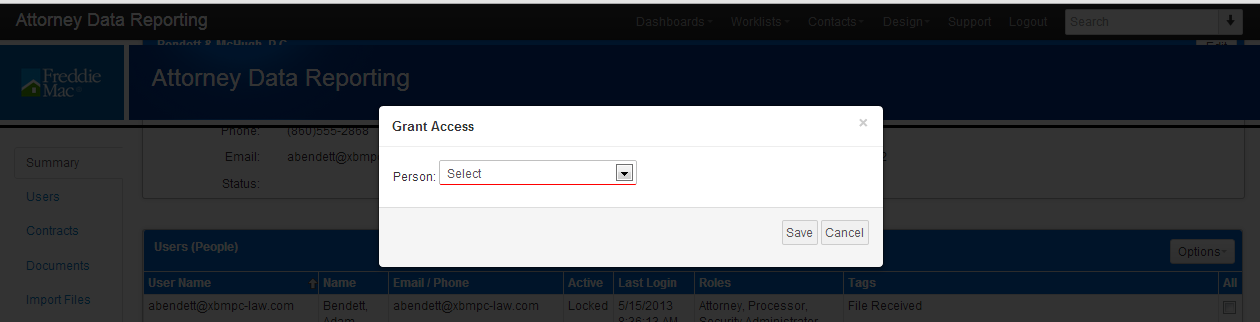
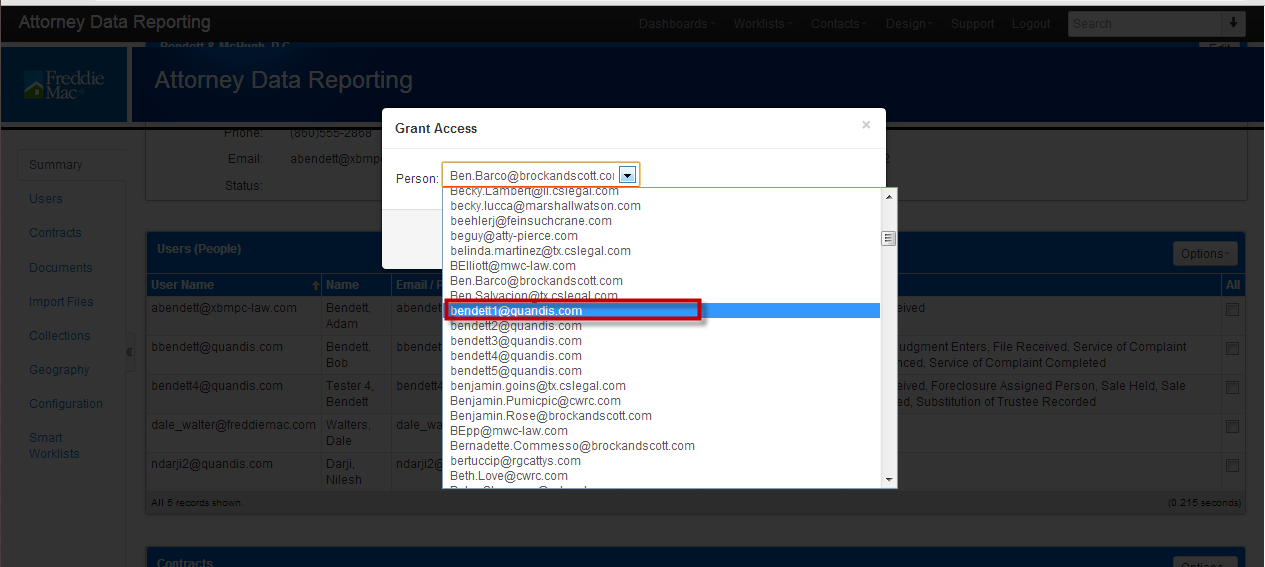
7. Select the user that should be activated from the drop down box. In this example, bendett1 is the user that is selected.
8. Click Save.
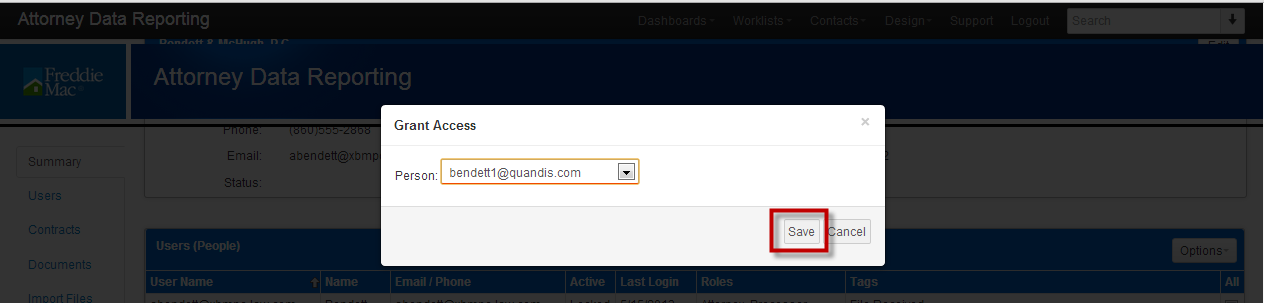
9. The user now has access to the additional organization. In this example, Bendett1 has access to the office located in CT.
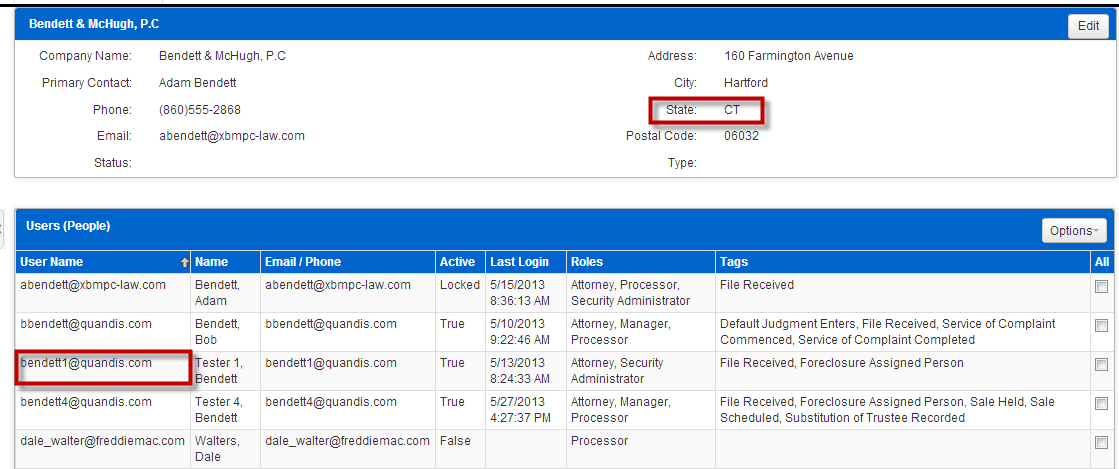
10. Only users that have the role of Security Administrator can complete the above.
2 Accessing the System
***Please Note*** the system is compatible with the following internet browsers:
Internet Explorer 9, 10, and 11
Google Chrome (Version 25+)
Firefox (Version 17+)
Safari (Version 5+)
**Users that are not using one of the above compatible web browsers will receive an error message and be denied access to the ADR website**
2.1 Logging into the system
- Enter https://freddiemacadr.com in your address bar.
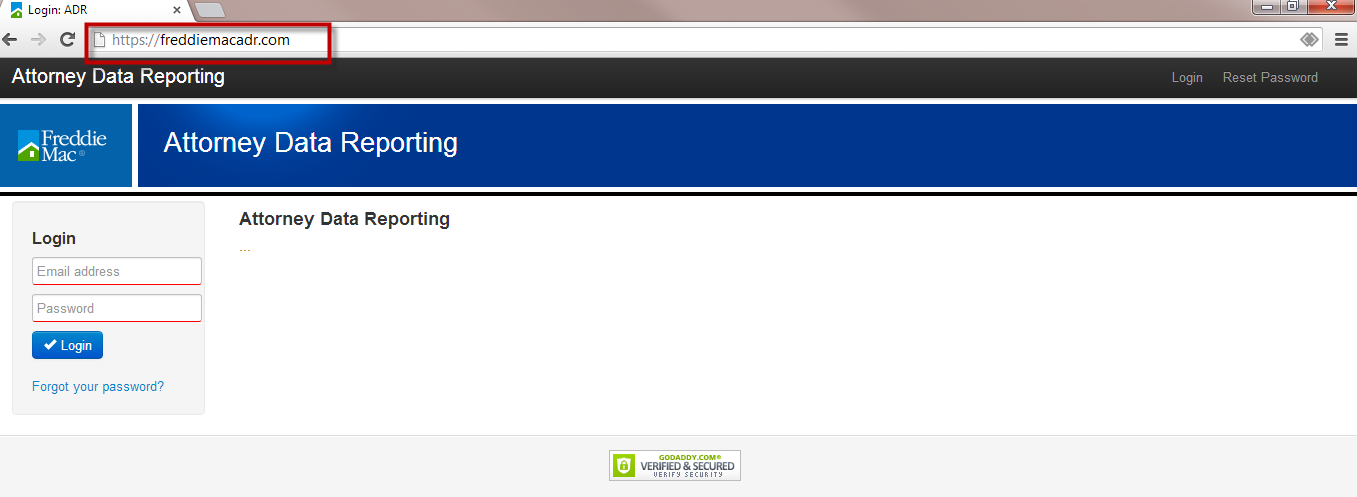
2. Enter the e-mail address, which is your user name, in the E-mail field

3. Enter your password in the password field.

4. Click Log In.

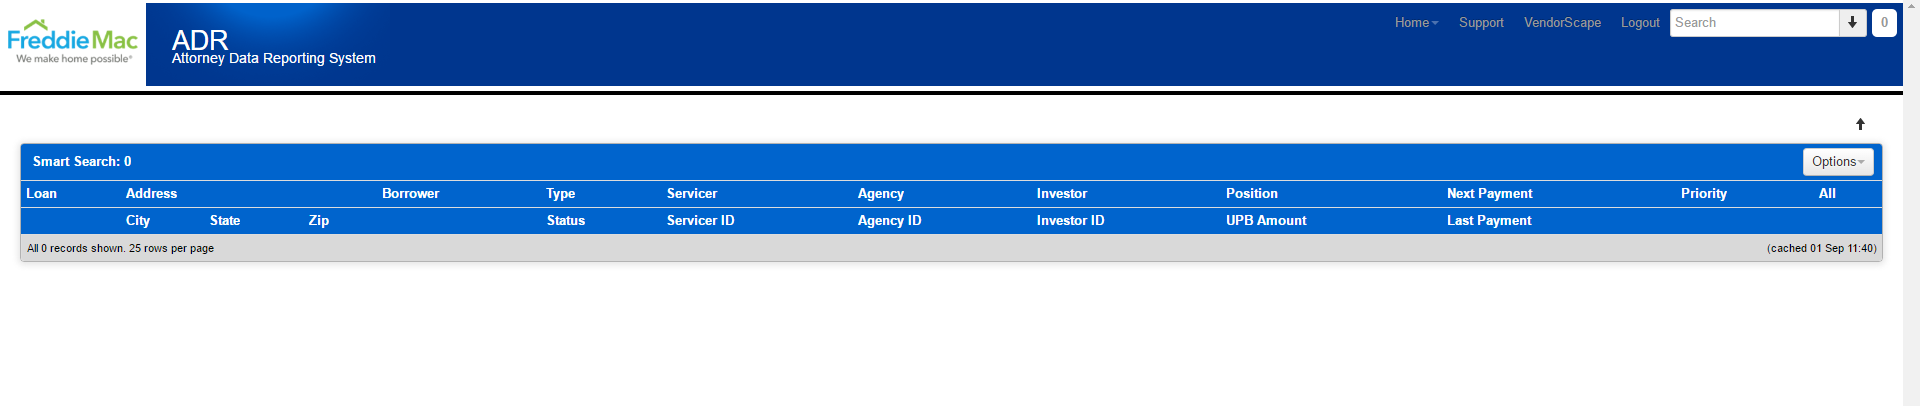
5. You are directed to the Search Page.
2.2 Resetting Your Password
- A Security Administrator for your firm can send a Password Reset email to you (see Section 1.6), or you can click on the “Forgot your password?” Hyperlink.
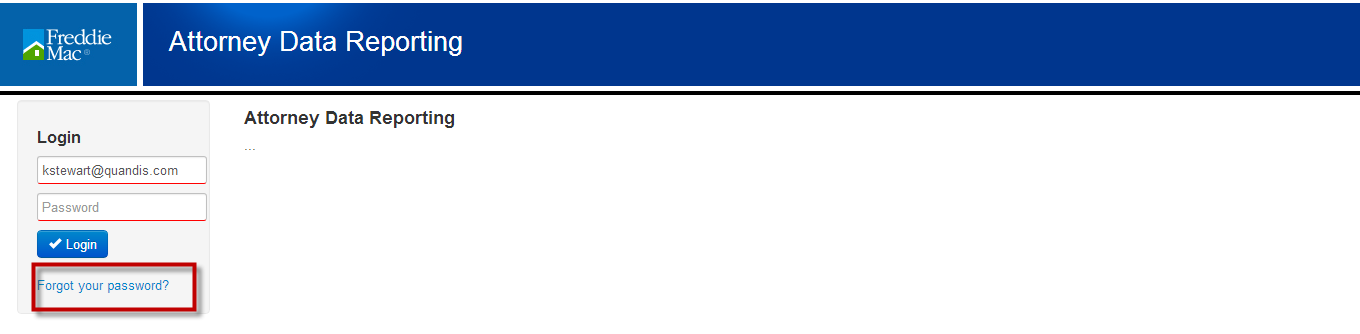
2. You are directed to the Password reset page
3. Enter you email address in the email address field.

4. Click Reset
5. Whether you used the “Forgot your password?” link, or a Security Administrator initiated the Password Reset, you will receive an email with instructions on how to reset your password.

6. Passwords are case sensitive and must adhere to the following Freddie Mac security guidelines:
- 8 characters long
- At least one of the following special characters: ! @ # $ % ^ & * ( )
- At least one number
- At least one capital letter
- At least one lower case letter
- Your new password cannot match any of the previous 3 passwords
7. Users are required to reset their password every 90 days. Reminder notifications will be sent to the users prior to their passwords expiring. Should any user not reset their password prior to the 90-day expiration, their user account will be locked out. Upon their next attempt to login, they will be notified to contact their Security Administrator.
3 Opening a Foreclosure
All fields underlined in red are require fields.
Please note: The loan information may not be populated when you try to open the Foreclosure. Freddie Mac provides limited loan information prior to cases being opened. Once the Foreclosure case has been opened, the loan and property information will populate within 24 to 48 hours.
3.1 Opening a Foreclosure
- Select Loans from the Dashboard drop down menu.
2. Search for the loan you need to activate by entering the Freddie Mac loan number in the search field and click enter. Freddie Mac loan numbers are 9 characters in length and cannot be altered by users.

3. Your search results are presented.

4. You can also click on the down arrow located next to the search field.

5. The loan search panel is expanded.
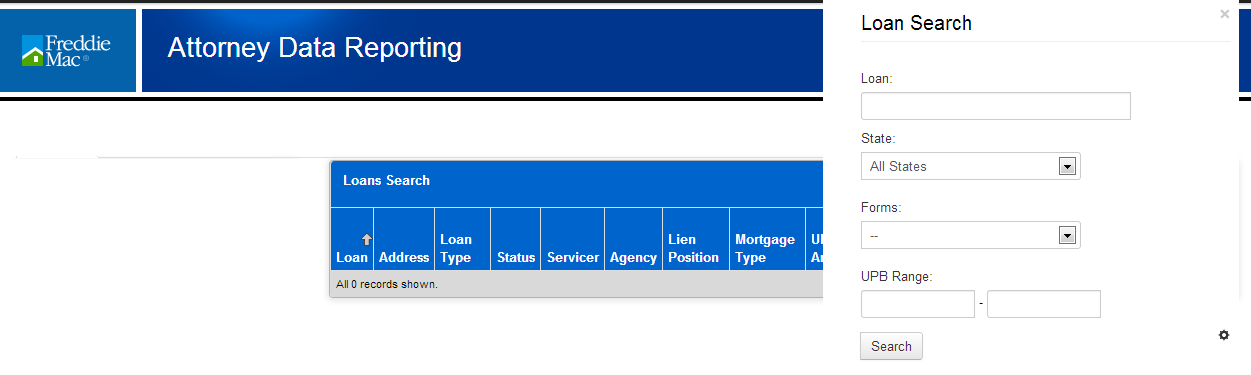
6. Enter the loan number in the loan field.

7. Click Search.
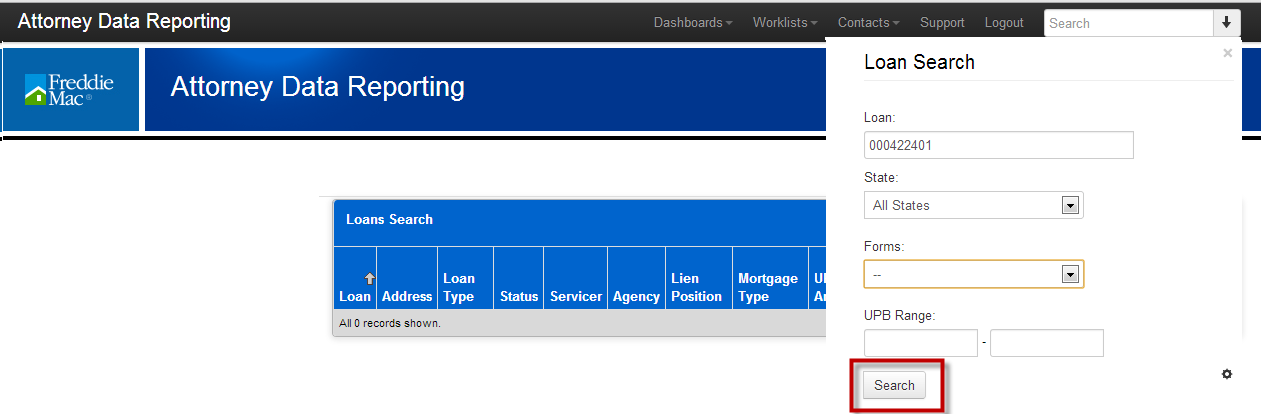
8. Your search results are presented.
9. You will be able to view those loans that are located in your designated state and you have a contract with the servicer that is servicing the loan. If you are unsure as to your coverage area or of the servicers which you have a contract, please review the Organization section.
10. Click on the Loan hyperlink in the Loan column.

11. You are directed to Loan Summary page,
https://www.freddiemacadr.com/Mortgage/Loan.ashx/Summary?ID=XXXXX
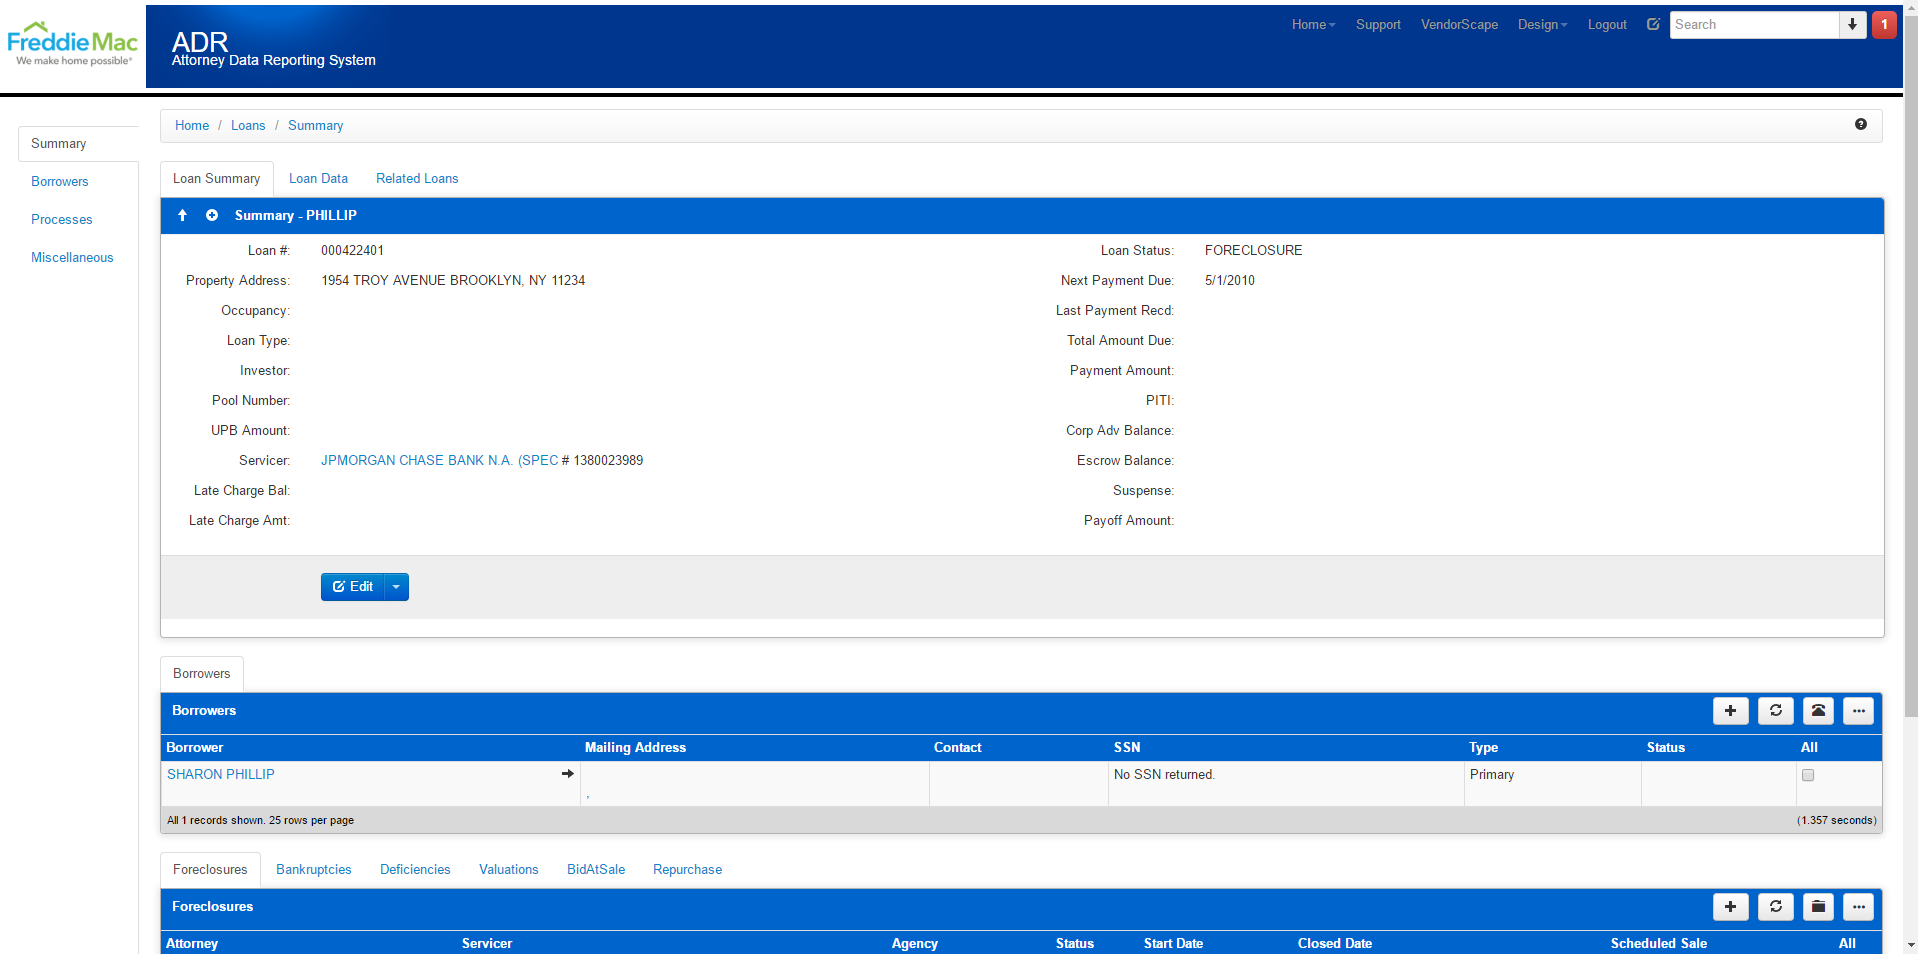
BE ADVISED: The blue bar on the Foreclosure Summary panel has an arrow and a plus sign. This pattern is used in all process summary sections
- Arrow – Lets the user collapse the entire panel section so it’s hidden except for the blue bar
- Plus sign – Lets the user expand and collapse the hidden sections of a panel
–
NOTE: The loan information may not be populated when you try to open the Foreclosure. Freddie Mac provides limited loan information prior to cases being opened. Once the Foreclosure case has been opened, the loan and property information will populate within 24 to 48 hours.
12. Navigate to the Foreclosure tab. Select the “+“to Open a NEW foreclosure file. Be advised that a new Foreclosure File can NOT be opened in the instance that another file is already open, whether it be under your firm or another firm besides your own.

13. The Start Date (selected below on the left) will auto-populate with today’s date. The Start Sate should be the date in which you received the file, and not necessarily the date that you open the file in ADR (although if you did receive the file the same day that you are opening it in ADR, then this is okay). Also be advised that a future date can not be entered.
The other two sections that you are required to enter are your Atty Case # and the Firm Name. The Firm Name should auto-populate with your firm organization that you are associated to in ADR, but it is best practice to still make sure by clicking the dropdown to make sure the right organization is selected, especially if you are associated to more than one organization.
PLEASE NOTE
If your firm does business in several states, and you are a member of each organization, you will need to be sure the correct organization is in the drop down. If you do not have the correct state and organization, you will not be able to open the foreclosure.
14. The Foreclosure has been opened – See the Status and Start Date reflect the date entered, and status “Open” – Be advised that the Start Date should be the date the Foreclosure File was originally referred to your firm, and necessarily the date in which you open the file (unless the referral date and the date you open the file are the same, then the date would reflect the same).
15. The number you provided in the Attorney Case Number field will be highlighted blue (as shown below). This Case Number is clickable and is the way you will access the file itself.
NOTE: if this attorney case number is not highlighted blue, this means you do not have access to the file. If your organization has an open file that you do not have access to, you will need to contact your Security Administrator and request for access.
16. Upon clicking the blue hyperlink (the Atty Case Number), you are brought to the Foreclosure Summary page, which shows all the details of said Foreclosure. This panel can be expanded or retracted based on the clicking of the white arrow icon and the white “+” icon (which becomes a “-” when clicked, and so on), as shown below.
3.2 Loan Has Active Foreclosure
If a law firm managed a prior Foreclosure and did not close out the Foreclosure you will need to contact the firm and have them close their Foreclosure.
- When you click on the Foreclosure tab, the information contained in the Foreclosure Summary is completed with another firm’s information. You cannot open your Foreclosure action until the prior firm closes their action.

2. Click on the attorney name hyperlink.

3. A dialogue box opens with the attorney information.
4. Contact the Law Firm and request they close their action. The status field on the Foreclosure Summary panel must be updated to Closed. If the Law Firm does not respond to your request to close the Foreclosure, contact Freddie Mac.
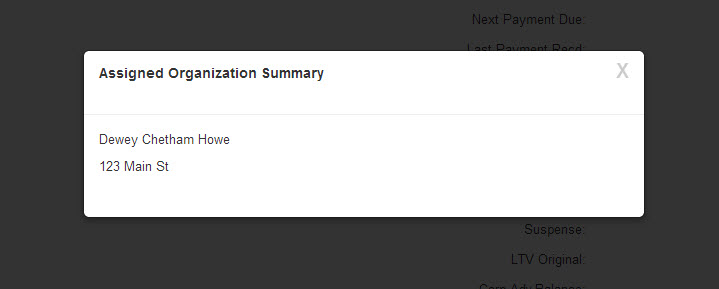
3.3 Loan Indicators
- There are specific indicators that are added to a loan to alert the user of possible special handling. This is documented on the Labels/Tags section found in the Loan Summary panel. Click the “+” icon to see these indicators.
PLEASE NOTE: the “+” icon to the left of “Summary – Phillip” in this example was clicked to expand the Loan Summary page to reveal the Labels shown below.
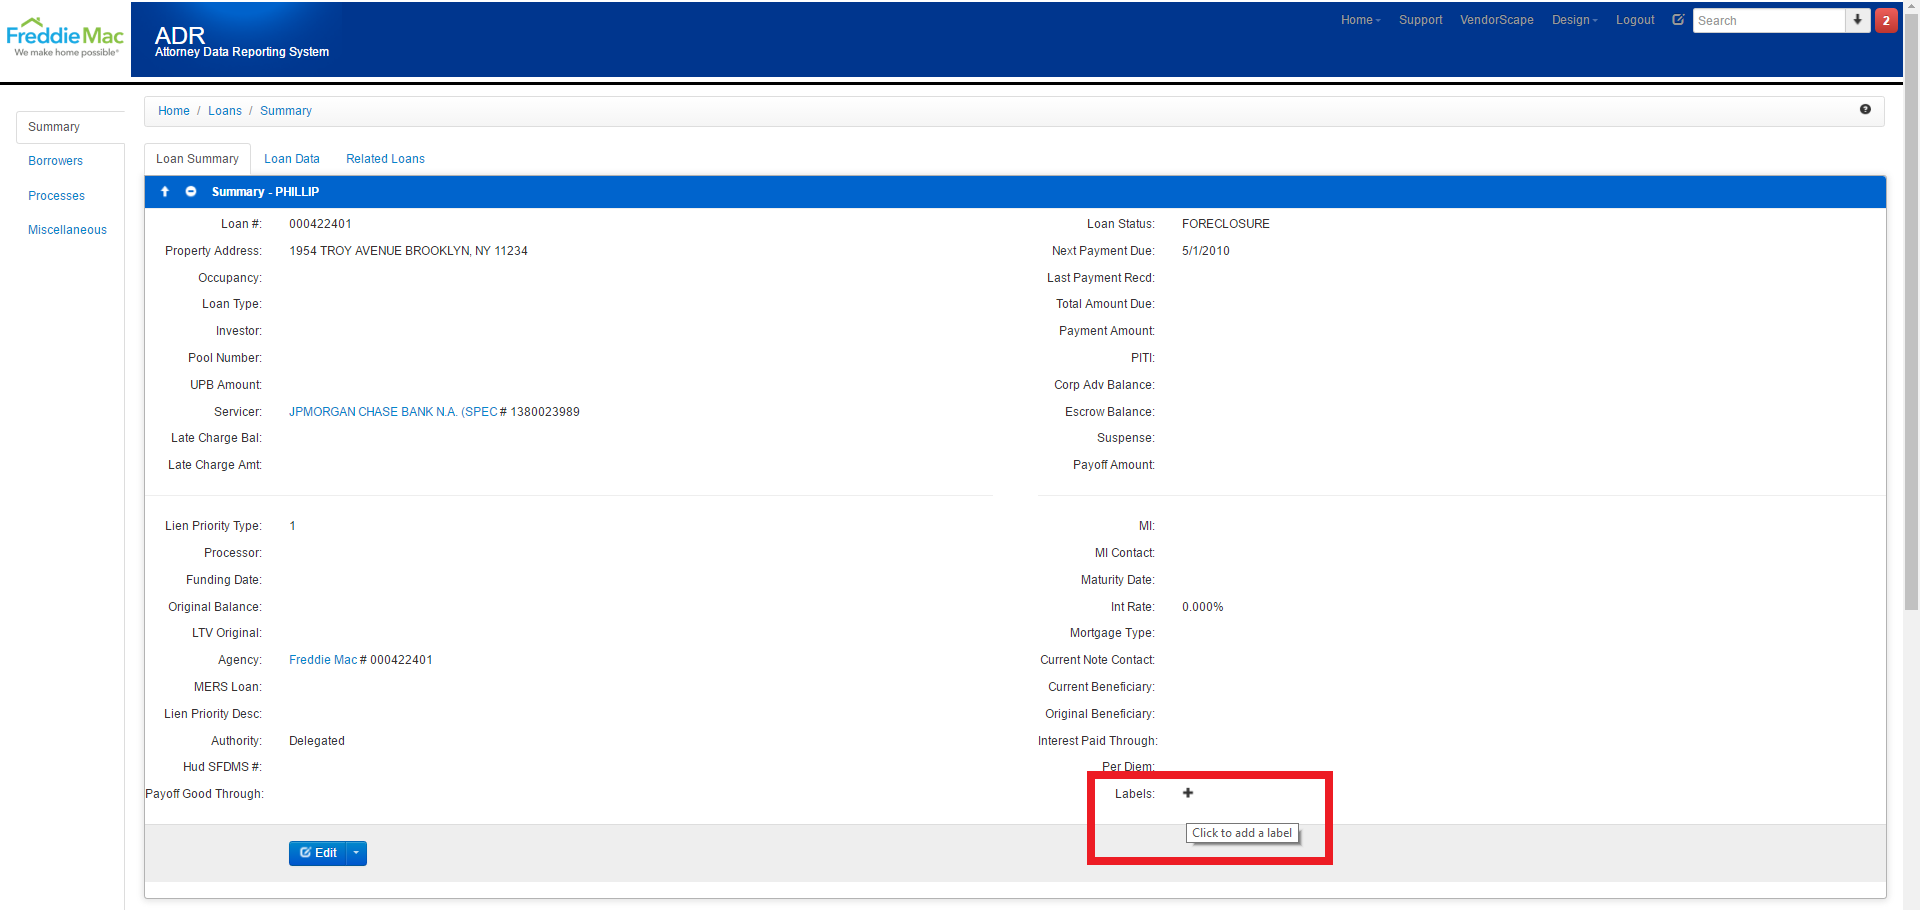
If any of the special indicators are present, this information would be displayed on this panel. Said indicators are as follows:
- Environmental Issue
- Native American Loan
- RHS Identifier
- Rural Property
- Title/Legal Issue
- Date Exceeded
- If a Repurchase has been approved
3.4 Related Processes
- The Related Processes tab lists all actions related to the loan including Foreclosures, Bankruptcies, and Repurchase information.
- Click on the Related Processes tab
- The hyperlink in the Process column, when clicked, will direct you to the process. In this example, when the hyperlink Testing456 is clicked,

4. The user is directed to the Foreclosure.
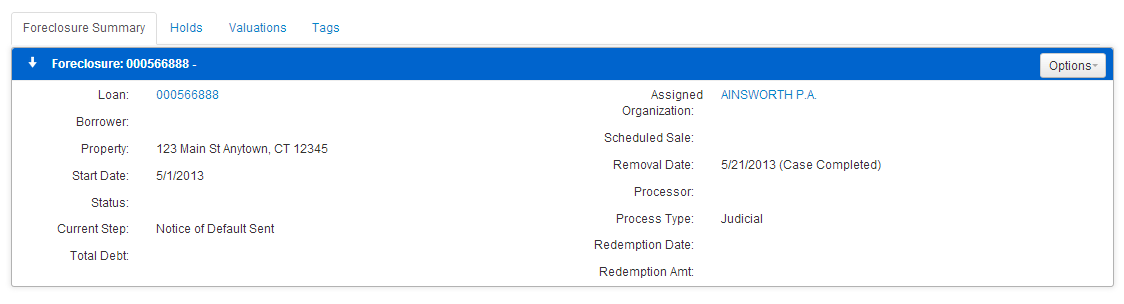
5. The Process column will identify the action as Foreclosure, Bankruptcy, or a Repurchase.

6. The Status column represents the status of the related process. This will reflect Open or Closed.
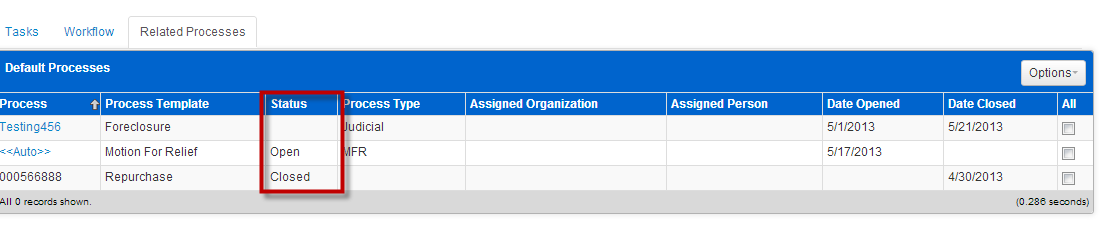
7. The Process Type column identifies if a Foreclosure was Judicial or Non Judicial and if the Bankruptcy that was opened was a Motion for Relief or a Proof of Claim.
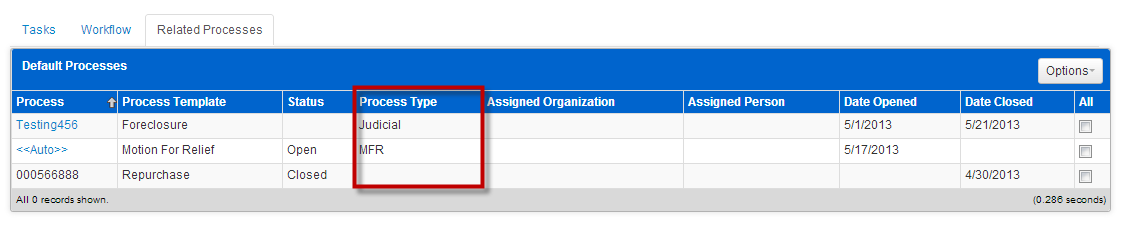
8. The Open Date is the date the process was opened.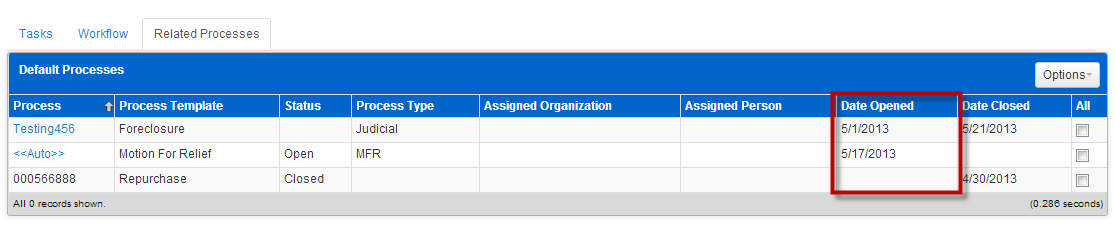
9. The Close Date is the date the process was closed.
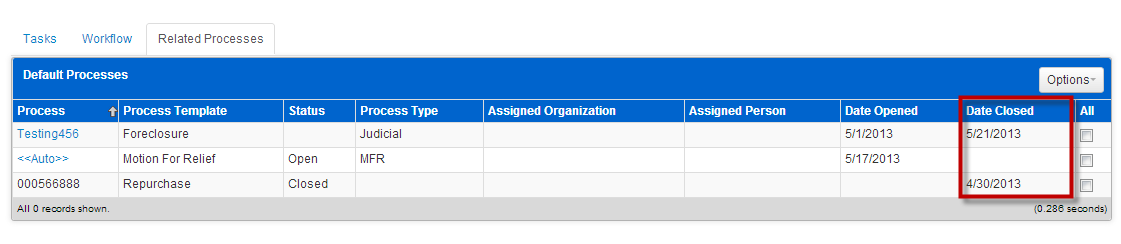
10. PLEASE NOTE: The value in the Process column for Repurchases is the Freddie Mac Loan Number.
4 Holds
4.1 Placing an order on Hold
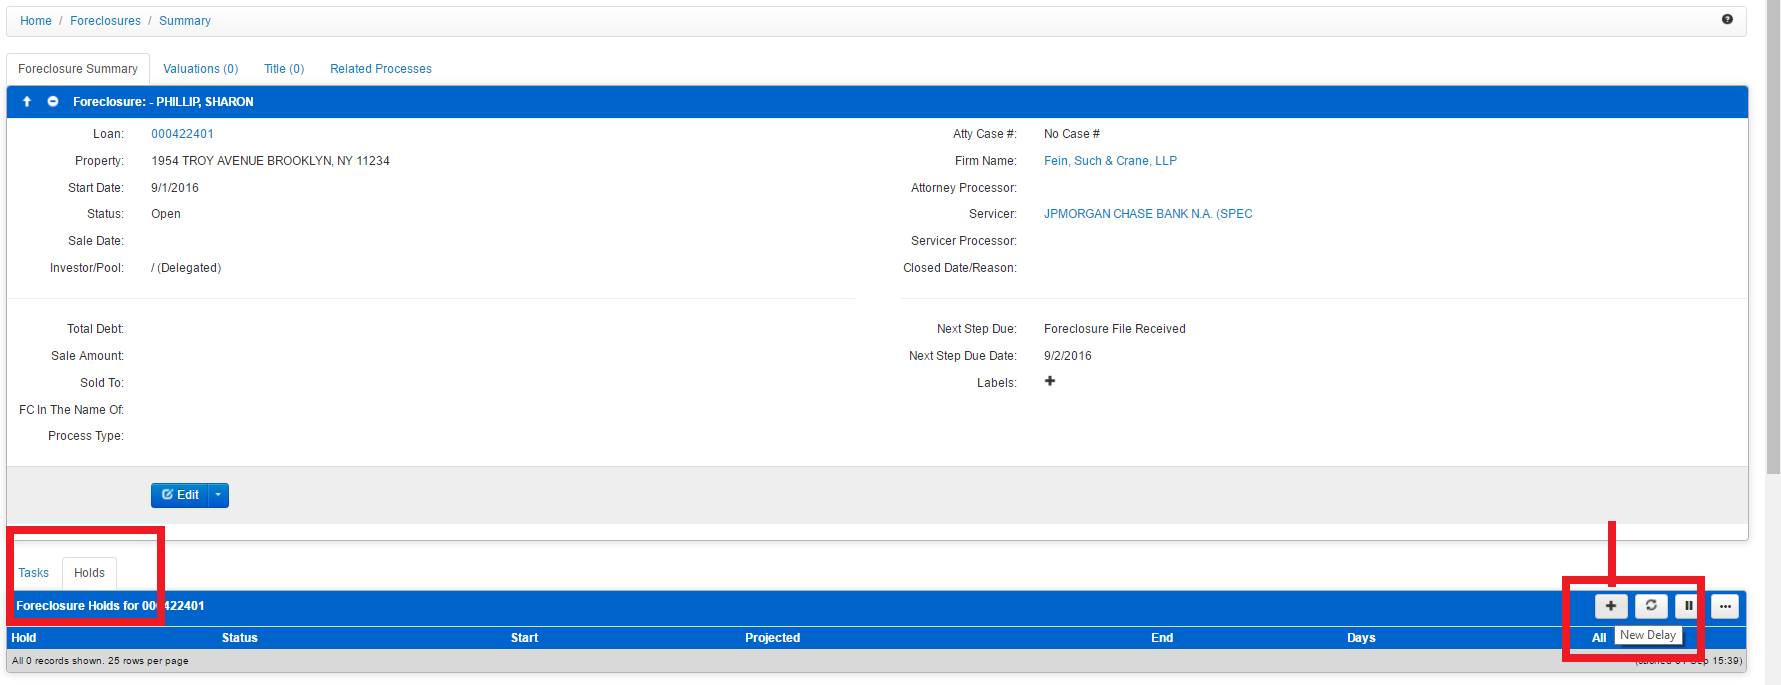
- From the Foreclosure and Bankruptcy Summary Pages, to the right of the Tasks tab, you will find the “Holds” tab. Click on it to see any active Holds. From the right, you can see the “+” to Add a new Hold/Delay.
2. Select a Hold type from the Hold drop down menu.
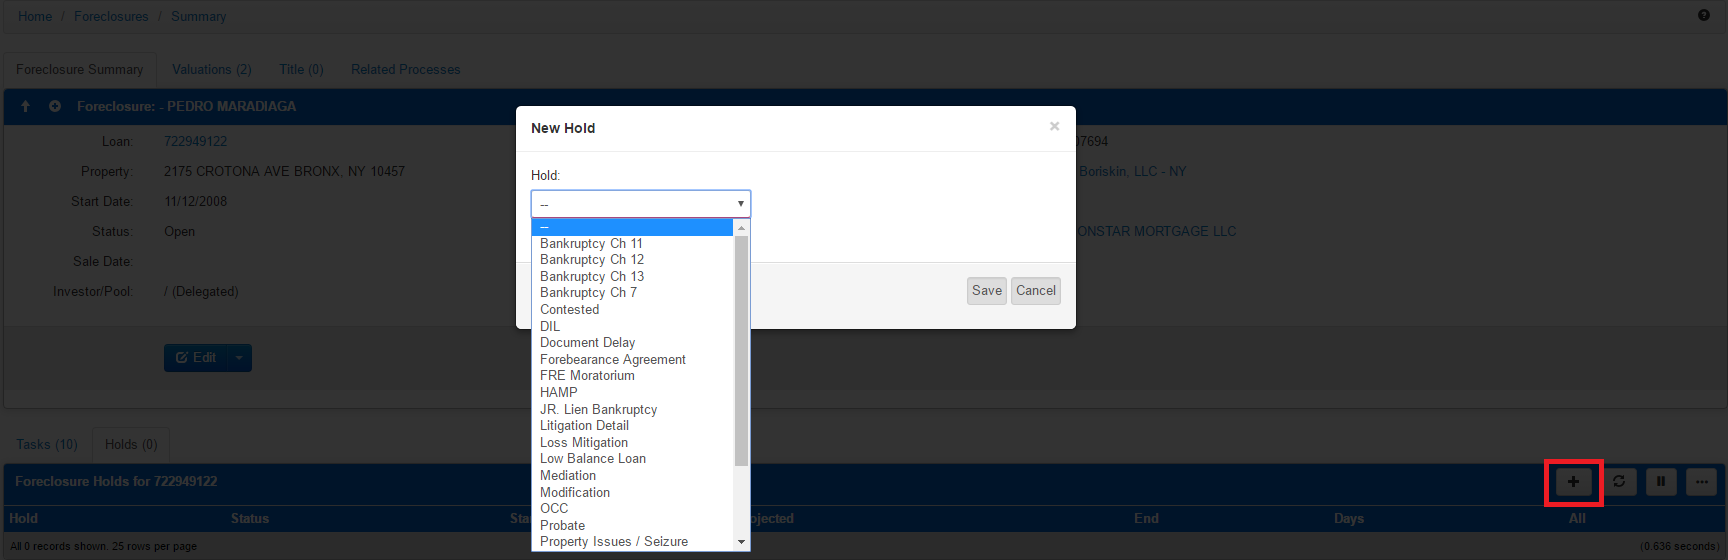
3. The Description field is populated with the Hold type from the Hold drop down menu. The auto-populated description can be used or you can enter a different description.
- Start date is populated with current date. A past date or current date can be entered. A future date cannot be entered.
- Projected date is when the Hold is expected to be removed. It can be the current date or a future date. Projected date is a required field.
- Comments are populated with following message: Delay added on XX. You can move to the next step and retain the default comments, add additional comments to the default comments or you can delete the default comments and add your own comments. In this example, comments were added to the default comment.
4. Click Save, and the Hold is saved.
5. Priority message notification icon is populated.

4.2 Reprojecting a hold
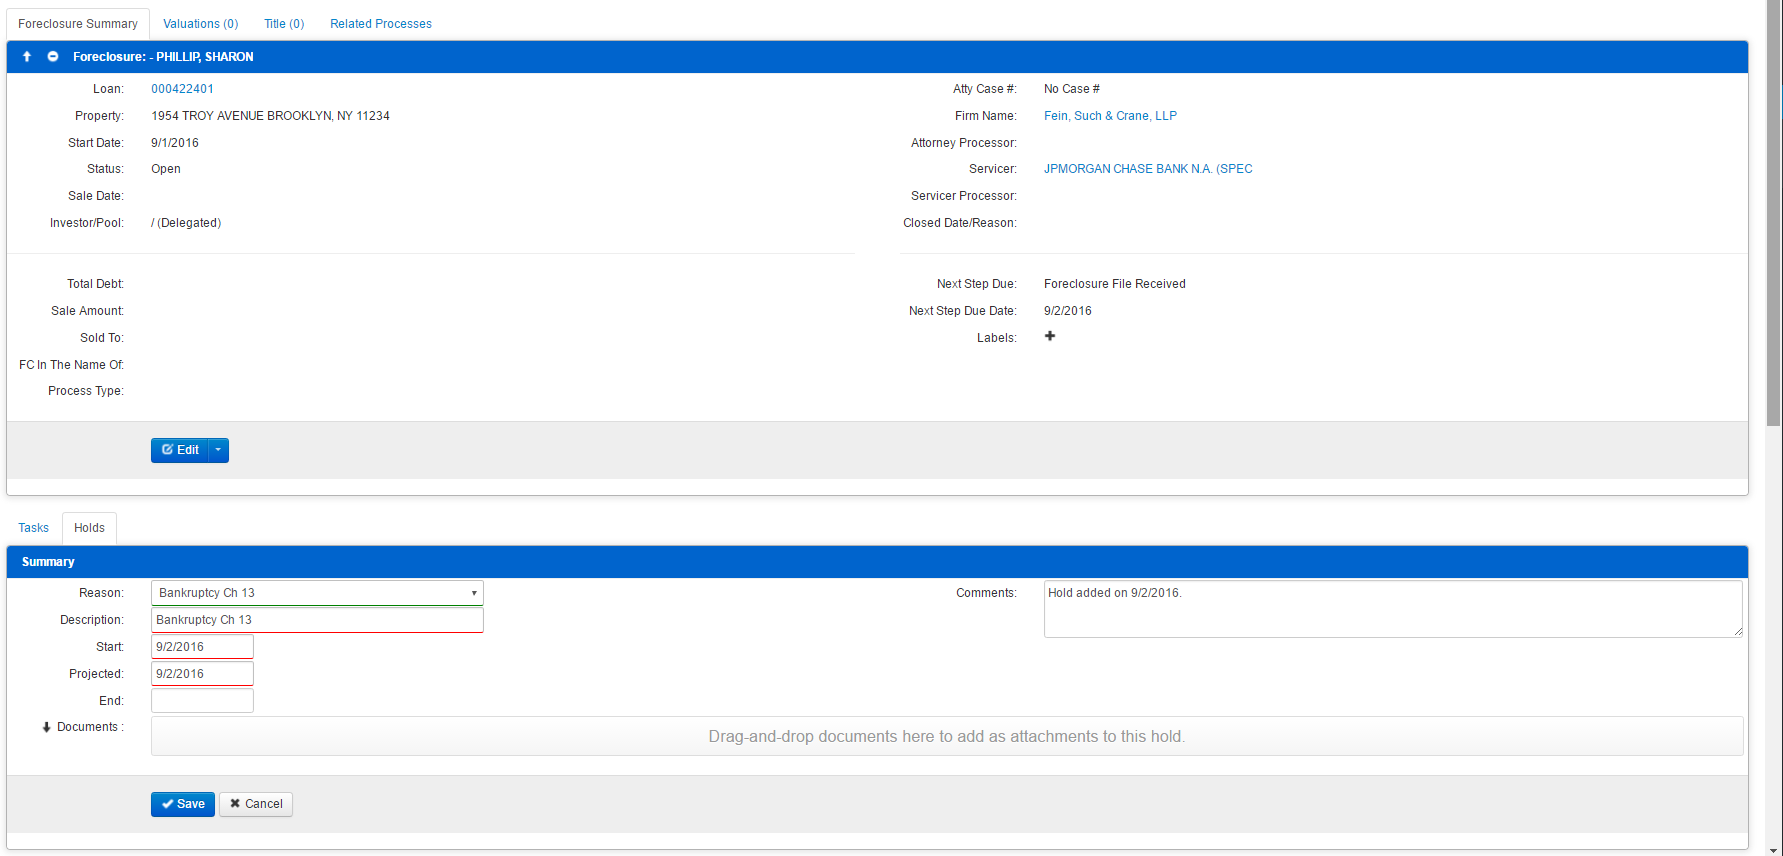
- To update a Projected date for a Hold, simply access the Holds tab from the Foreclosure Tasks panel and choose the hold you wish to have adjusted.
2. Update the Projected date to the new date.
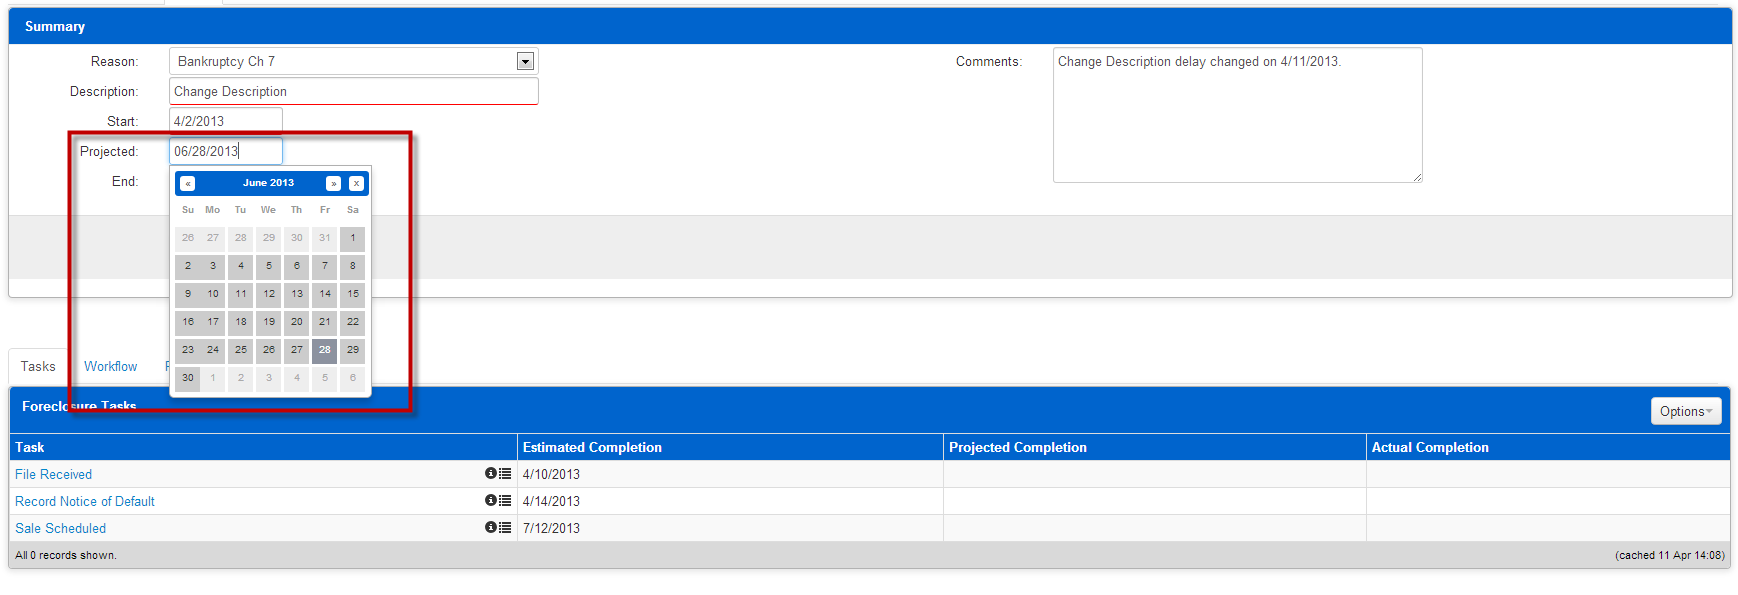
3. The comments have a default comment of the following: Hold description delay changed on X (The date the hold is being revised).

4. Click Save.

5. Projected date has been updated.
4.3 Complete a hold
- To End a Hold, access the Foreclosure Tasks panel and select “Holds”. Select the open hold/delay by clicking he name of the Hold, which will appear as a blue, clickable hyperlink.
2. Enter a date in the end date field.
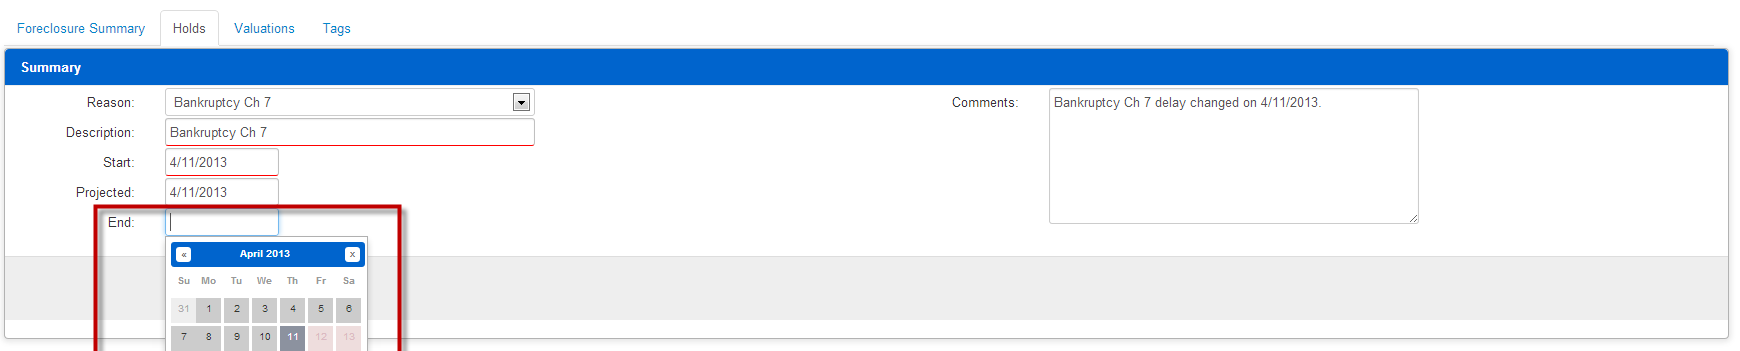
3. Hold is closed
4. Priority message notification icon is 0.

4.4 Review a hold
- Click on the information icon, which appears as a black circle with a lowercase “i” just beside the name of the hold.

2. A message panel is presented.

3. The message panel lists the user that created the hold, the date the hold was created along with any details you mind useful regarding any open, or previously closed Holds/Delays.
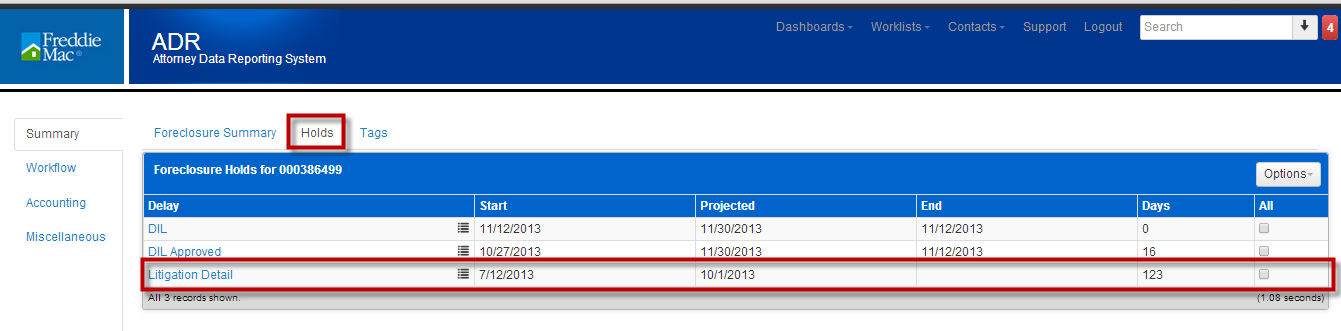
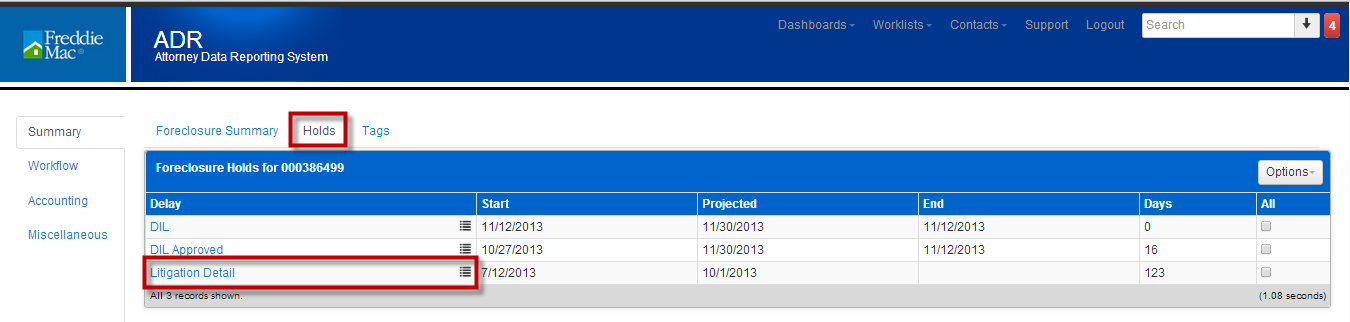
5 Litigation Detail
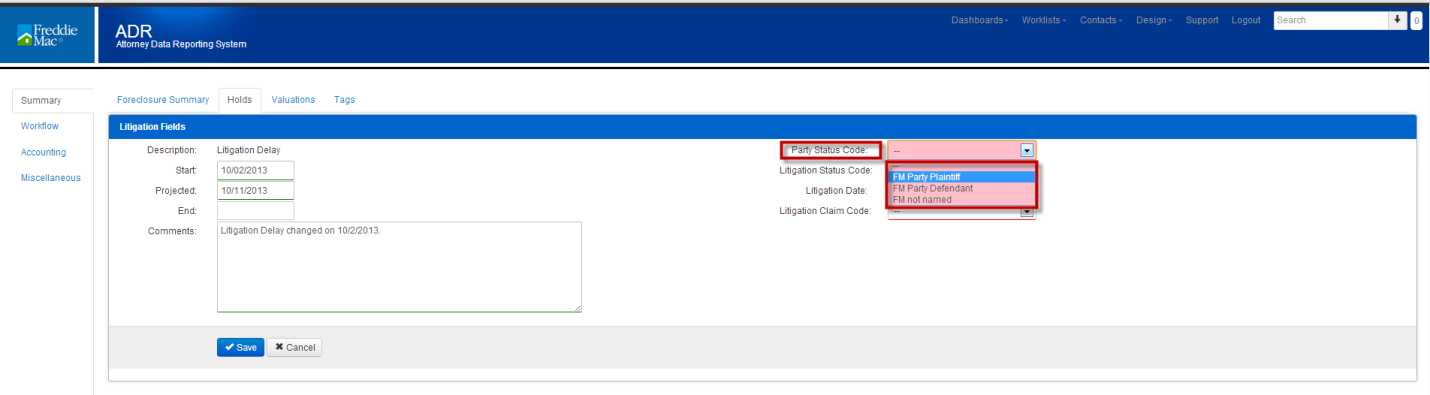
5.1 Adding Litigation Detail
- Click on Holds tab.

2. From the the dropdown of available Holds, choose Litigation Detail.
3. Description Populates with Litigation Detail.
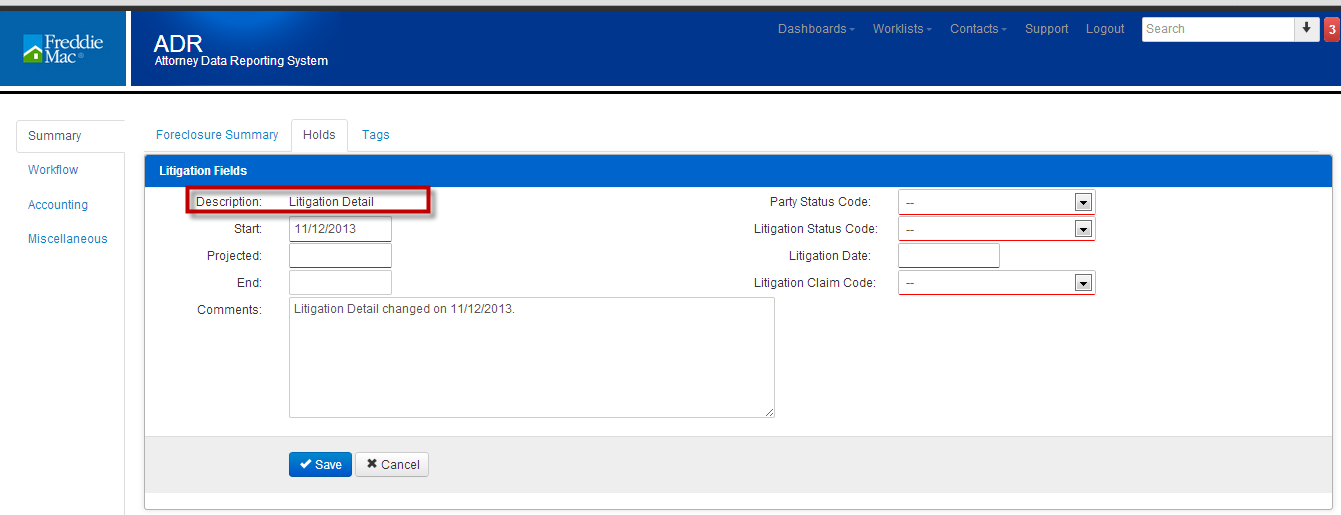
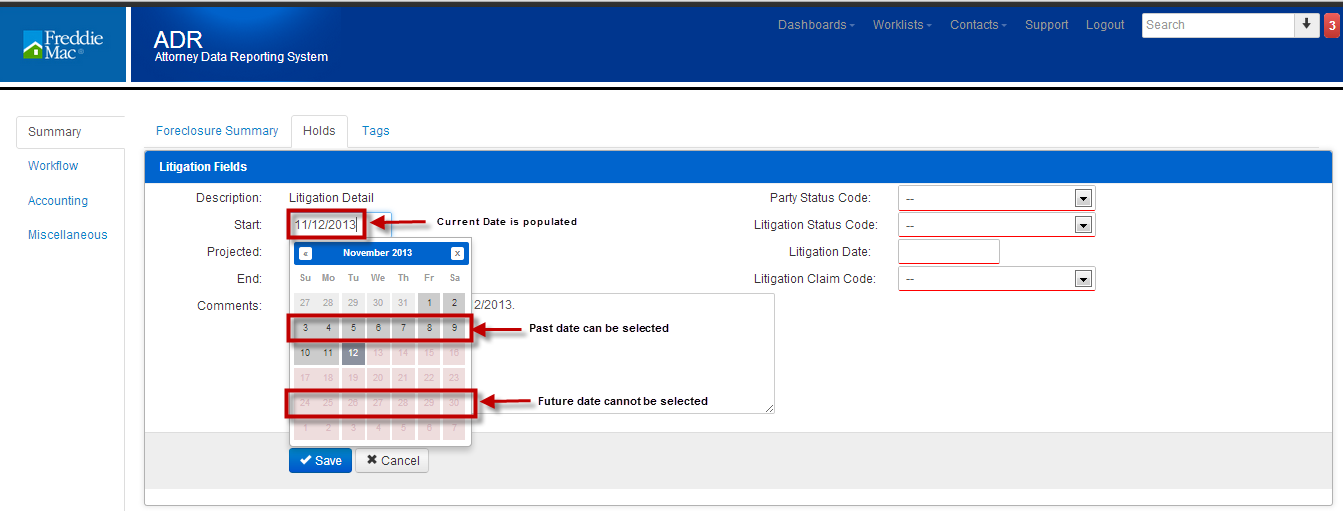
4. Start date populates with current Date. You may enter a past date or the current date. You cannot enter a future date. A Start date is required.
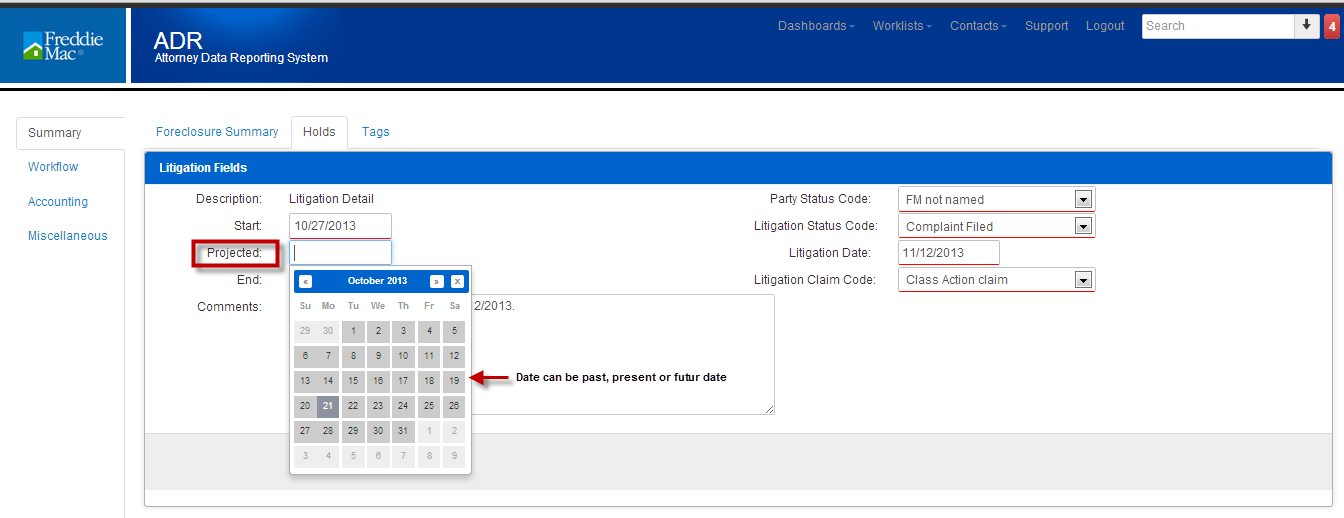
5. Projected date is required. Date can be the current date or a future date. Holds cannot be projected using a past date. This is the date you will follow up on the Litigation.
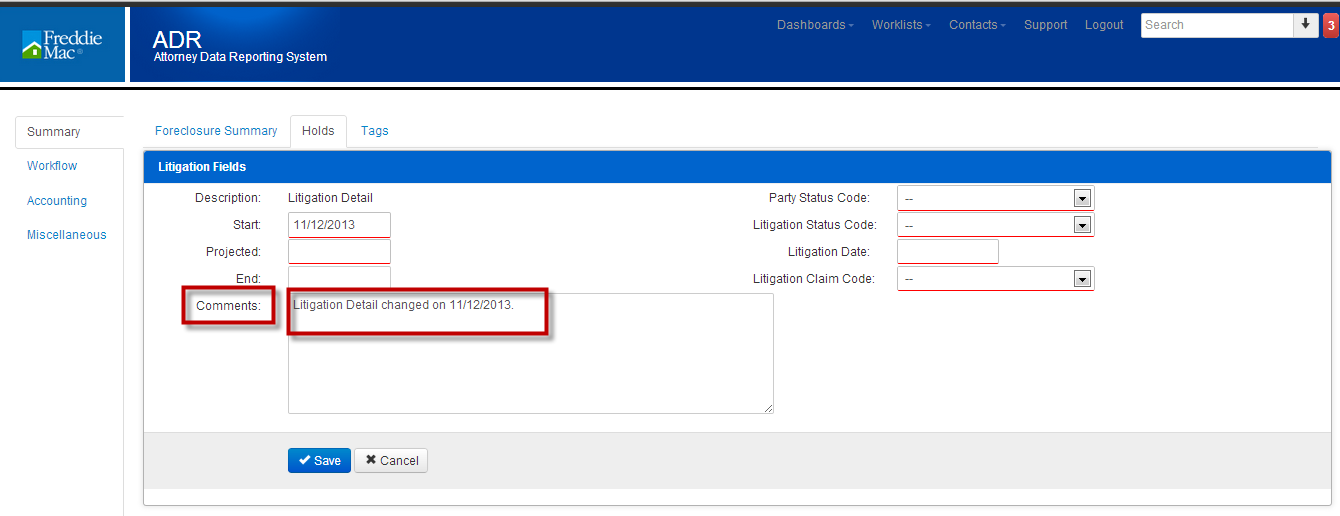
6. Comments section populates with the following: Litigation Detail changed on (date Litigation Detail created). You can append to the existing comments with additional commentary that will explain the reason for creating the Litigation Detail.
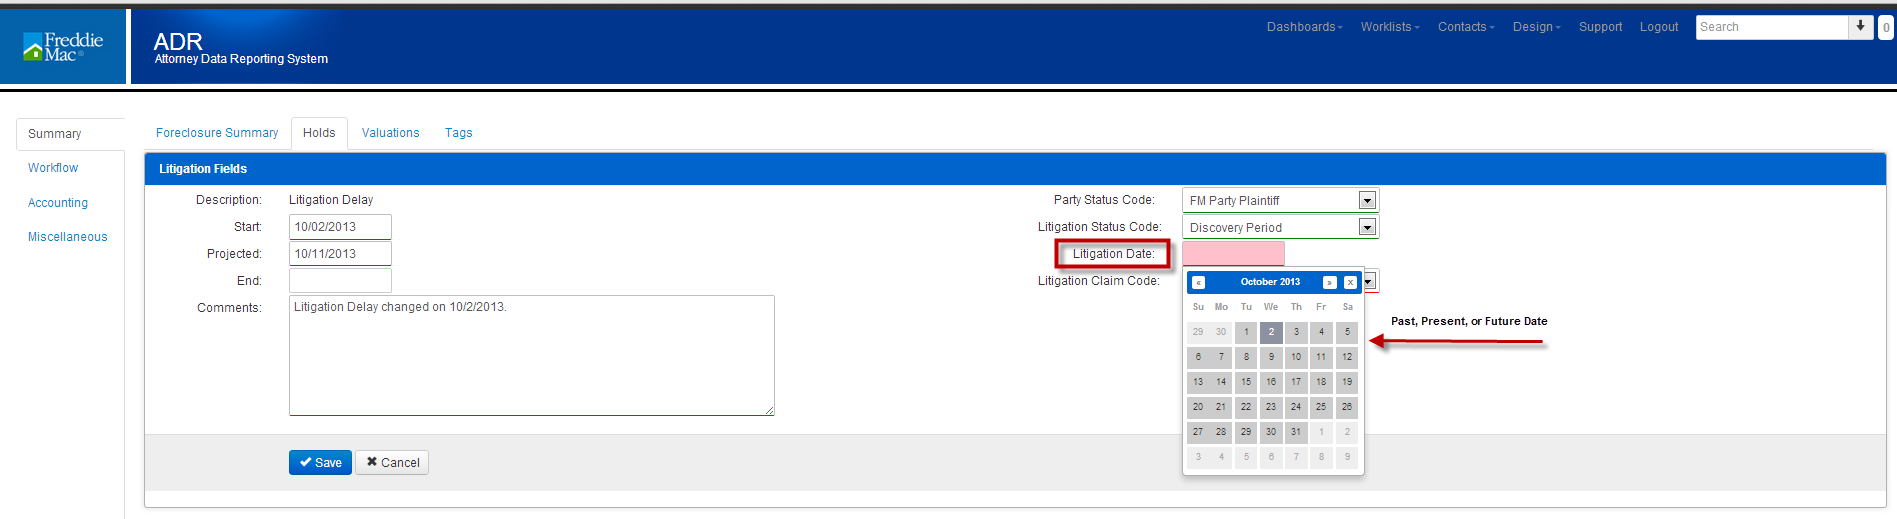
7. Party Status Codes is a list of the parties. Your options are FM Party Plaintiff, FM Party Defendant, FM Not Named. This is a required field.
8. Litigation Status Code is the status of the Litigation. Your options are: Complaint Filed, Dispositive Motion Filed, Discovery Period, Trial Date, Notice of appeal Filed, Appellate Briefing Schedule, Post Trial Proceedings. This is a required field.

9. Litigation Date is the date of the litigation trial. The date can be a past date, a future date, or a current date, but cannot be set to a date prior to the Start Date. This is a required field.
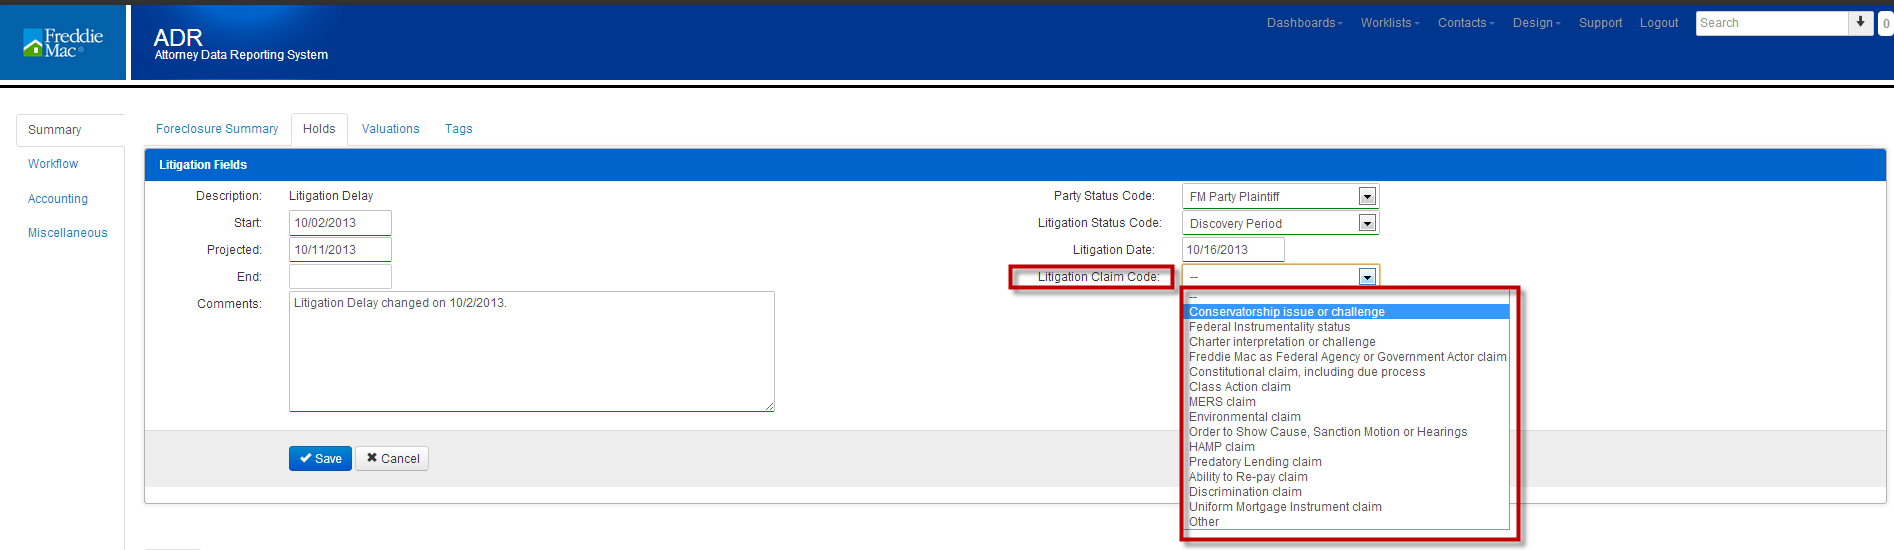
10. Litigation Claim Code is the type of Litigation. Your options are: Conservatorship issue or challenge, Federal Instrumentality status, Charter interpretation or challenge, Freddie Mac as Federal Agency or Government Actor claim, Constitutional claim, including due process, Class Action claim, MERS claim, Environmental claim, Order to Show Cause, Sanction Motion or Hearings, HAMP claim, Predatory Lending claim, Ability to Re-pay claim, Discrimination claim, Uniform Mortgage Instrument claim, Other. This is a required field.
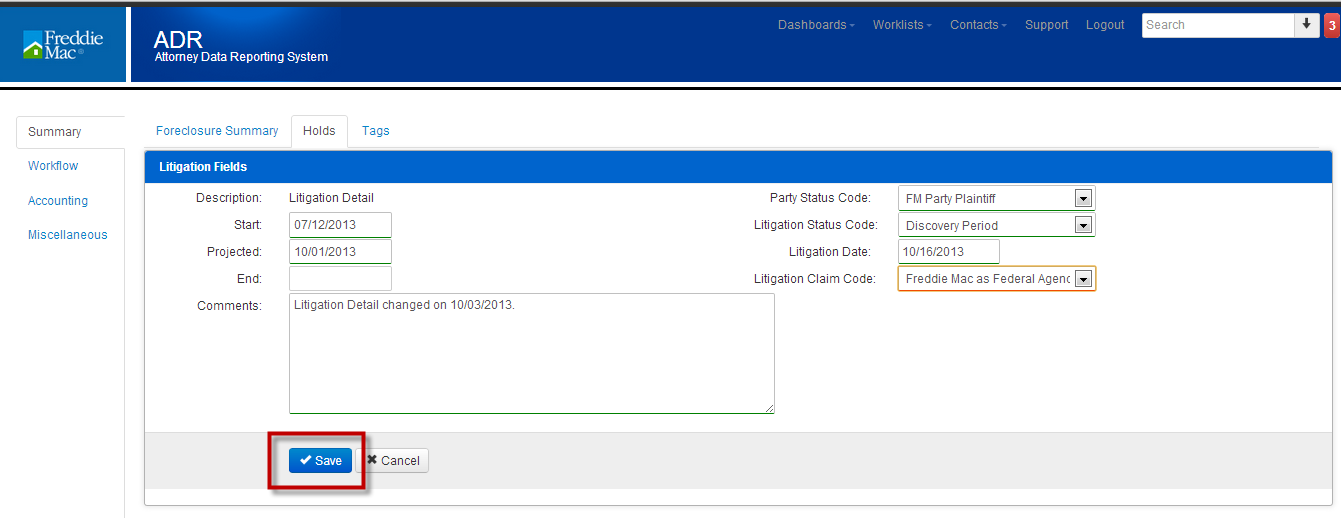
11. Once all information has been added, click Save.
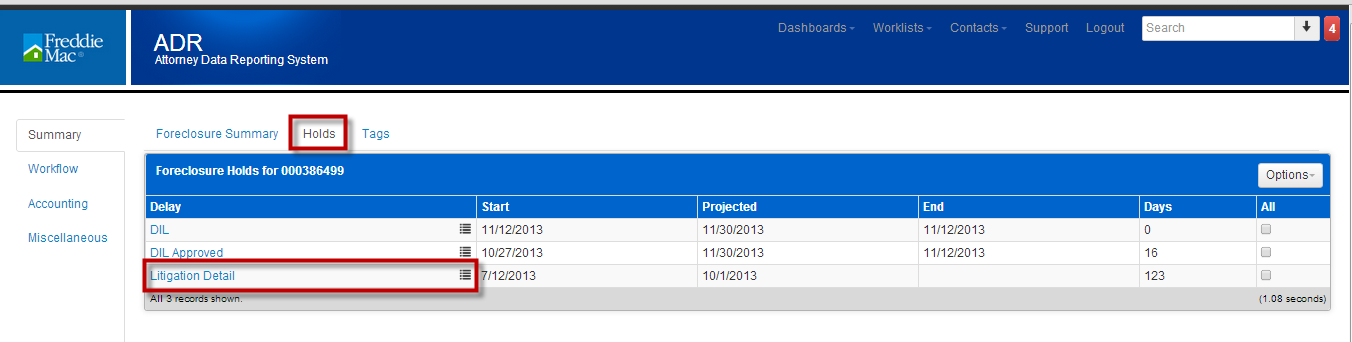
12. Hold panel displays the hold, start date, projected date, end date and number of days hold. If the hold is open, the number of days is based on the start date to the current date. If the hold is closed, the number of days is based on the start date to the closed date.
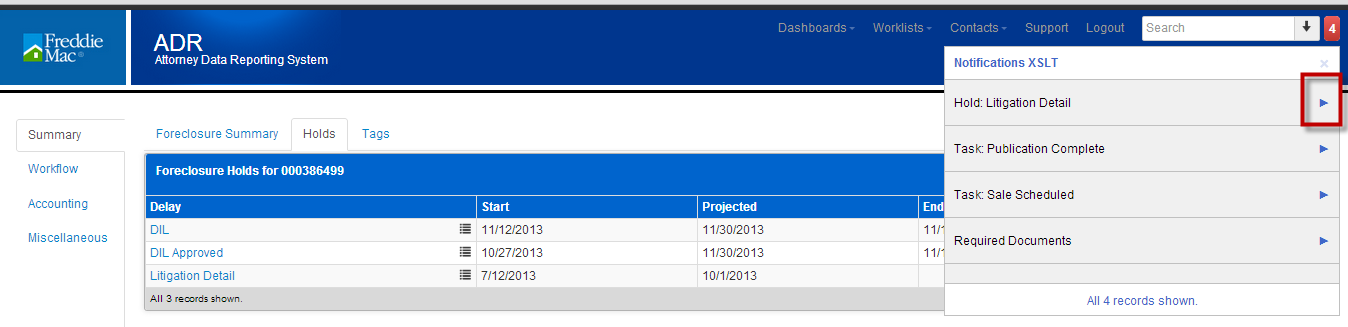
13. Review the Litigation detail by clicking on the Litigation Detail hyperlink.
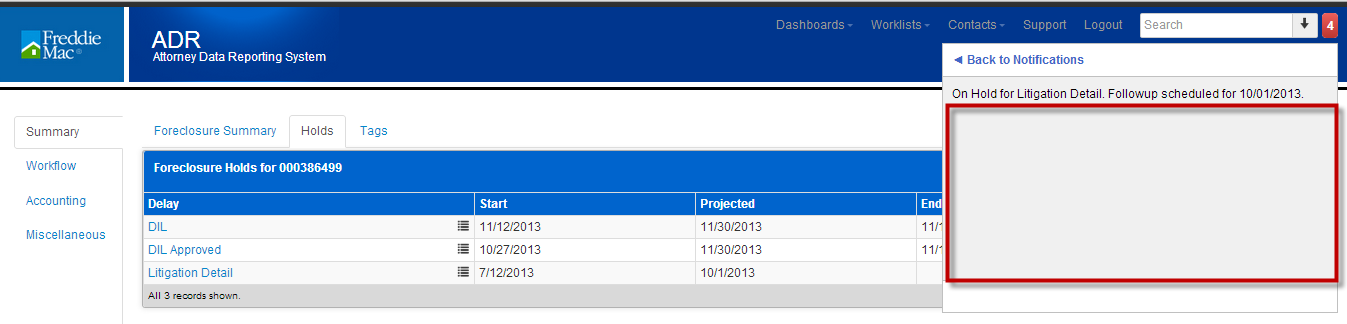
14. The Litigation Detail will be listed in the priority messages. Click on the priority message icon.

15. The delay is listed.

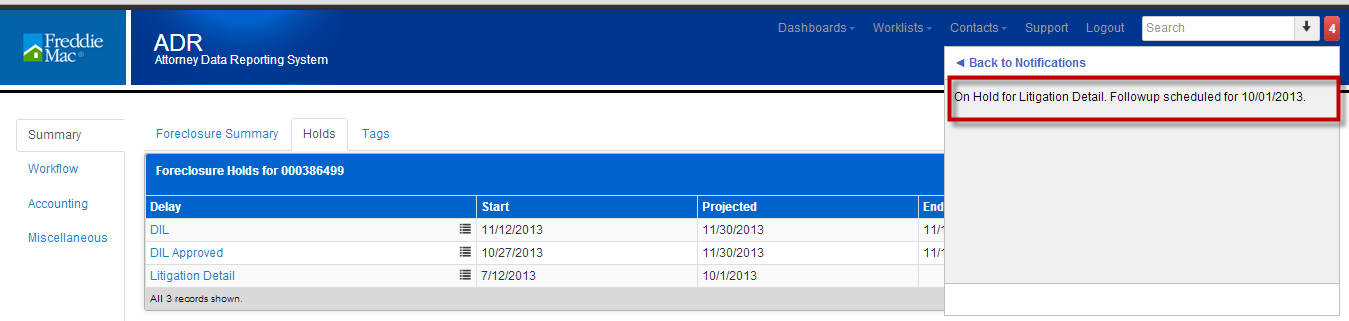
16. Click on the arrow.
17. The delay reason and the projected follow up date are displayed.
18. Close the hold message by clicking in the gray area of the message.
5.2 Remove Litigation Detail
- Click on Hold tab.

2. Click on Litigation Detail hyperlink.

3. End is the date the delay has ended. The field will default to the current date. You may enter a past date. You cannot enter a future date. The date cannot be prior to the Start date. In this example, the Start date is 10-02-2013. The End Date must be any date after 10-02-2013.
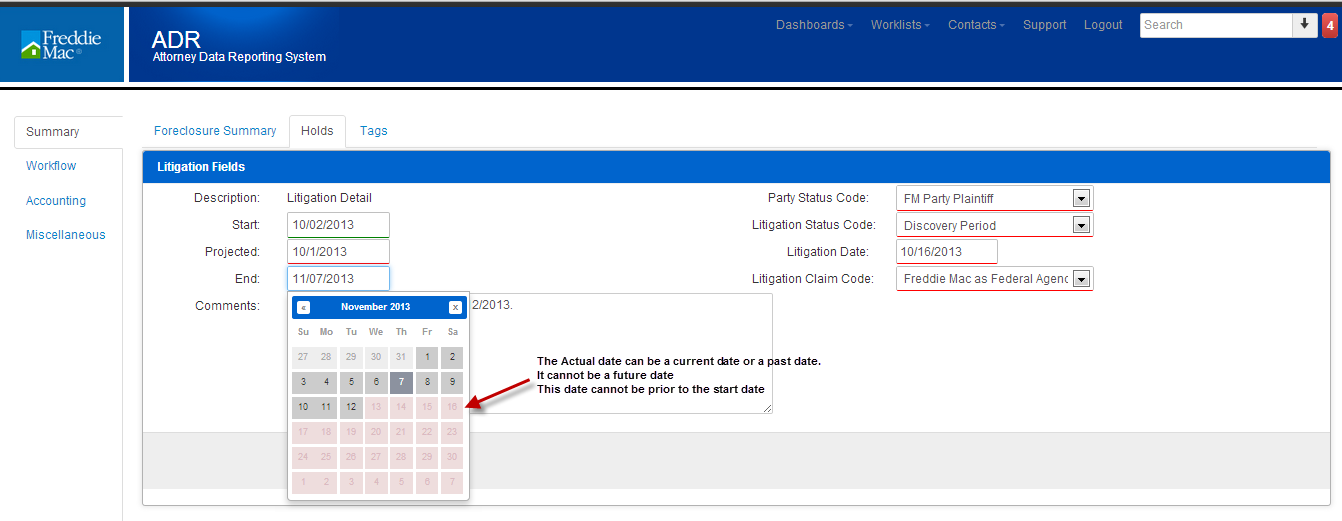
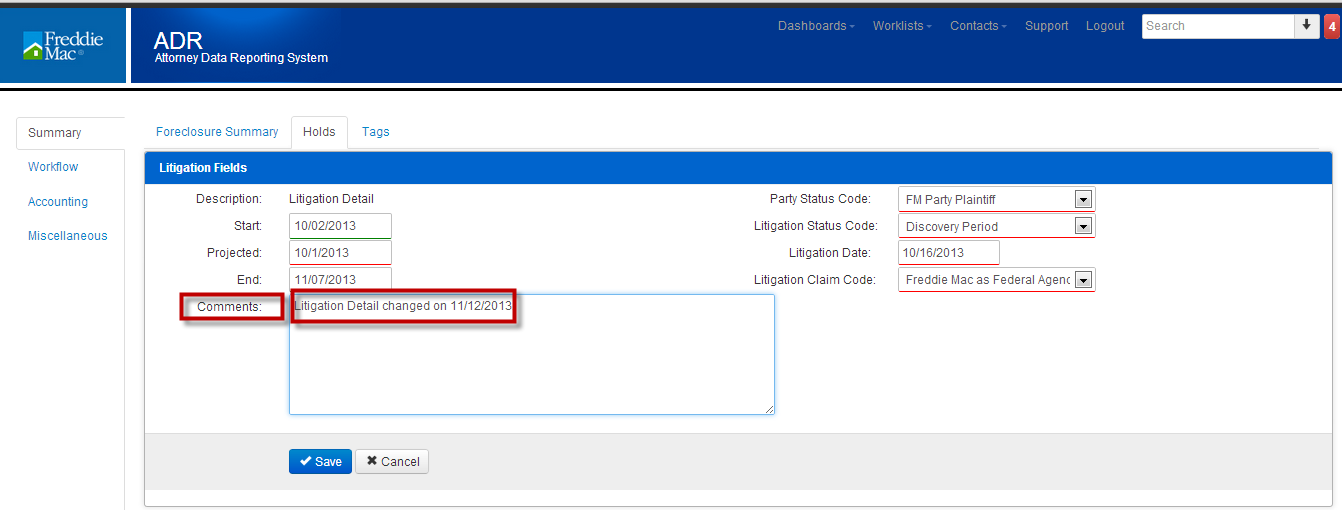
4. The Comments field will automatically populate with the following: Litigation Detail changed on 10-02-2013. You can append this comment with additional information regarding the results of the litigation.
5. Click Save.

6. You are directed to the hold tab. The end date is complete. The days are calculated based on the start date and end date.
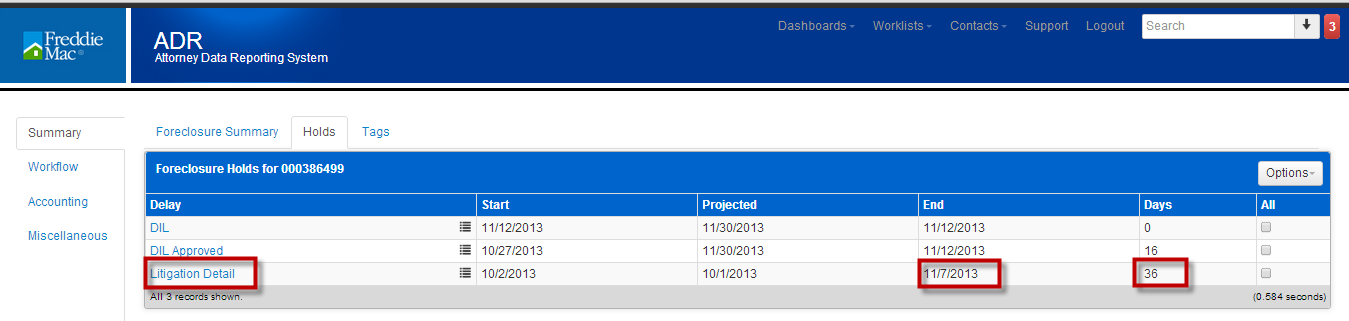
7. The priority message has been removed.

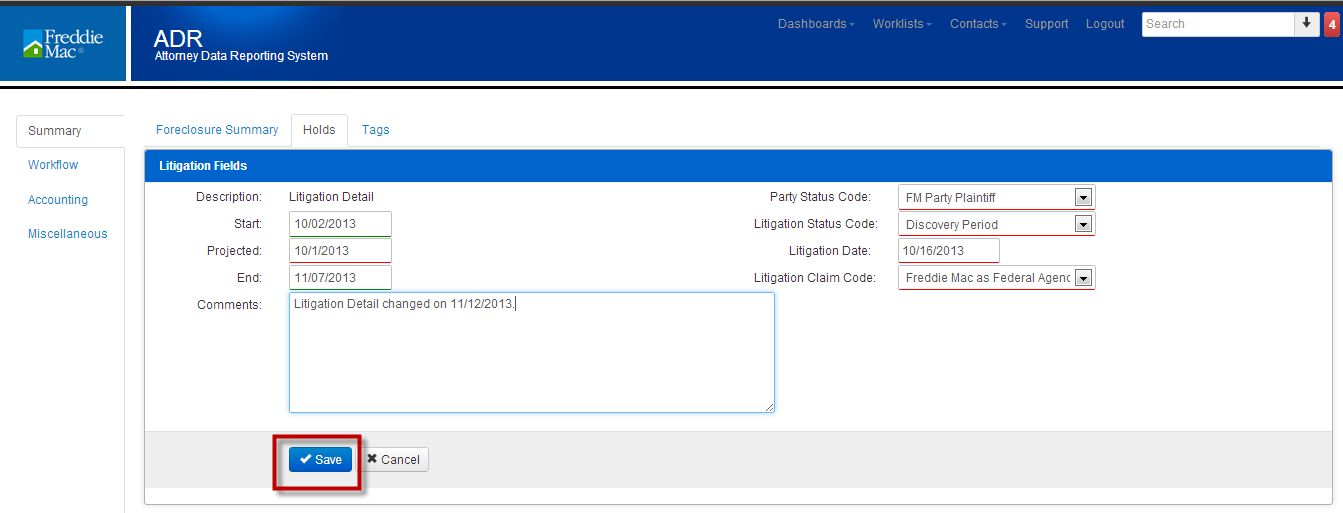
5.3 Update Litigation Detail
- Click on Hold tab.

2. Click on Litigation Detail hyperlink.
3. Perform all necessary updates within the hold, including re-activating the hold by removing the End Date. All rules mentioned above apply to performing updates. Note: If the End Date of the Hold is more than 180 days in the past, none of the information can be updated. This is for auditing and reporting purposes. Additionally, only one active Hold can exist per case, so if any additional active Holds are associated with your case, you will not be able to remove the End Date. Once all updates are made, click Save.
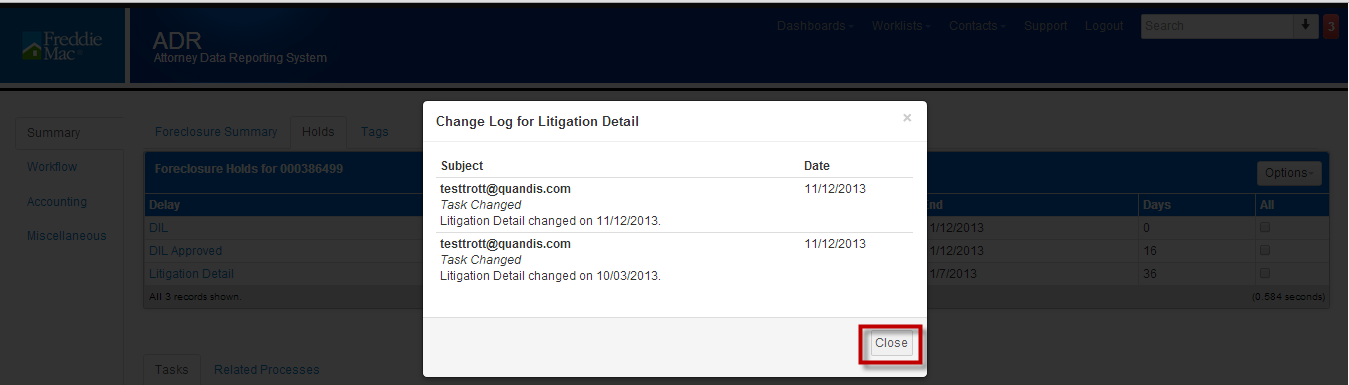
5.4 View Litigation Detail Revisions
- View the changes made to the task by clicking on the horizontal parallel lines in the delay column.

2. The change log is displayed. This log will list the user(s) that changed the Litigation Detail and the date of the changes along with the comments.
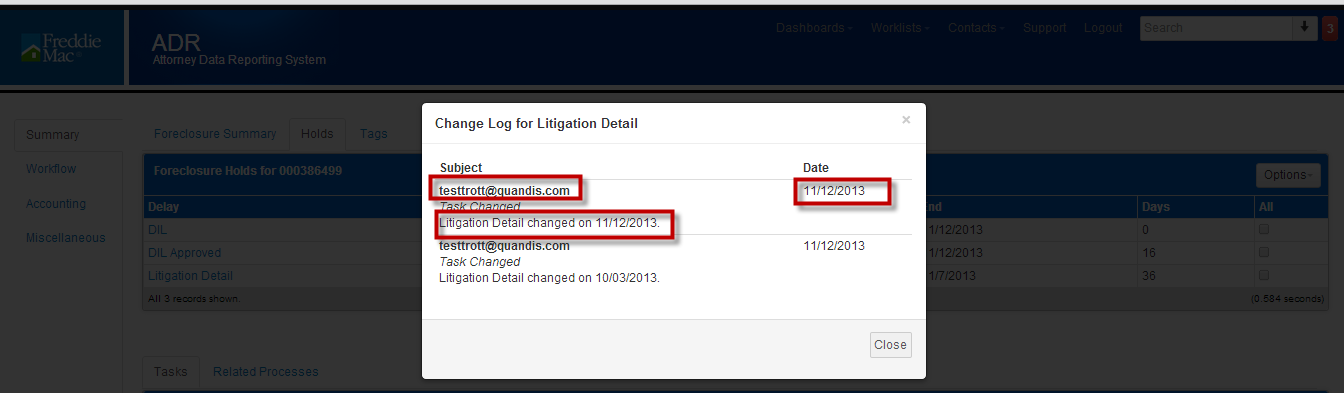
3. Close the dialogue box by clicking on Close.
5.5 When to use Litigation Detail
Refer to your Freddie Mac guidelines to determine when to use the Litigation Detail feature and when you should or should not proceed with the Foreclosure or Bankruptcy action whenever resolving a litigated matter.
6 Foreclosure Tasks
PLEASE NOTE: Your screens may slightly differ from what is below.
6.1 Completing Tasks
The due date for the first task is based on the start date entered when the foreclosure was opened. If an error was made in entering the start date, you will need to close the foreclosure and open a new foreclosure. Please refer to the Closing the Foreclosure section for instructions on closing a foreclosure.
2. Select All Tasks from the Options drop down.

3. Click on task name hyperlink.

4. Enter either the current date or a past date in Actual Date field. You cannot enter a future date. This date cannot be prior to the completion date of the prior task.
In this example, a date prior to 11-13-2013 cannot be entered in the Actual Date field for the task Notice mailed and Pub sent to Legal Newspaper because the prior task, First and Second Notice Prepared has a complete date of 11-13-2013.

5. The body field defaults to the standard comment: Task Name changed on <<Current Date>>
You can either delete this comment and enter a comment or you can append a comment to the default comment. In this example, the comment was appended.
6. Click Save.

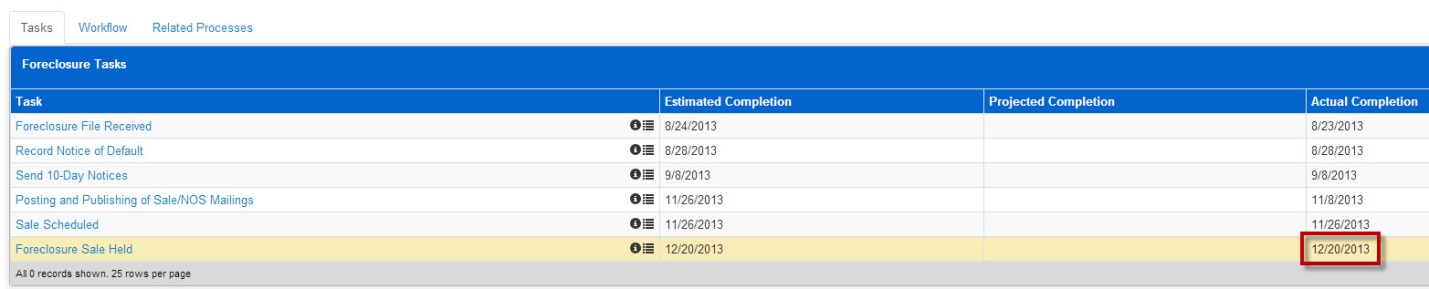
7. You are returned to task tab. Actual Completion column is populated with the date entered in the Actual date field.

8. This view will list only those tasks that are due to be completed. You will not see all tasks associated with the foreclosure. To view all tasks, please refer to the Viewing All Tasks section of this document.
6.2 Foreclosure Sale Held Task
PLEASE NOTE: Your screens may slightly differ from what is below.
The Foreclosure Sale Held Task has additional elements that will be required when it is completed.
- Click on the “Foreclosure Sale Held” hyperlink.

2. Enter the date the Foreclosure Sale was held in the Actual Date field. As with all other tasks, you cannot enter a future date in this field. This date cannot be prior to the completion date of the prior task.
3. Opening Bid Amt, Credit Bid Amt, Credit Bid Received, Sale Amount, Total Debt, UPB, and Sold To fields will be presented. A value is required to be entered in each of these fields.
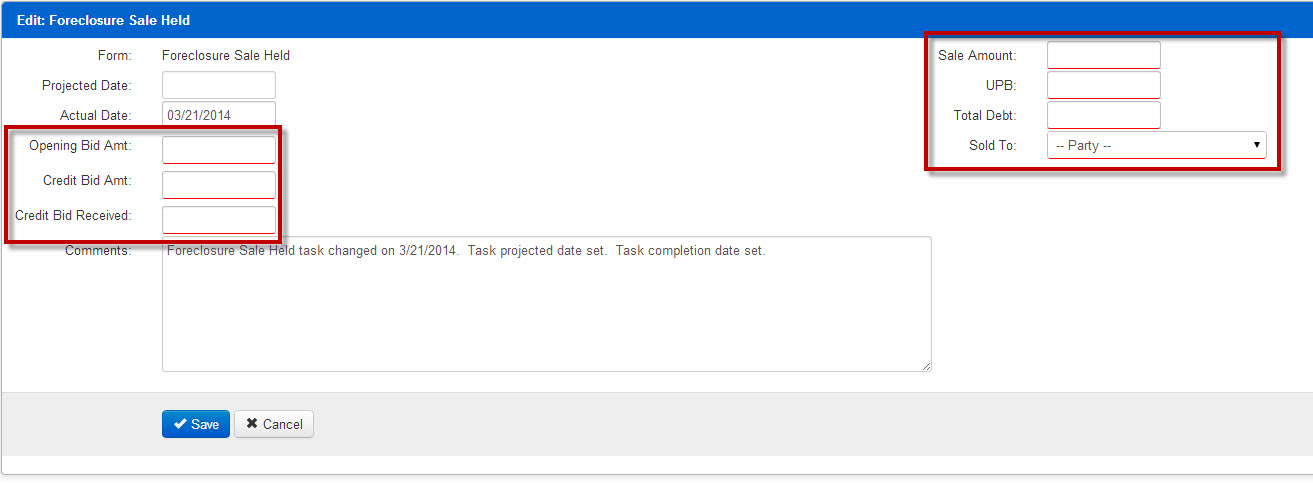
4. Opening Bid Amt, Credit Bid Amt, UPB, and Total Debt must all be greater than 0. Each field can only have numeric values.
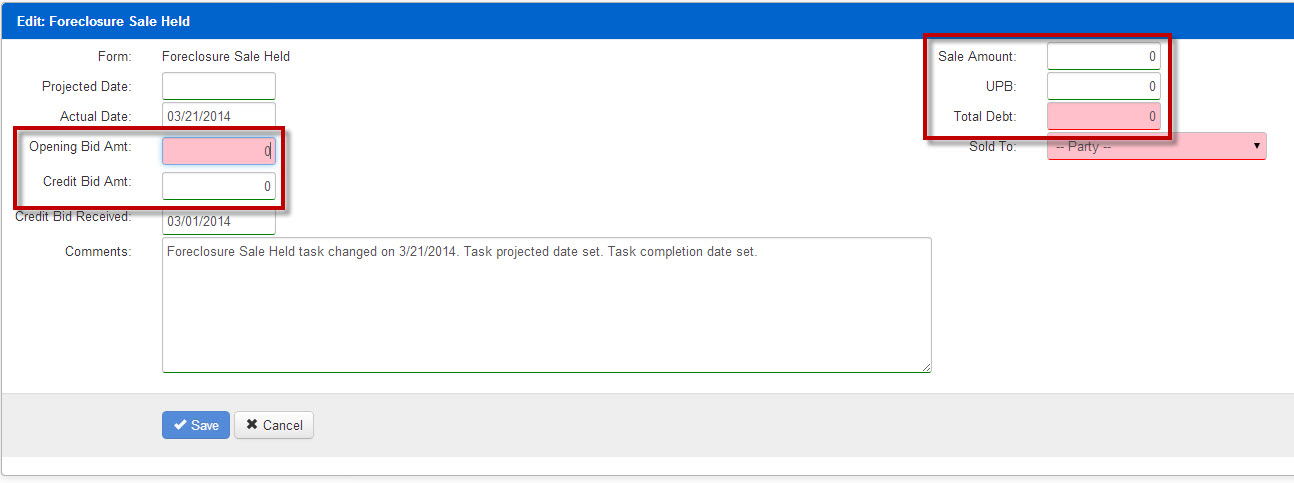
5. Select a date for Credit Bid Received.

6. Sale Amount must be greater than 100 when Sold To is either Third Party or Undisclosed.
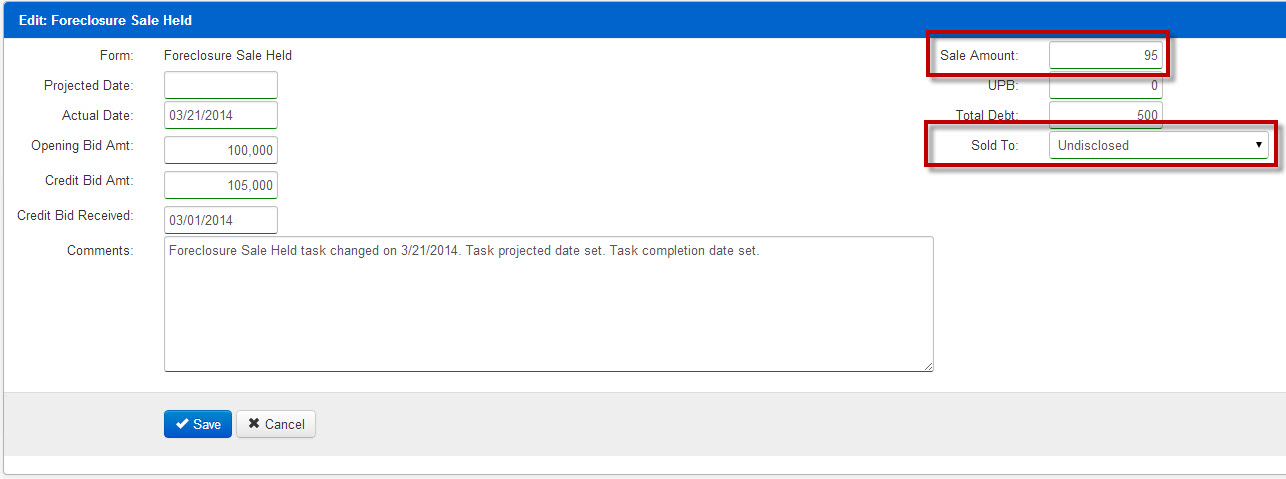
7. Sold To options are: Back to Beneficiary, Third Party, Reverted to Senior, Undisclosed.
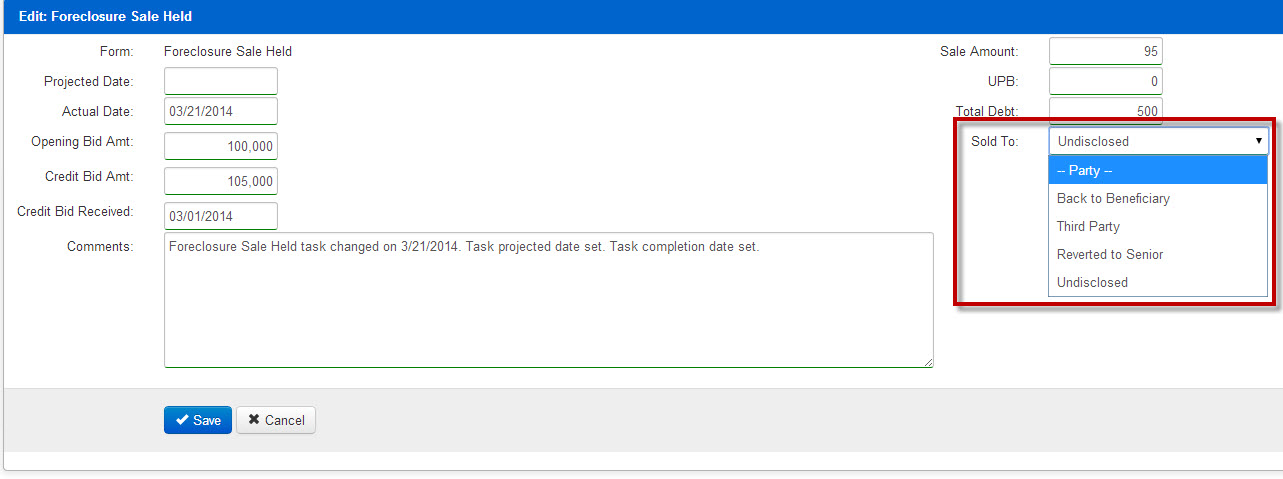
8. When Third Party is selected, Third Party Contact fields are displayed. All elements require a value in order to save.
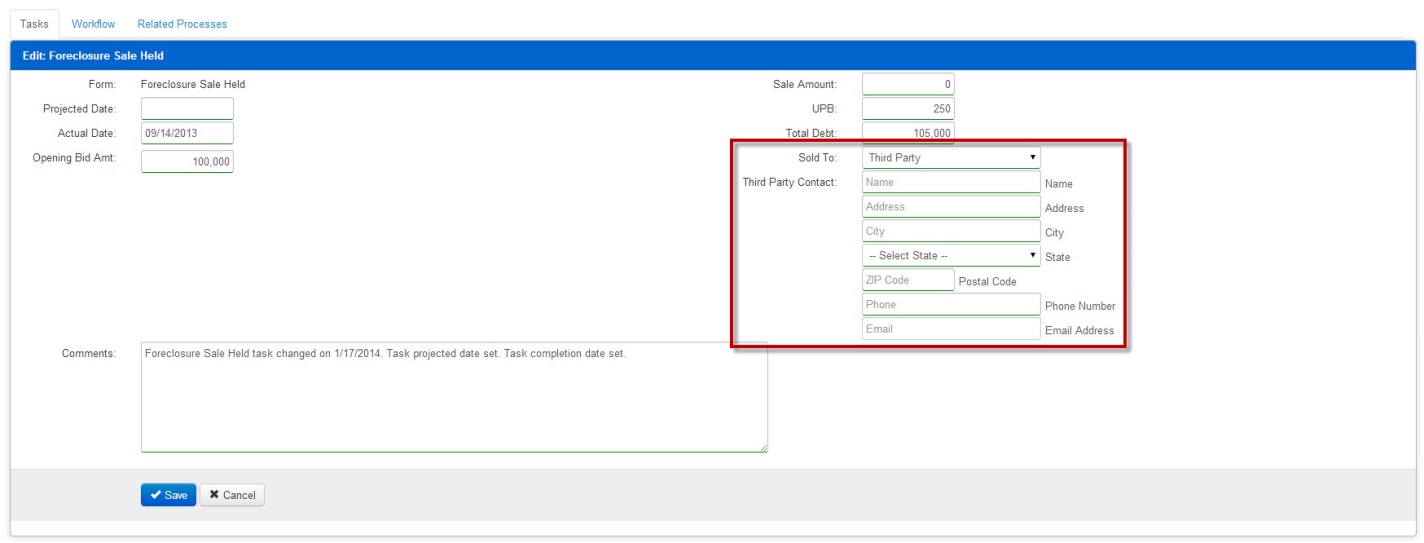
9. Once all data has been entered, click Save.
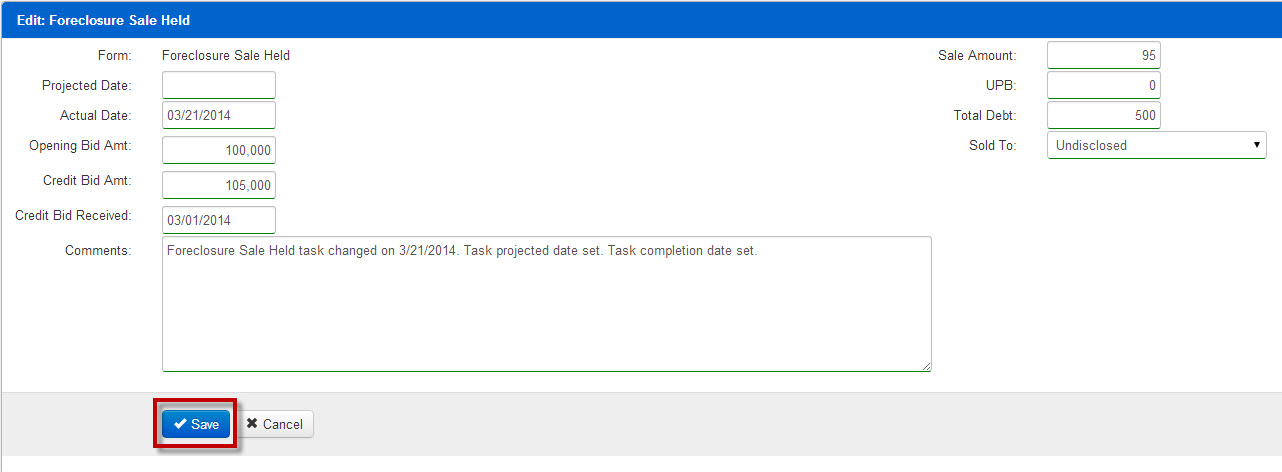
10. Actual Completion column is populated with the date entered in the Actual date field.
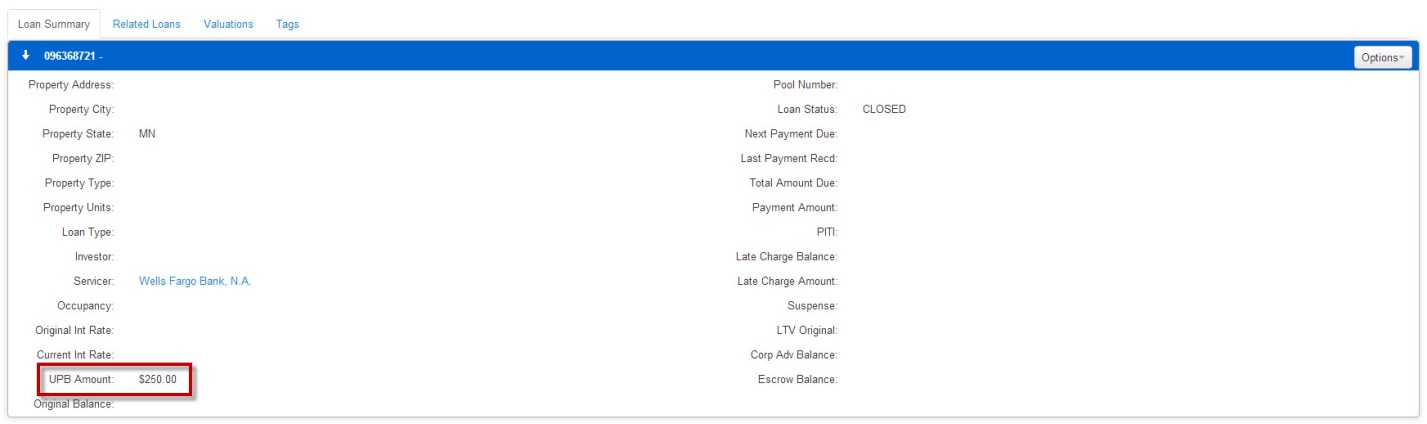
11. Refresh the page and verify the appropriate values are displayed in the Foreclosure panel. Some values will be displayed by expanding the view. To expand the Foreclosure panel, click on the “down arrow” to the left of “Foreclosure” in the blue bar. For Internet Explorer Version 8 and older, the “down arrow” is not displayed, so you will need to click on the white space to the left of the word “Foreclosure”.
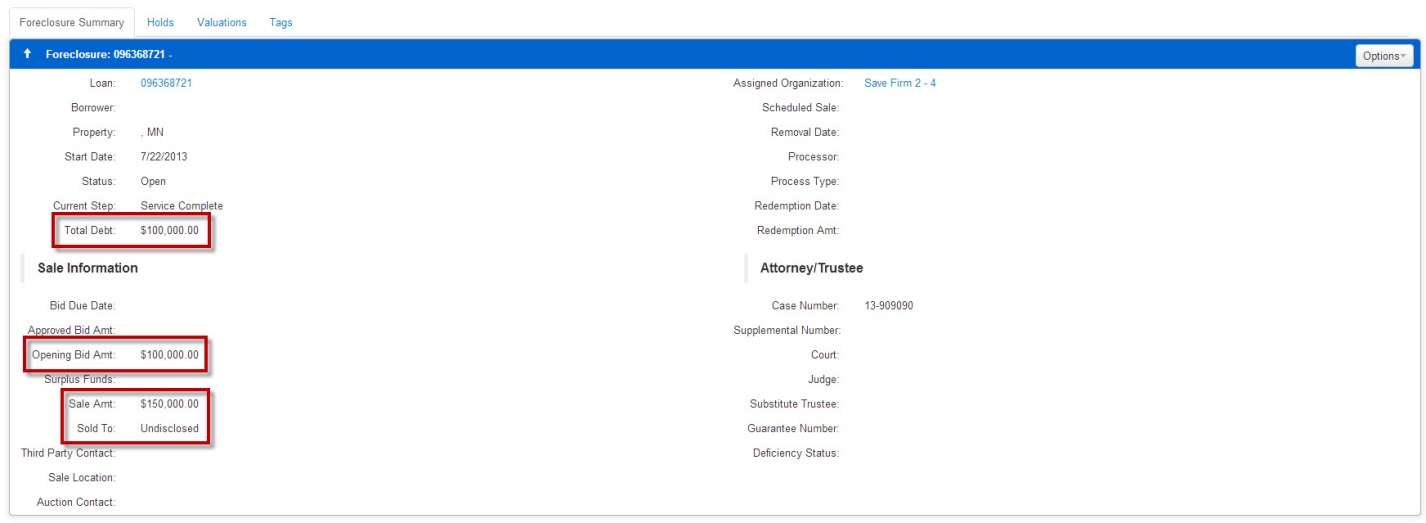
12. You may view the UPB amount entered by accessing the loan’s summary page. This can be accessed from the foreclosure file by selecting the loan number in the “Foreclosure Summary” panel.

13. On the loan’s summary page, review the “Loan Summary” panel and confirm the entered “UPB Amount”.
6.3 Reprojecting a Task
Tasks cannot be reprojected to a past date. For example, the current date is July 1, 2013; the Projected Date must be greater than July 1, 2013. If you enter a date that is less than the current date, you will receive the following error message:
Tasks cannot be reprojected to a past date
PLEASE NOTE: Your screens may slightly differ from what is below.
1. Click on task name hyperlink

2. Task opens in Edit mode (your screen may slightly differ from below).
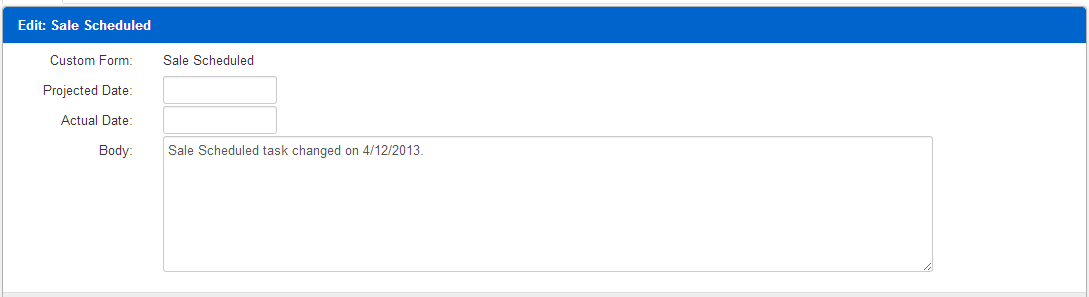
3. Enter the date the task is expected to be completed in the Projected Date field.
4. Enter commentary in the Body field.
5. Click Save.

6. The projected date has been updated.

**Sale Scheduled date cannot be projected more than 360 days from the existing projected dated****
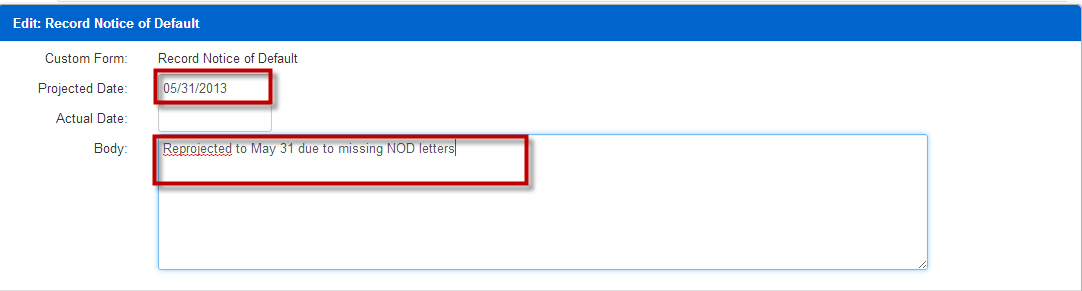
6.4 Reprojecting Foreclosure Sale Held Task
PLEASE NOTE: Your screens may slightly differ from what is below.
Reprojecting the Foreclosure Sale Held Task now requires a reason for the reprojection.
- Click on the Foreclosure Sale Held hyperlink.

2. Enter the date the task is expected to be completed in the Projected Date field. As with all other task reprojections, this date must be in the future.
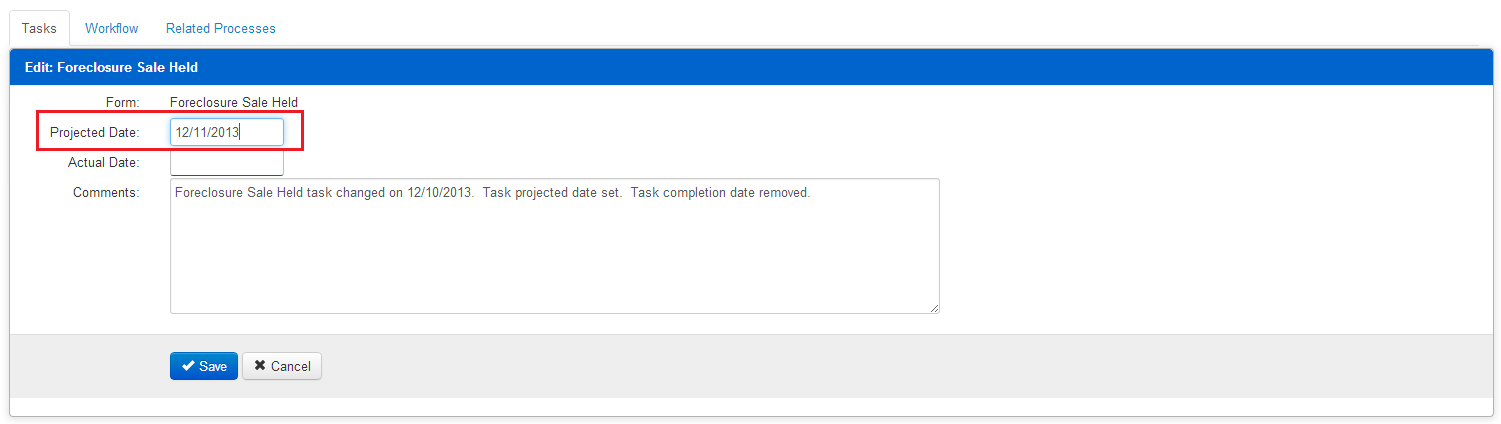
3. A drop down list is presented, requiring a reason for the reprojection. Options are listed in the screenshot below.
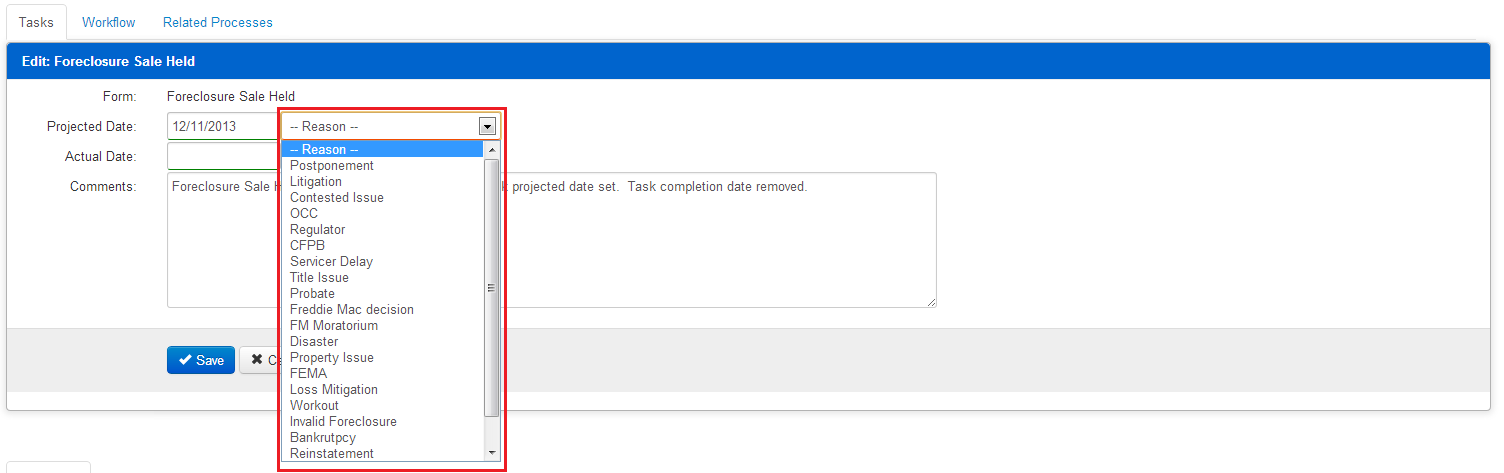
4. Select the appropriate reason and click Save.
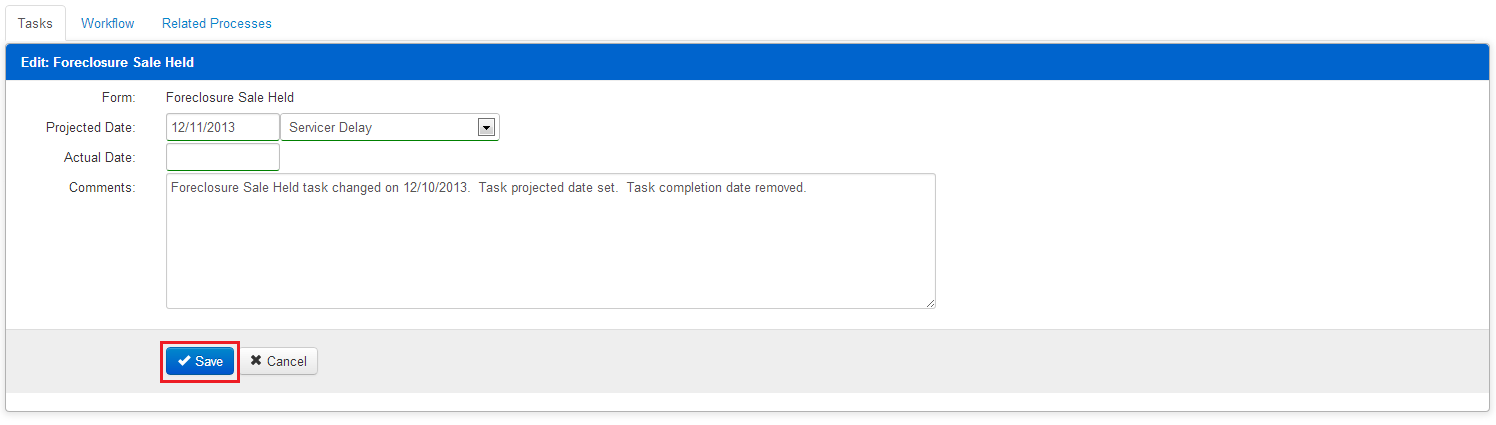
5. The Projected Completion Date is now populated in the Tasks panel.

6.5 Bulk Updating Tasks
The ability to bulk update Tasks is now available in the production environment. These are the step-by-step instructions:
- Run the ADR – Case Load Next Task Due report
- Add two columns to the far right, ensuring that all other columns remain untouched. These columns will be titled “ActualCompletion” and “ProjectedCompletion”, as shown here.
- You will likely need to sort and filter the spreadsheet before adding the columns and projections/completions If you do, make sure the entire spreadsheet is sorted, so none of the ID columns get misaligned with the rest of the data. This is very important, as misalignment of the data will lead to incorrect Tasks being updated.
- The rules for the dates that you’ll enter in these columns follow the same rules as if you were entering them from the front end, i.e. can’t complete a Task in the future, can’t project a Task in the past, etc. You will also find that Tasks that require additional data to be entered when completing also cannot be updated using this function. Examples of this are Complaint Filed (requires Court Case Number) and Sale Held (requires sale and bidding information).
- Once you’ve entered all of your projection and completion dates in columns Y & Z, save it to your desktop (or some other location on your machine that you’ll remember)
- Navigate to Home >> Import Files and in the panel on the left, labeled Import Dashboard, you’ll select Bulk Task Updates
- Drag and drop the file from the location you chose into the blue bar and ensure it appears in the panel below it.
- Refresh the lower panel until it reaches a terminal status (Complete or Error).
- If it lands at an error, contact support@quandis.com for further assistance.
- If it lands at Complete, you can click on the link in the Import File column, then select the Logging tab to review the update operations. If there are any errors, you can click on the error message and it will tell you why it failed (i.e. business rules such as future dates being used for completion). You can either correct those from the front end by navigating to each individual case, or correct them within the spreadsheet and resubmit those rows.
- Validate the updates are accurate by navigating to a subset of the cases and reviewing their Projected and Actual Completion Dates
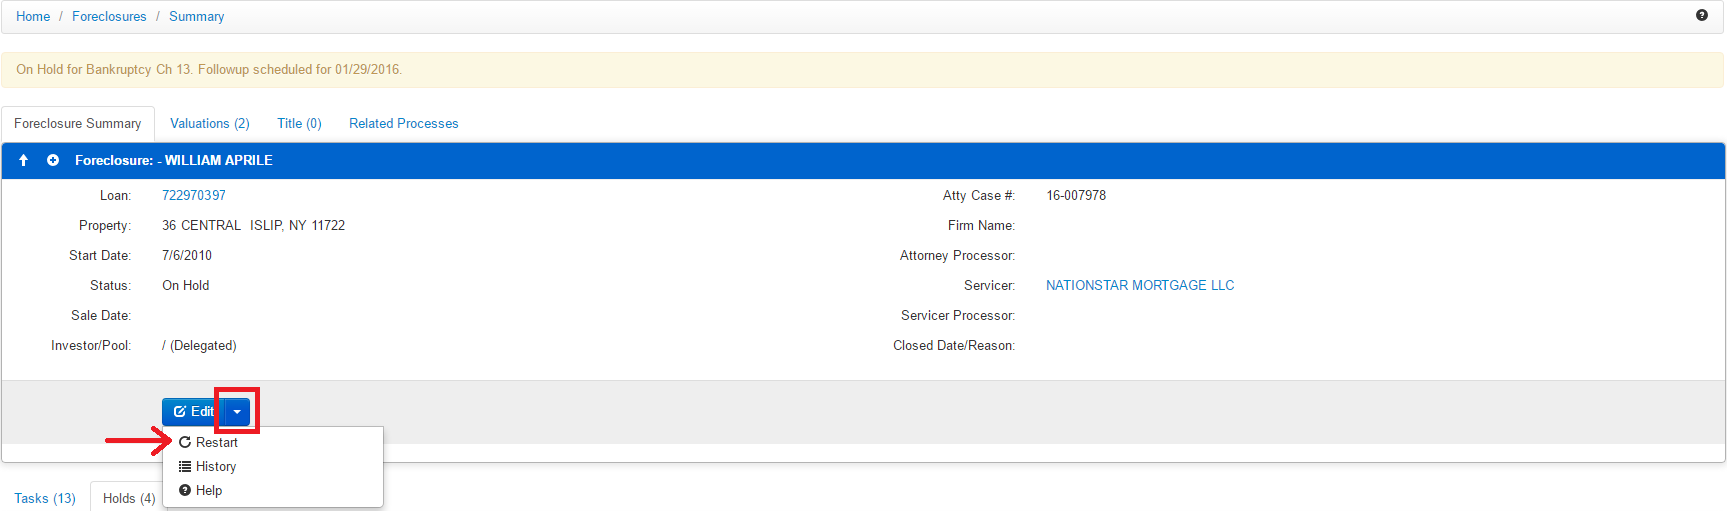
7 Restart Foreclosure Process
If a Foreclosure needs to be restarted for any reason, you may choose to close the file out (see Section 8) and open a new file, or you can use the Restart function.
- From the Foreclosure Summary panel, mouse over the dropdown menu next to the “Edit” button and select “Restart”
- In the popup window, enter the new/correct Start Date in the Restart Date field, and provide the reason for the Restart, then click “Save”.
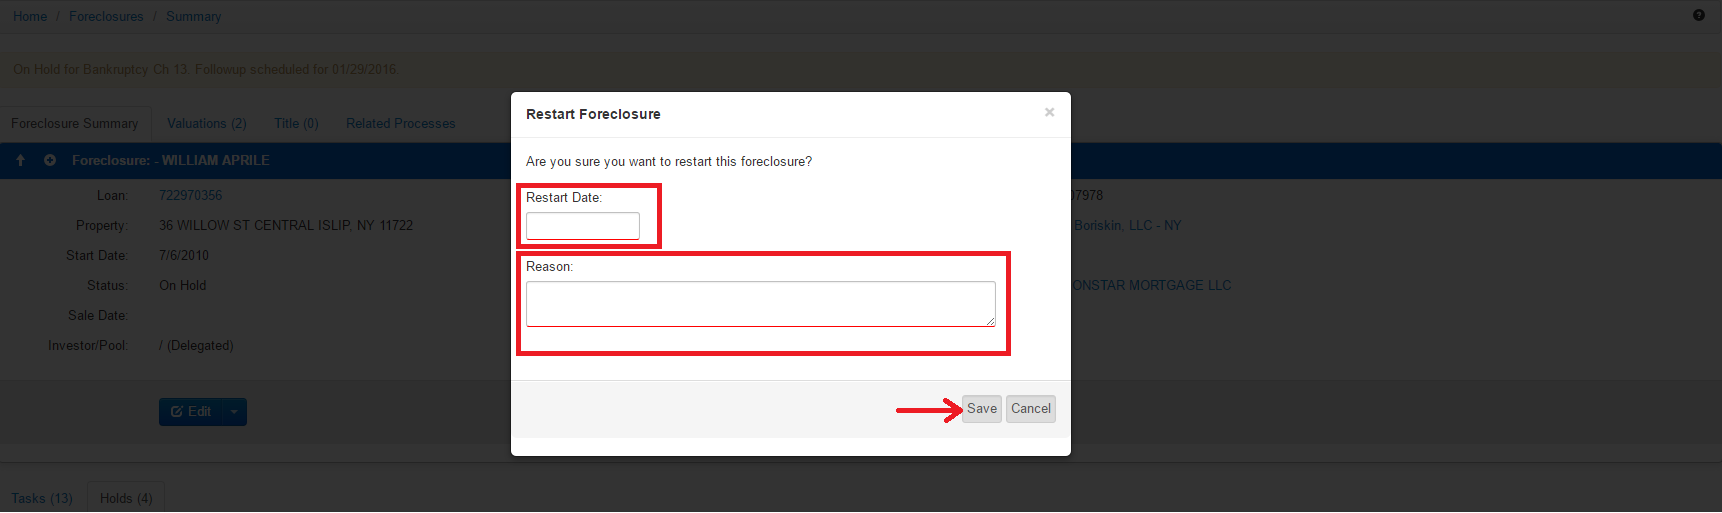
- The Foreclosure Start Date will be set to the Restart Date provided, and a new Timeline will be launched, allowing the Restart Date to be used as the Foreclosure File Received Task’s Completion Date. A Message will also be created, for auditing purposes.
8 Closing the Foreclosure
If a Foreclosure has gone to sale, has been opened in error, or you’ve been instructed that the file should not be open for any other reason (i.e. Servicer Request), the file will need to be closed. If an incorrect Start Date was entered, you may also choose to close the file out to allow a new file to be opened, or Restart it (see Section 7).
- To close a file, choose the Foreclosure Summary tab, and select “Edit”, as highlighted below.
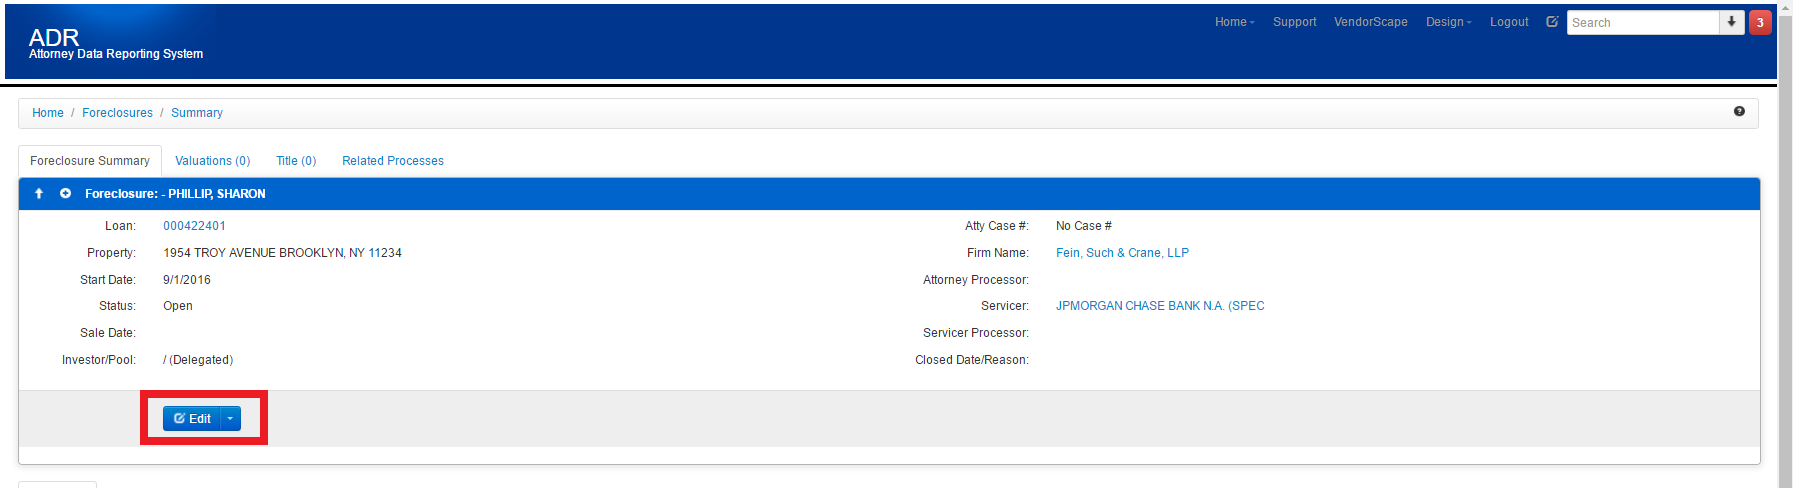
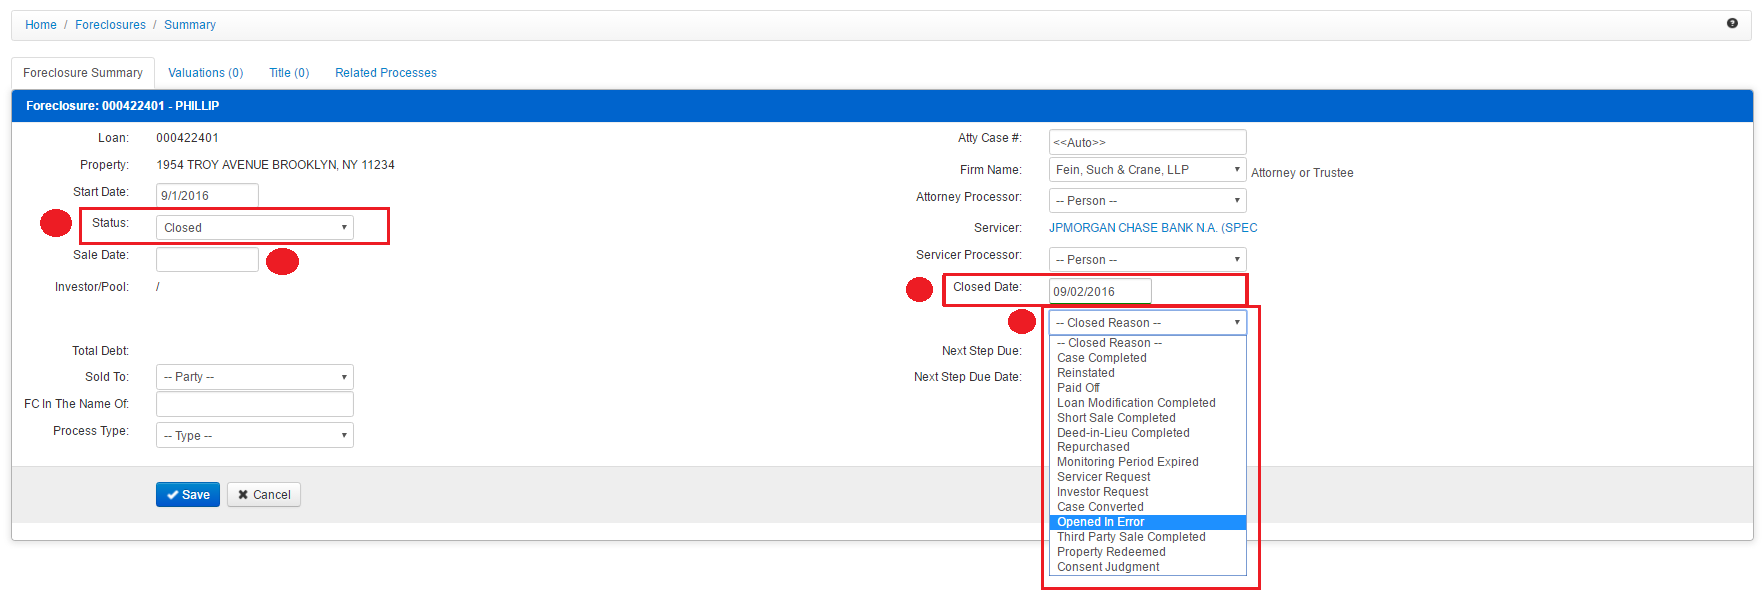
- The Status will need to be set to “Closed”, and a “Closed Date” and a “Closed Reason” will need to be chosen.
NOTE: IF THE FORECLOSURE HAS GONE TO SALE, THE SALE DATE WILL NEED TO BE ENTERED (as seen below the Status dropdown box).
- Once all required fields are entered, choose “Save” (the blue button in the bottom left), and the File has now been closed, leaving you with the option to open a new Foreclosure if needed.
NOTE: The system will provide you with a prompt if the required fields are not completed when trying to close the file.
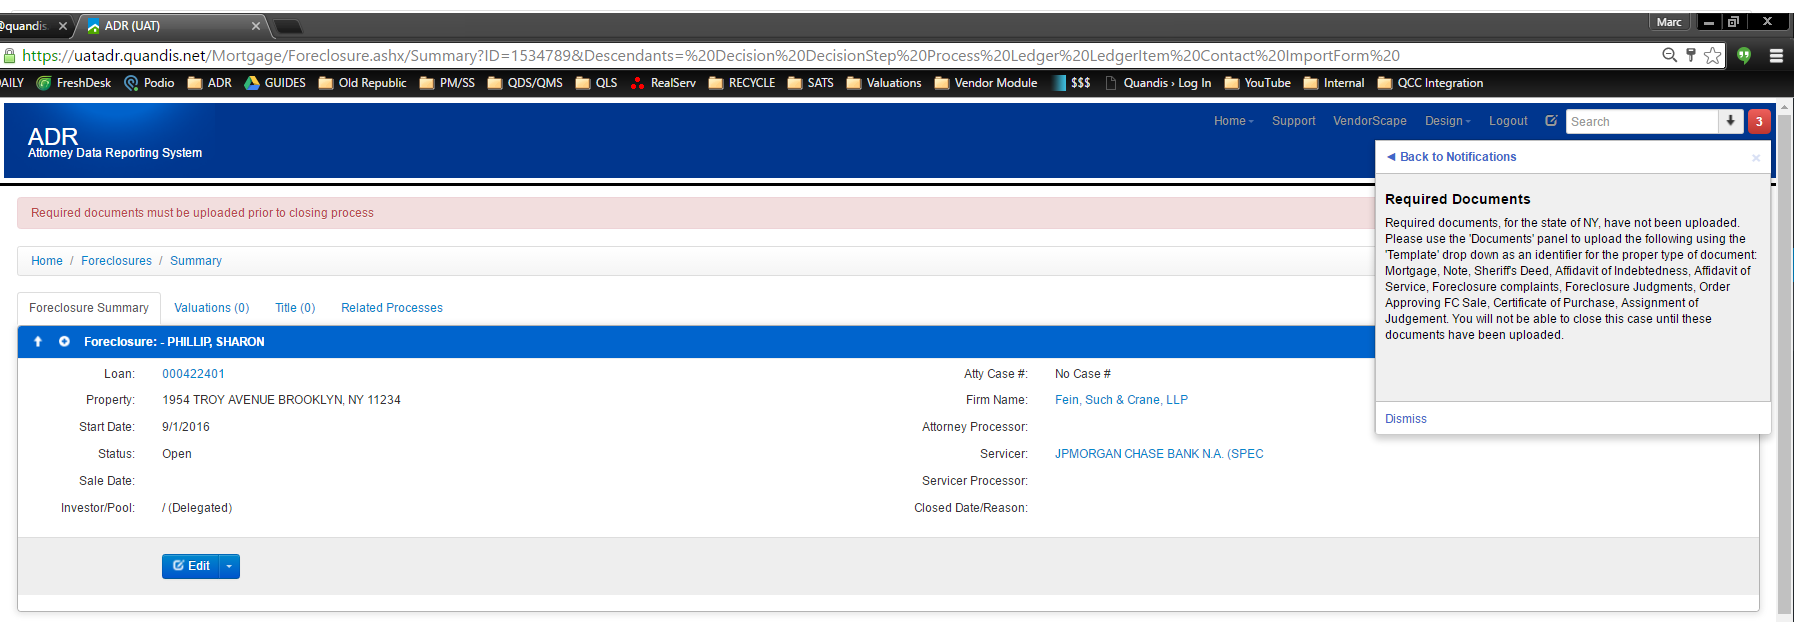
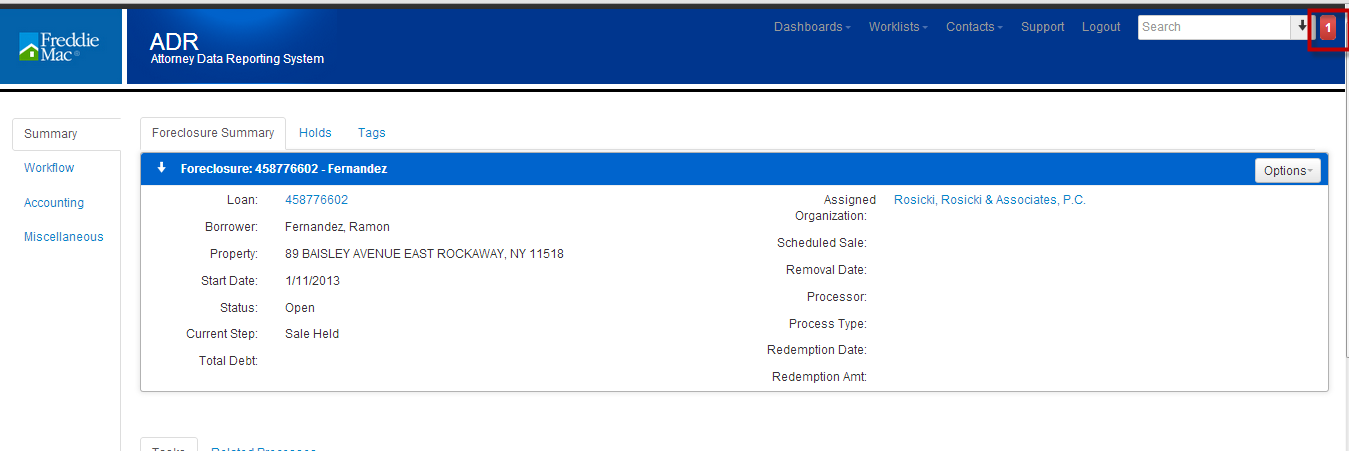
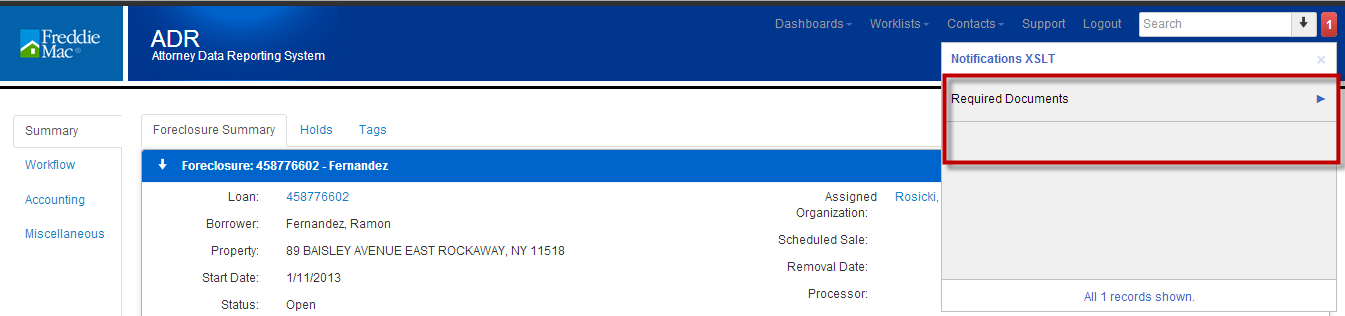
NOTE 2: You may also be required to upload Required Documents in order to close the file. - If Required Documents are required, the system will alert you prior to closing the file. You can see the Required Documents by accessing the Red Button icon in the top right, which will reflect a number of items that require your attention. In the example below, there are 3 things needed, including Required Documents, before the file can be successfully closed.
8.1.2 Closing a Foreclosure that has gone to Sale
Closing a file that has gone to sale requires that the Sale Held task be completed within the Foreclosure Tasks list first, which will often be the final task to complete. Once this task has been completed, Sale information will be populated in the Foreclosure Summary panel (the same location where you would close a file).
After the Sale Held Task has been completed, you will follow the previous steps regarding the closing of the Foreclosure File and choose “Case Completed” or “Third Party Sale Completed” as the Closed Reason.
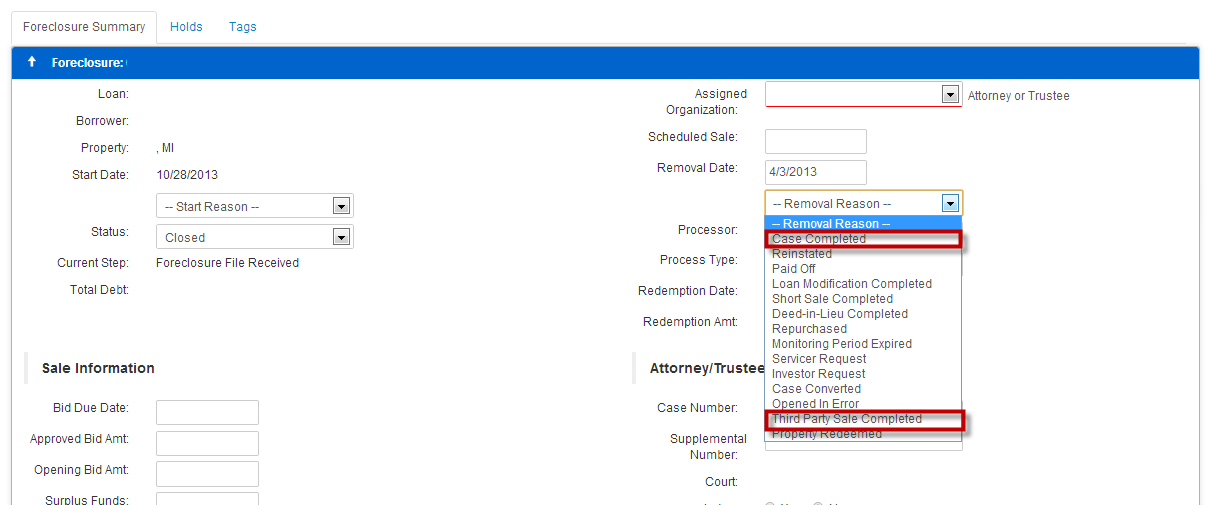
8.1.3 Removal Reason
NOTE: Your screen may look different than what is shown below. However, you should be able to close the file based on previous instructions regarding how to close a file.
- Enter date the Foreclosure is being closed.

2. Select either Case Complete or Third Party Sale Completed from Removal Reason drop down menu.
8.1.4 Deficiency
- THIS SECTION WILL BE UPDATED WHEN DEFICIENCY IS ADDED
8.1.5 Adding Required Documents
Freddie Mac has identified specific states wherein a deficiency will be pursued. You can view which documents are required via the Required Documents tab in the Support drop down. You can also view which documents are required on loan level by reviewing the Priority message. NOTE: This only applies when the Removal Reason being set is either “Case Completed” or “Third Party Sale Completed”.
8.1.6.1 Required Document List
- Click on Support.

2. Click on the Required Documents tab.

3. The first page of states and territories is presented.
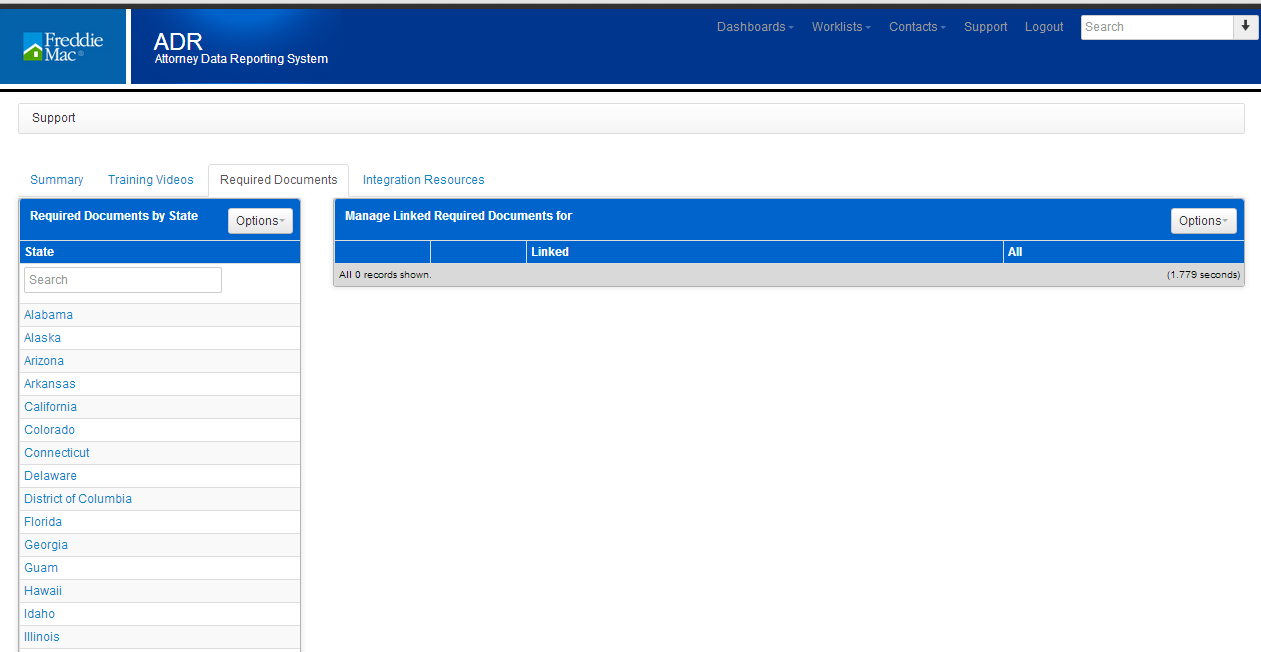
4. If your state is not on the first page, click on the number hyperlink to navigate to the next page.
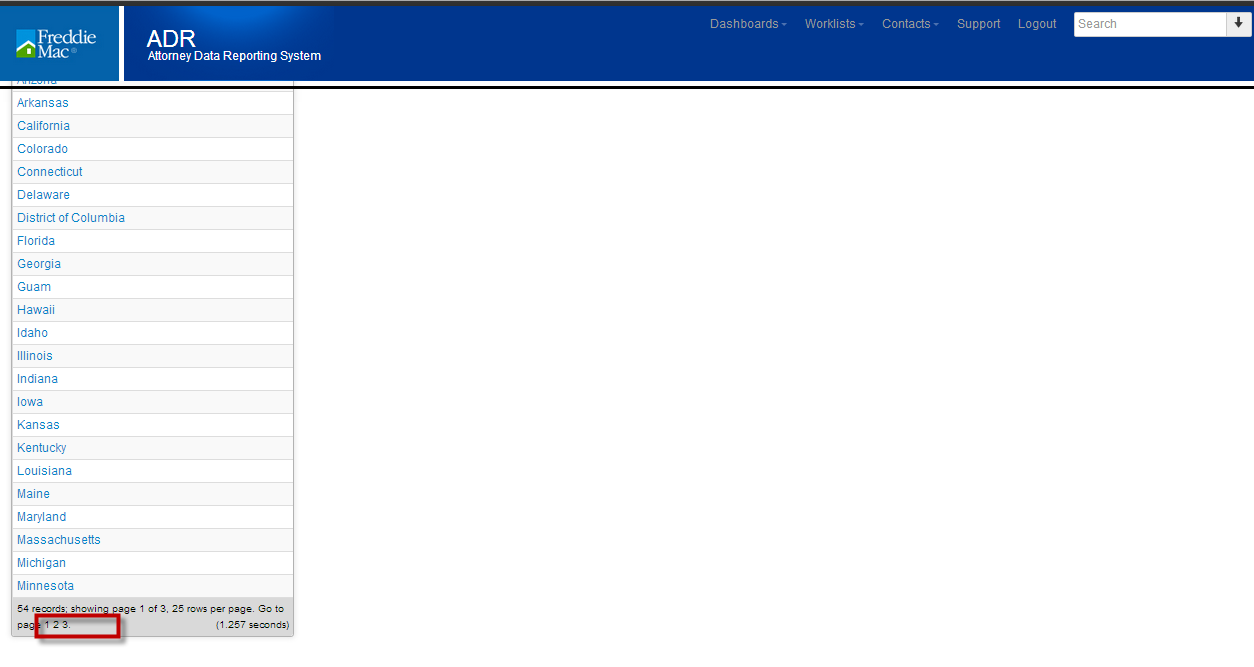
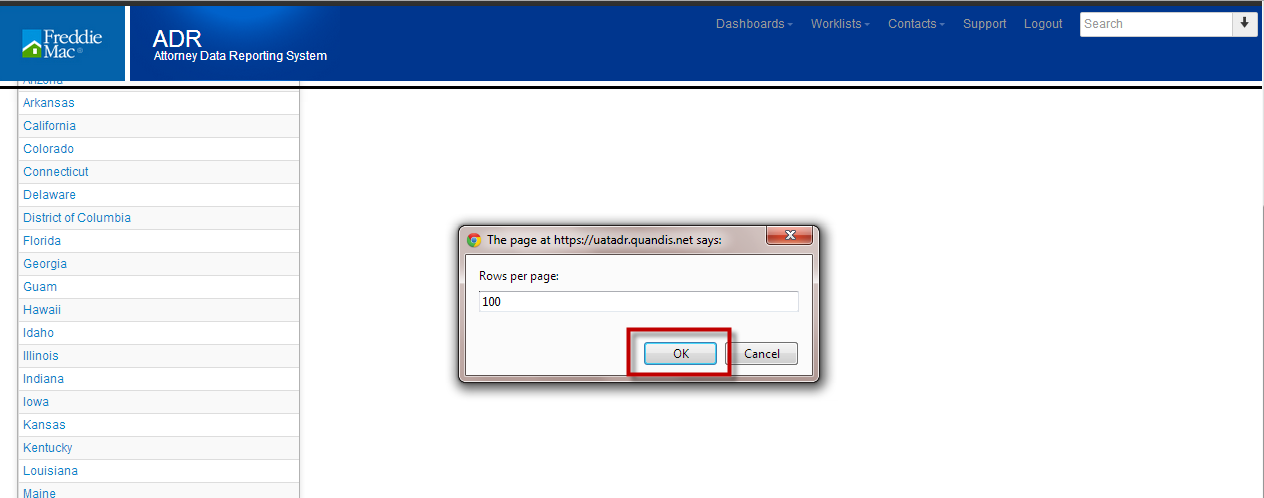
5. If you want to view all states and territories on one page, click on 25 rows per page hyperlink.
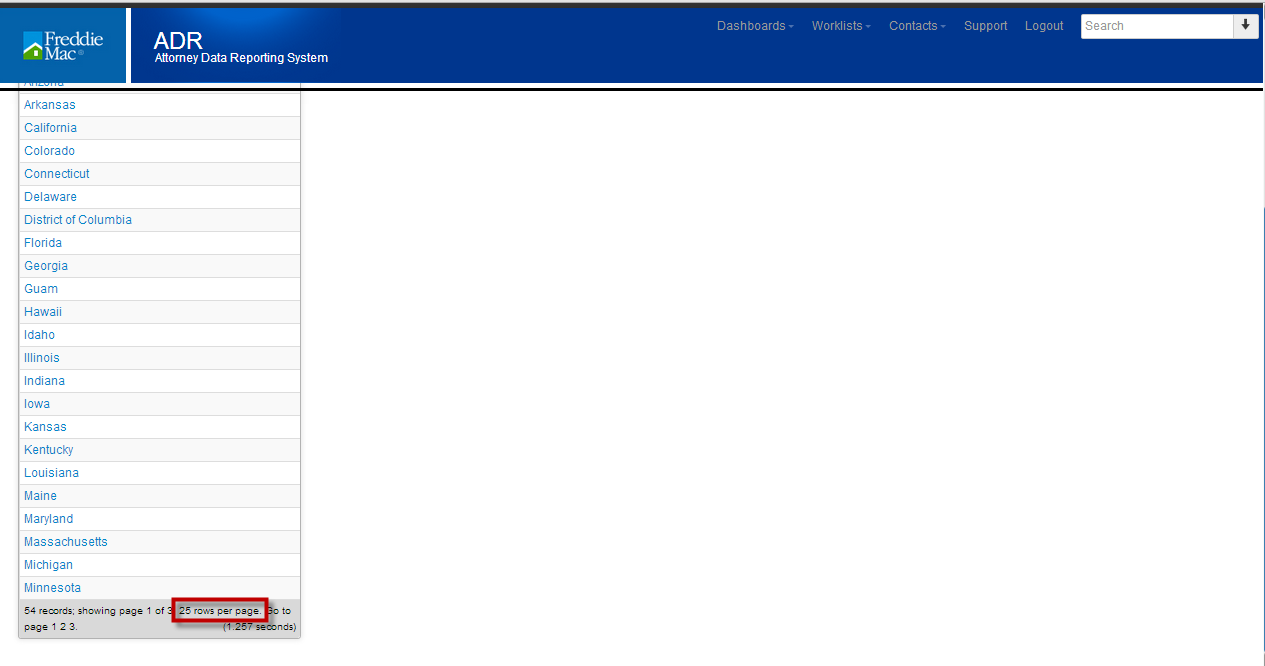
6. A Rows Per Page dialogue box opens. Enter the number of entries you want to see one page. In this example, 100 was entered.
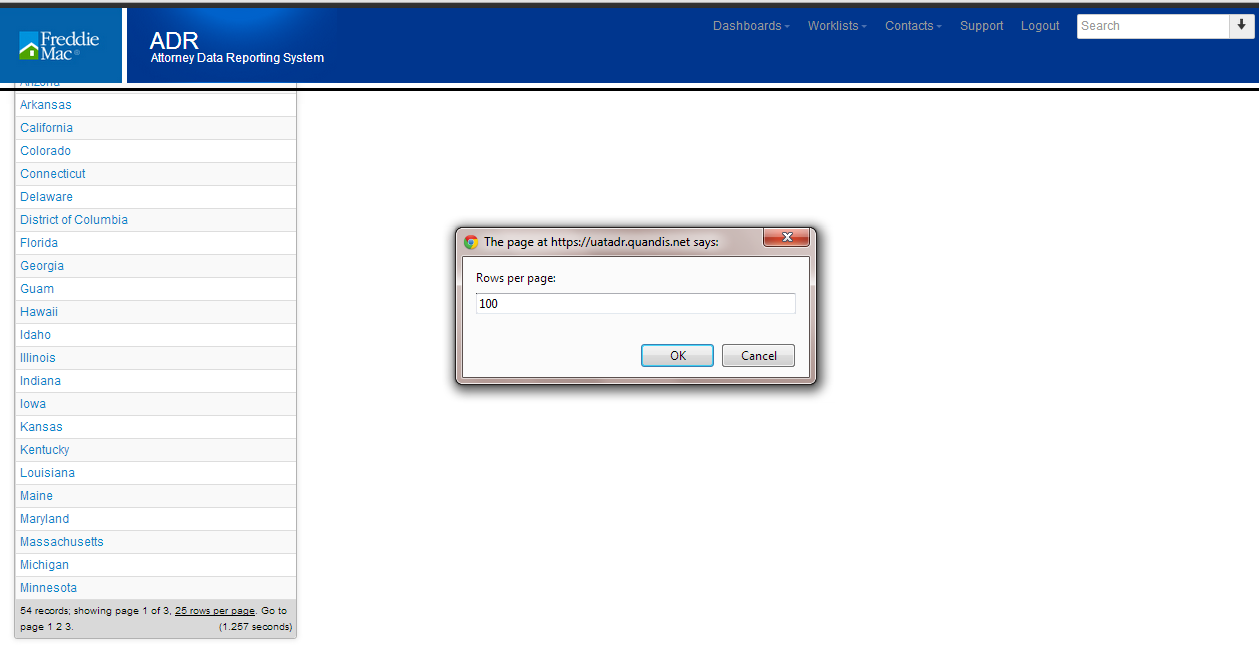
7. Click OK.
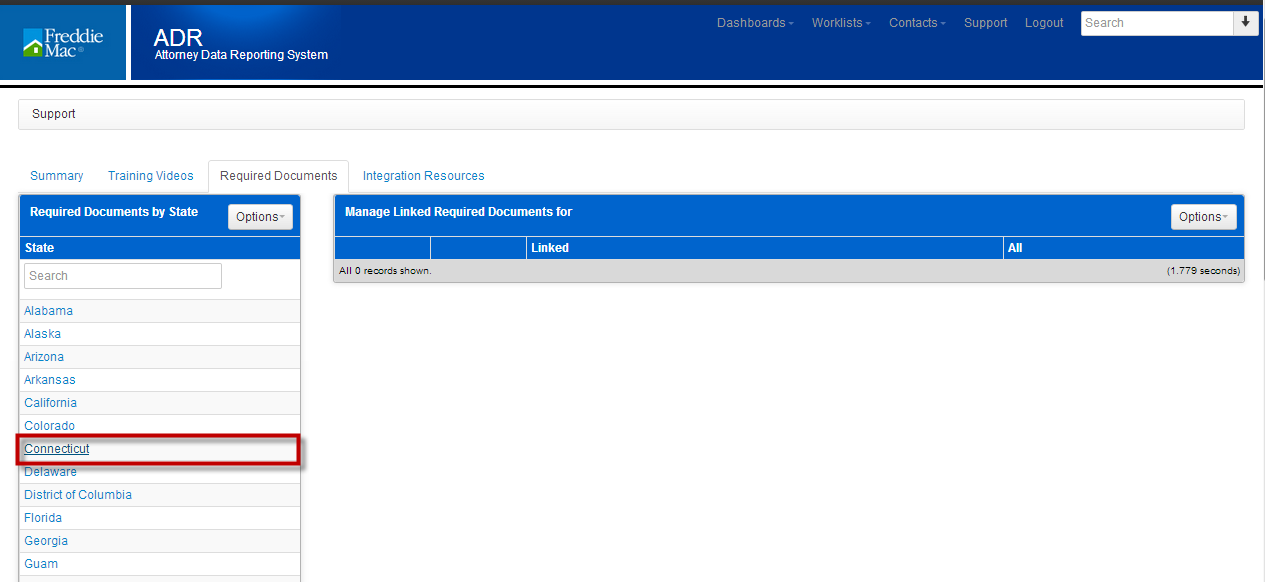
8. All states and territories are visible on one page.

9. Once you have located your state, click on the state hyperlink. In this example, Connecticut was selected.
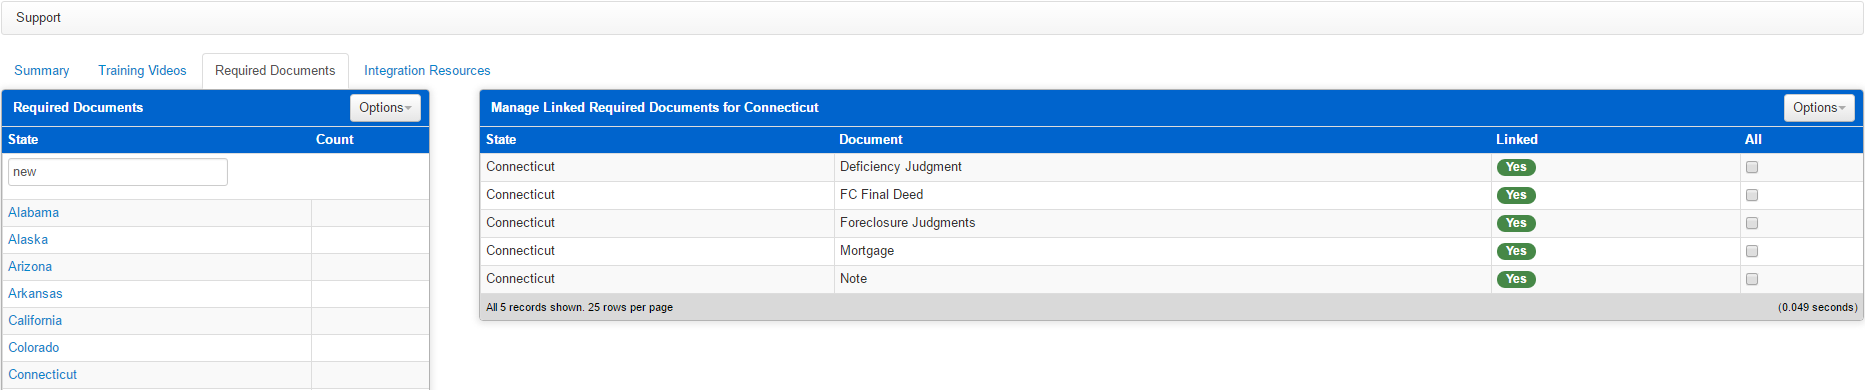
10. In the below example, there are 5 documents that are required.
11. If you would like to view all possible documents that can be uploaded, but are not required, select Show Non Required documents from the Options Drop down.
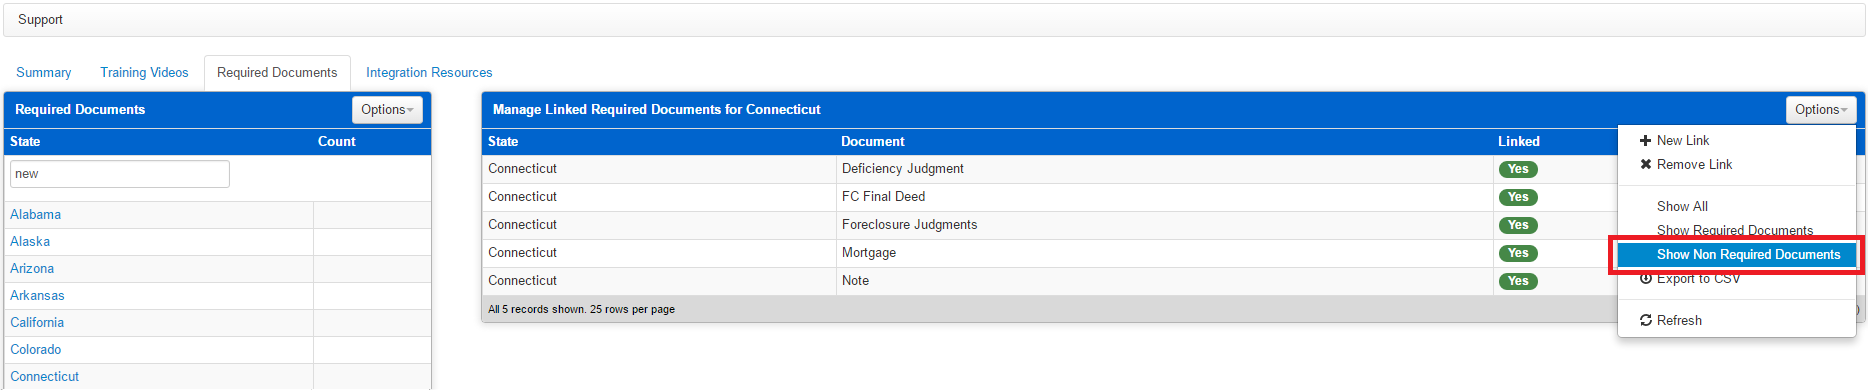
12. If you would like to limit your view to the Required Documents, select Show Required Documents from the Options drop down.
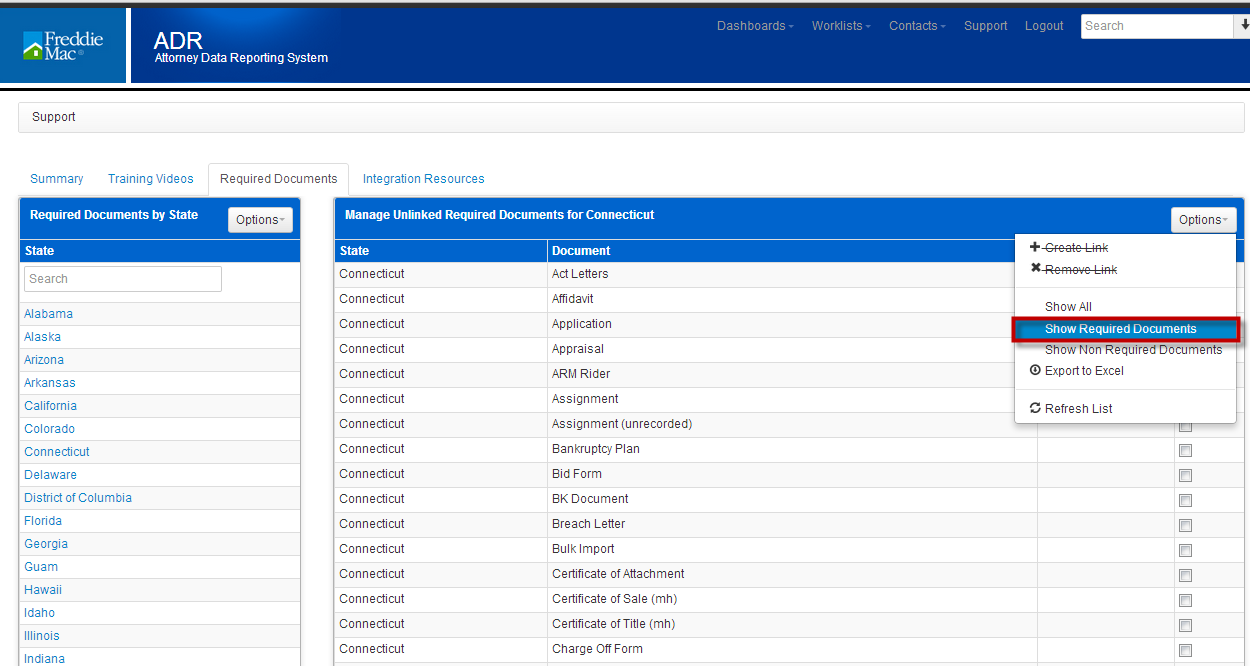
13. To export the list of documents into an excel spreadsheet, select Export to CSV from the Options drop down.
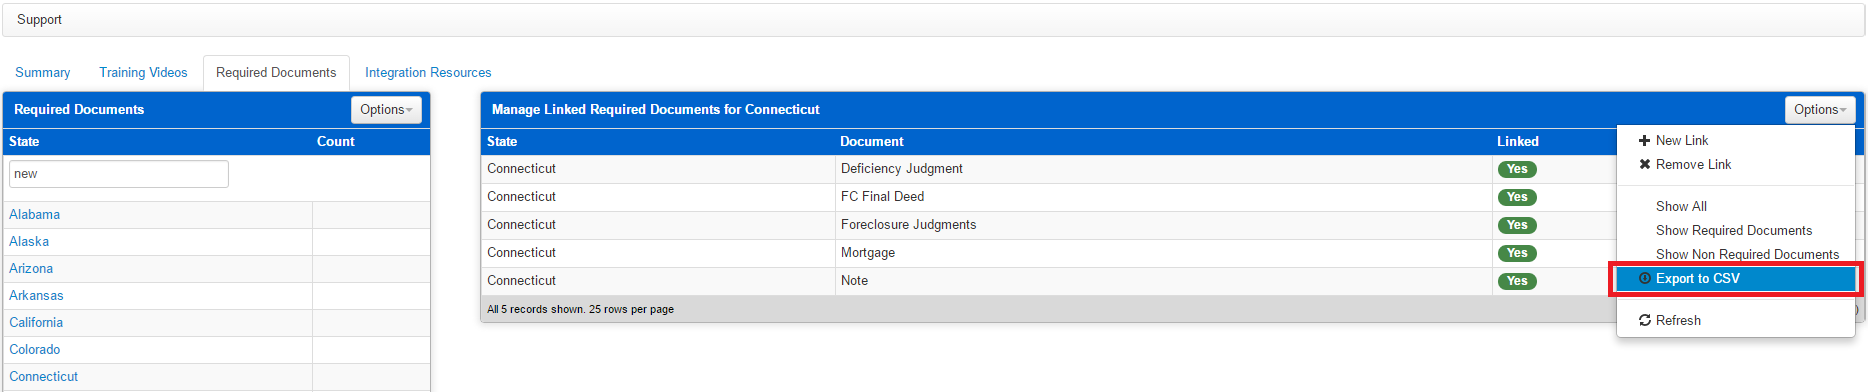
14. The spreadsheet will be formatted as follows:

If you do not upload all required documents, you will receive the following error message whenever you try to close the foreclosure:
![]()
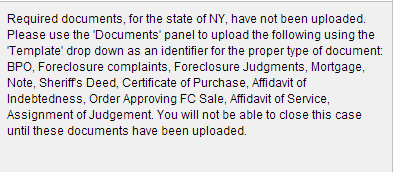
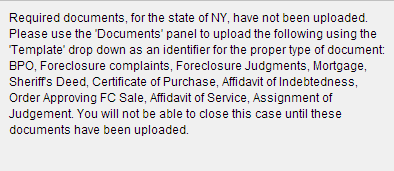
8.1.6.2 Priority Message
- You can view the documents required on a per loan basis by reviewing the Priority Message.
- Click on the Priority Message icon at the top right of the Foreclosure Summary page.
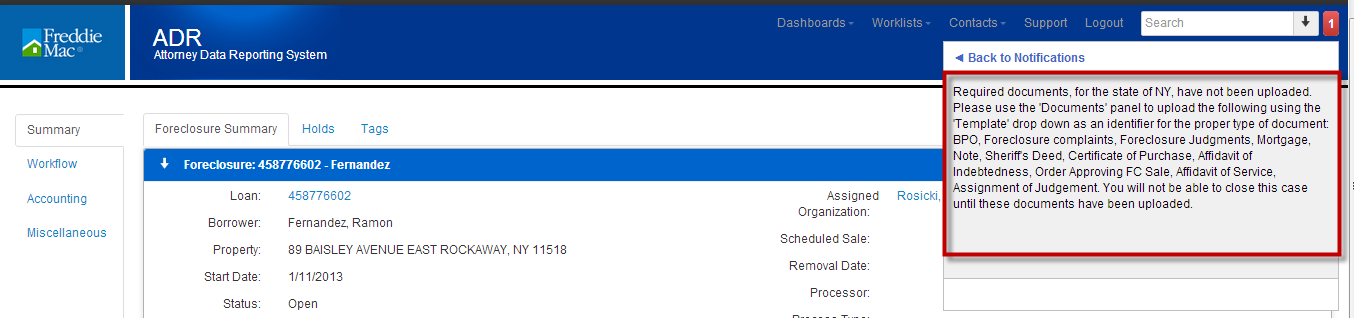
3. Click on Required Documents

4. A list is presented of documents that are required.
5. Whenever a document is uploaded, it is removed from the priority message list.
6. In this example, the following documents are required:
7. Notice the Note is listed as a required document.
8. Once the Note has been uploaded.
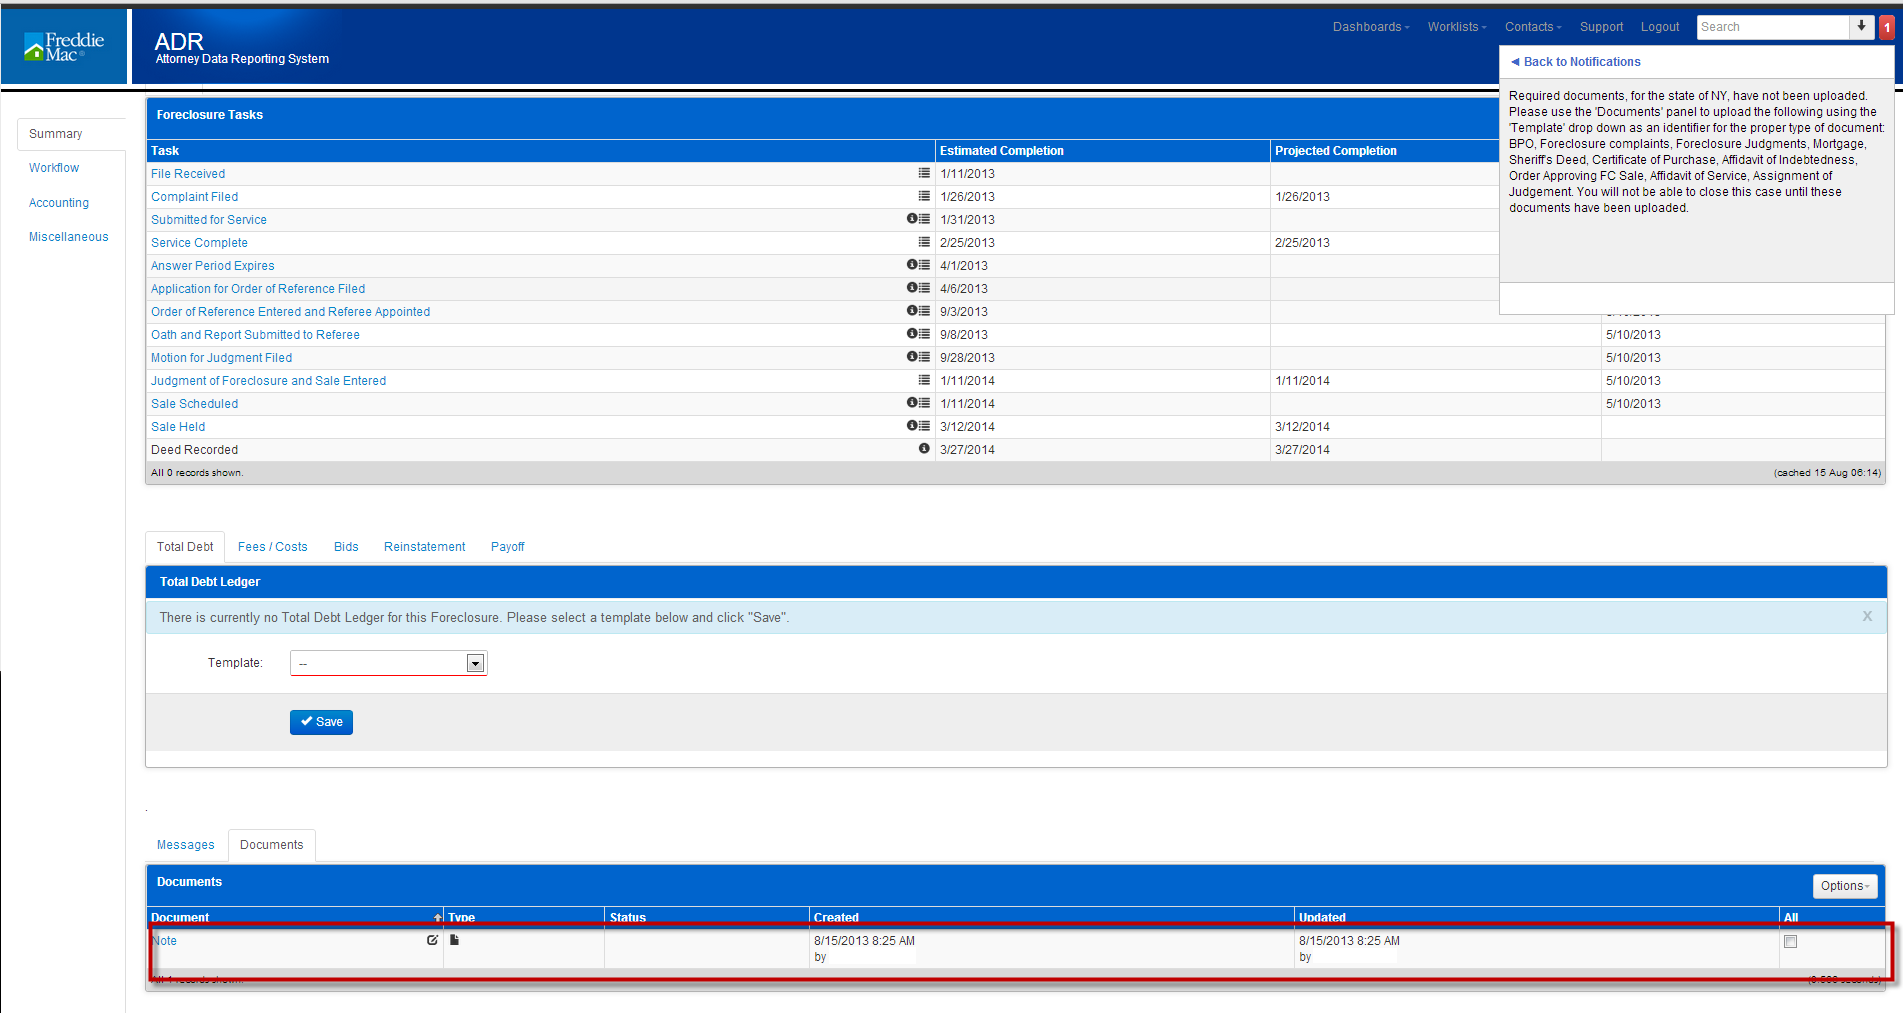
9. The Note is no longer listed as a required document.
10. Close the priority message by clicking in the priority message box.
11. Navigate to the list of all Notifications by clicking the Back to Notifications link.
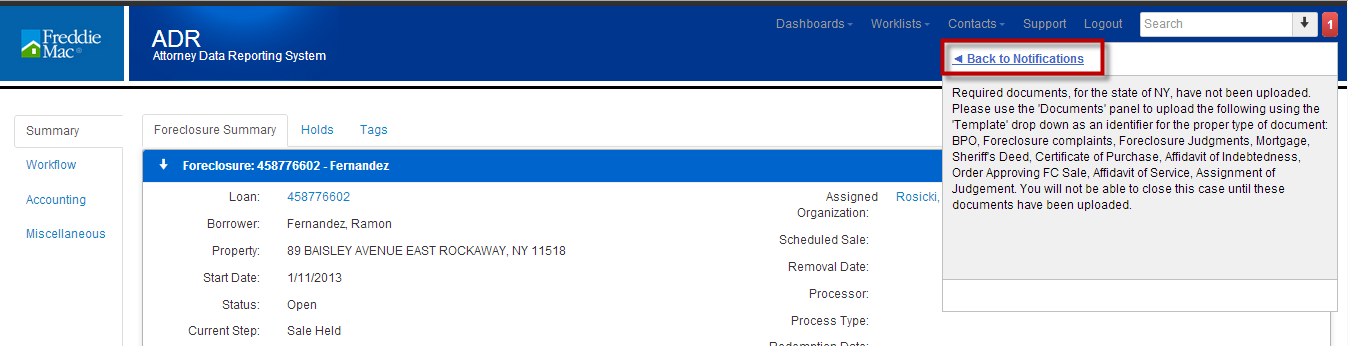
12. You are navigated to the Priority list.
****PLEASE NOTE FORMATS THAT CAN BE UPLOADED ARE PDF, .DOC and .DOCX.
****IF YOU ARE USING IE10, CHROME OR ANY OTHER HTML5 COMPLIANT BROWERS, THE DOCUMENT SIZE IS NOT LIMITED****
****IF YOU ARE USING IE8 OR IE9. THE DOCUMENT CANNOT BE GREATER THAN 2 MB IN SIZE****
8.1.6.3 Uploading a document
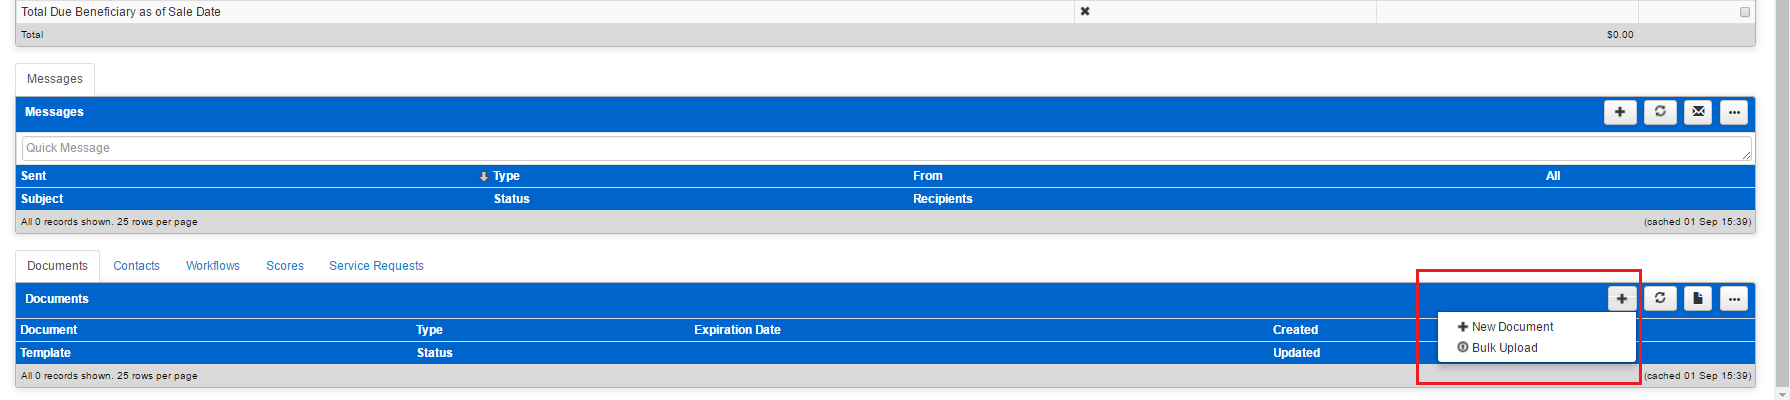
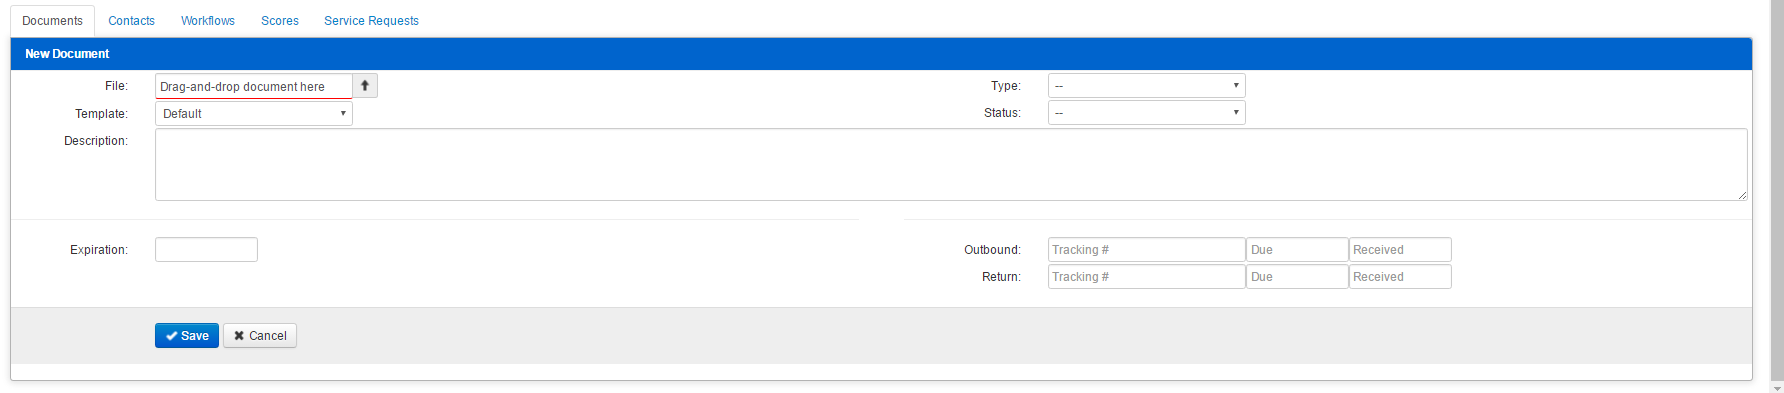
1. Click on the documents tab and then click on the “+” icon on the right, followed by “+New Document“
NOTE: You may see different tabs on your screen than what is below. However, you should be able to see the Documents Tab as one of your available tabs.
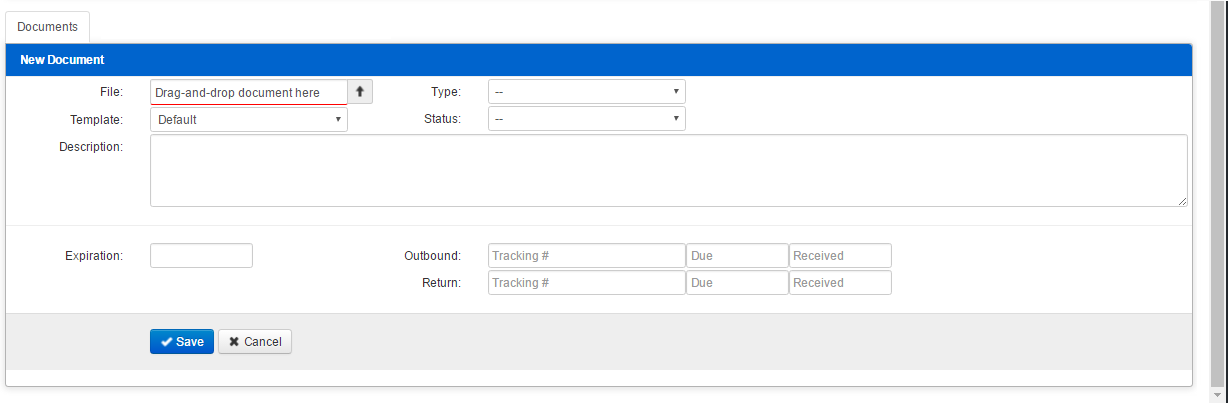
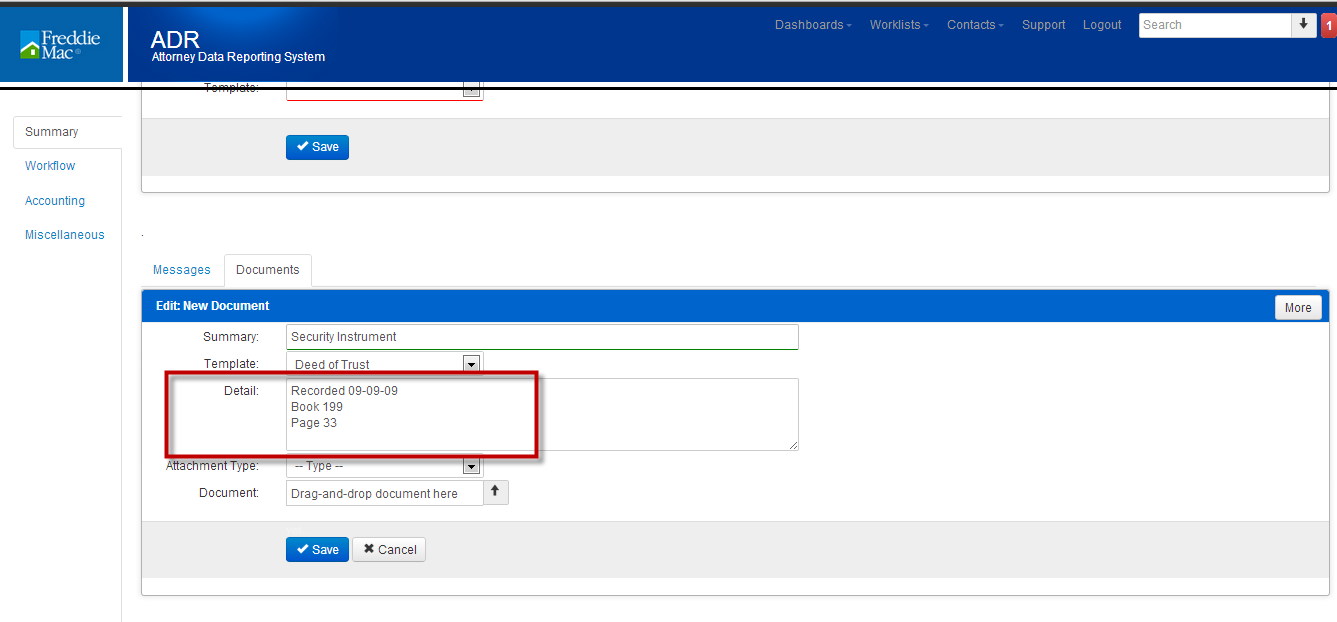
2. Click the arrow icon or Drag-and-Drop to upload your document. Be sure to select the Template that matches what is being asked of the Required Documents section, as the Template is most important in letting the system know that you have uploaded what is needed.
Once the Required Document is uploaded, click Save and move forward.
NOTE: The Template is what informs the system what document you are uploading. If you mislabel the template, even though the attachment/document you have uploaded is correct, the system will still show that this document is required. You must select the template that is reflecting the document requested- make sure this matches what is being asked as indicated by the red icon in the top right corner of the foreclosure summary page.
3. Enter details about the document being uploaded. This is not a required field.
9 Opening a Bankruptcy
All fields underlined in red are required fields.
Please note: The loan information may not be populated when you try to open the Bankruptcy. Freddie Mac provides limited loan information prior to cases being opened. Once the Bankruptcy case has been opened, the loan and property information will populate within 24 to 48 hours.
9.1 Opening a Motion for Relief (MFR) and a Proof of Claim
- Click on the Bankruptcy tab followed by the “+” icon on the right, then either a New Motion for Relief (MFR, which is also a bankruptcy) or New Proof of Claim.
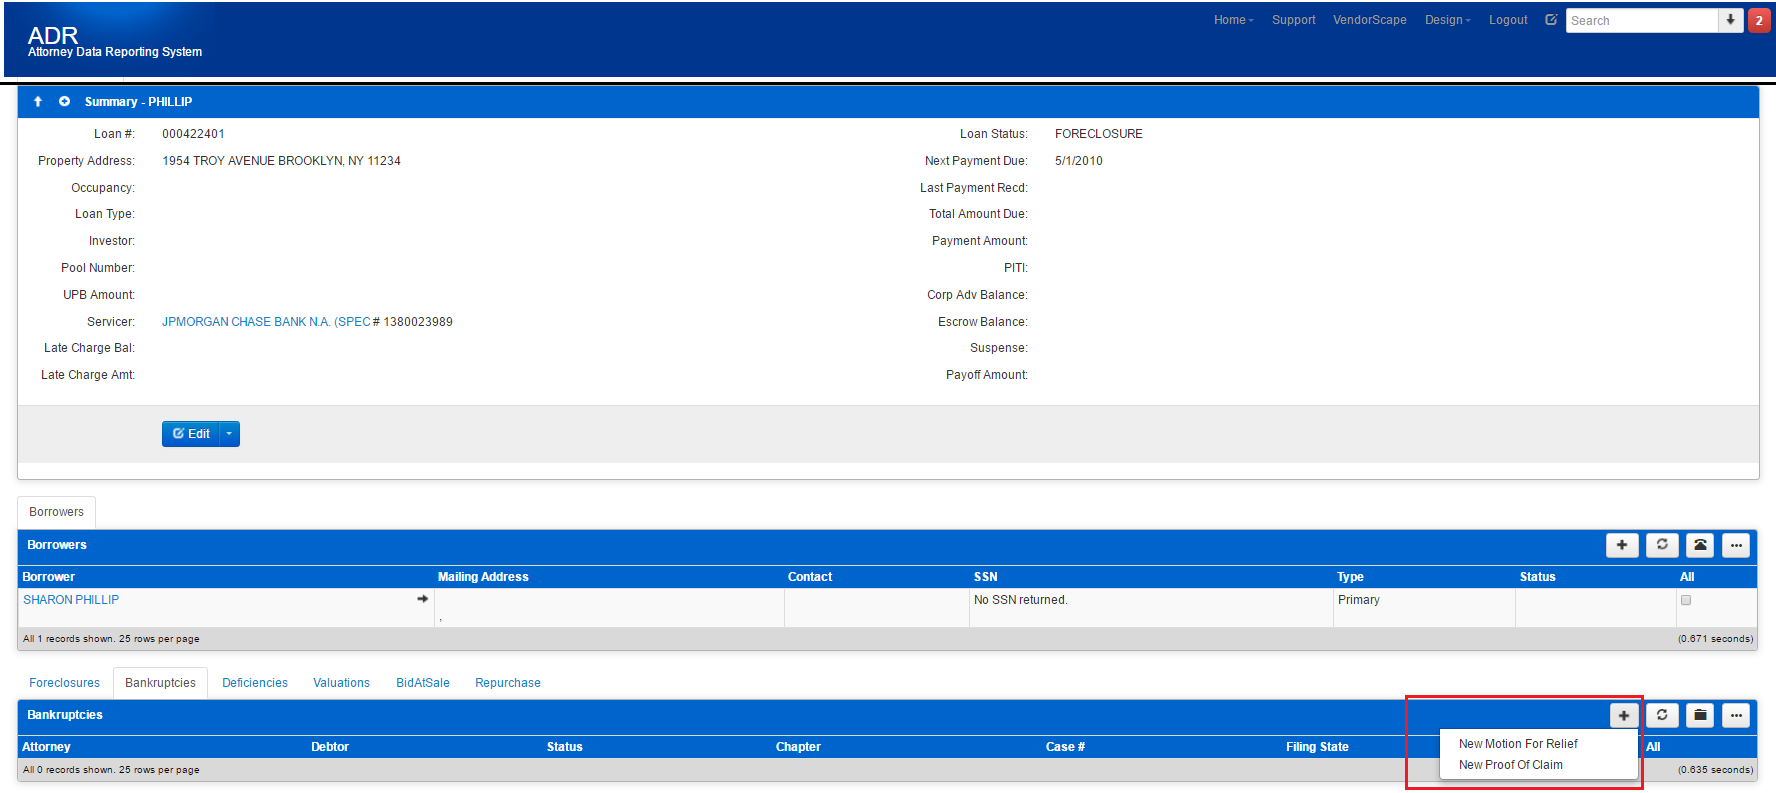
2. The necessary fields to properly open a Bankruptcy (MFR) or a Proof of Claim are as follows:
- State of Filing
- Filing Date
- Court
- Case Number
- Chapter
These 5 fields are required, however, please be sure to fill out any additional section that may apply, or if you have that information that can be entered such as the Atty Case # and your Firm Name, both of which can be found on the top right hand side.
Once the above is completed, click the blue “Save” button, and the Bankruptcy or Proof of Claim will now be open. If you are missing something that is required, an alert will appear on this screen informing you what else is needed before the file can be successfully opened.
10 Completing Bankruptcy Tasks
The due date for the first task is based on the start date entered when the bankruptcy was opened. If an error was made in entering the start date, you will need to close the bankruptcy and open a new one. Please refer to the Closing the Bankruptcy section for instructions on closing a bankruptcy.
1. Click on the Tasks tab.

2. Just like you would a foreclosure, bankruptcy Tasks are completed the same way. You will access the current available task by clicking on the blue hyperlink. In the example photo above, this is the File Received task. Notice how it is the only task with the blue hyperlink, and the only task available. Also notice that the Estimated and Projected dates have been entered but not the Actual Completion date. Once the Actual Completion date has been entered, the next available task (POC Filed) will become available.
NOTE: The Projected date may not require being entered, but the Actual Completion date, and Comments must be entered. Then you may click the blue Save button and continue.
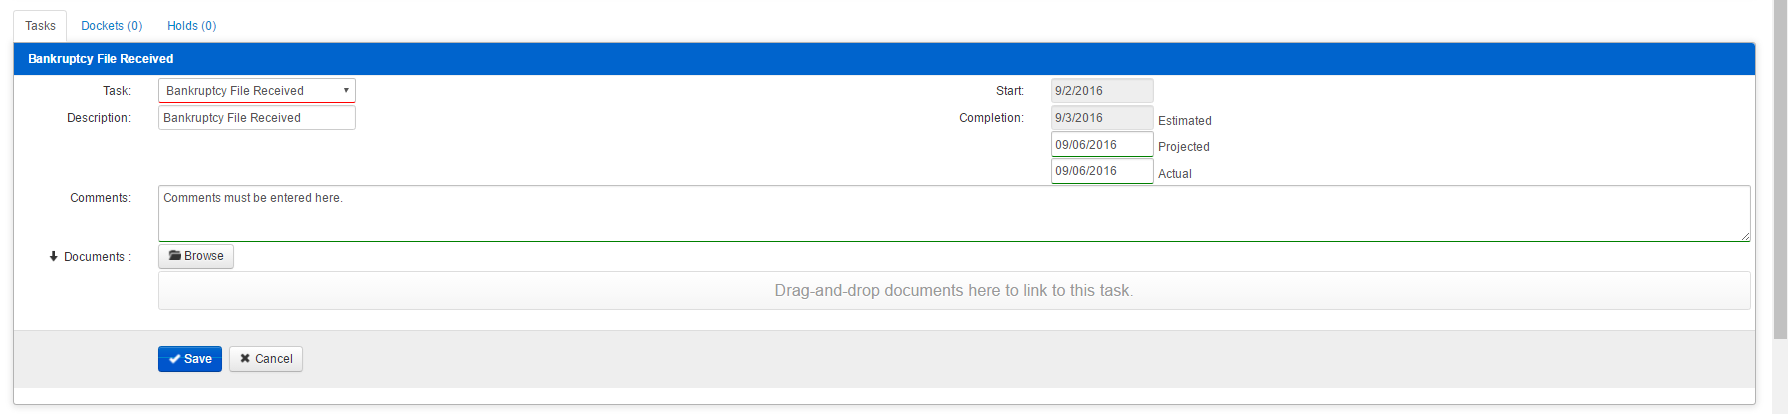
3. Continue repeating the process above, and be advised that some tasks will require the uploading of documents. The system will alert you of any documents that are required, which may be uploaded by clicking the “Browse” button in the screenshot above.
10.1 Viewing All Tasks
- By default, all tasks will be visible to you when working on a bankruptcy file.
10.2 Reprojecting a Task
Tasks cannot be reprojected to a past date. For example, the current date is July 1, 2013; the Projected Date must be greater than July 1, 2013. If you enter a date that is less than the current date, you will receive the following error message:
Tasks cannot be reprojected to a past date
- Click on task name hyperlink

2. Task opens in Edit mode.

3. Enter future date in the Projected Date field.
4. Enter commentary in the Body field.

5. Click Save.
6. The projected date has been updated.

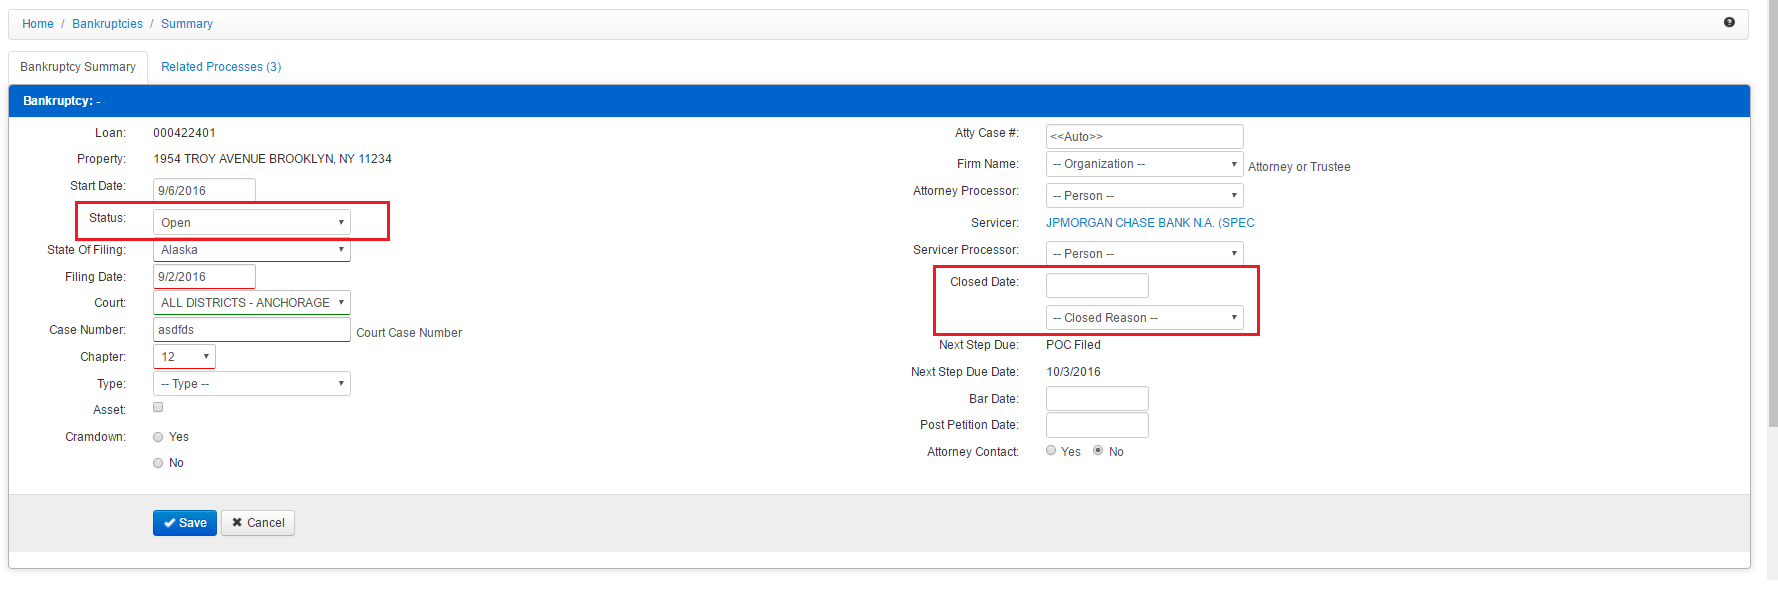
11 Closing a Bankruptcy
- Navigate to the Bankruptcy Summary page and select “edit” (the blue button).
- When closing a bankruptcy, the Status must be set to “Closed”, and a Closed Date and Closed Reason must be supplied. If any of these three elements are missing, the system will not allow the bankruptcy to be saved/closed out.
- Choose “Status” and select “Closed” from the dropdown, followed by entering a Closed Date and a Closed Reason that applies. Then click “Save” (the blue button).
12 Documents
- Uploading a document
- Click on the documents tab.

3. Click the “+” icon and choose “+New Document”

4. Select the Arrow Icon or Drag-and-Drop, to upload a file. Select a Template to match the document type (which needs to reflect the requested/required document, in order to appease the system), and enter a Description. Fill out any other text fields that may apply, though they are not necessarily required.
6. Click Save.
10. The document has been uploaded.
11. The document panel provides the following information:
Document name, user that uploaded the document, the date it was created, and date it was revised.

****Document types that can be uploaded include: PDF, Word, XLS, .PNG, .JPG, .JPEG
12.1 Viewing a document
Click on the document name hyperlink.

The document will open based on your settings for the document being viewed.
12.2 Deleting a document
- Click in the row of the document to be deleted.

2. Select Delete Selected Records from the Options drop down menu.
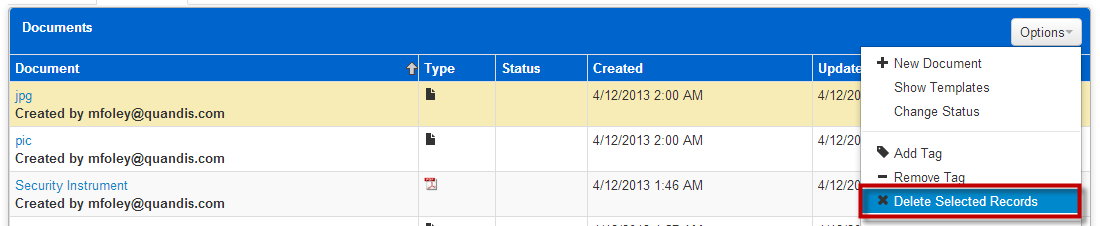
3. Confirmation dialogue box is presented.
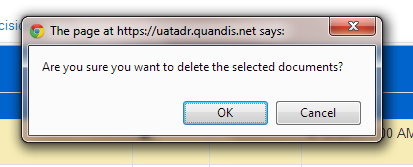
4. Click OK to confirm the document is to be deleted.
5. The document is deleted.

6. JPG document has been deleted.
13 Messages
- Click on the messages tab.

2. Select Add a new message by clicking the “+” sign on the right. .

3. The Message edit template opens. If a template is to be used, select the template from the drop down box. Template message will complete the subject line and body section. Otherwise, confirm Select is in the template field.
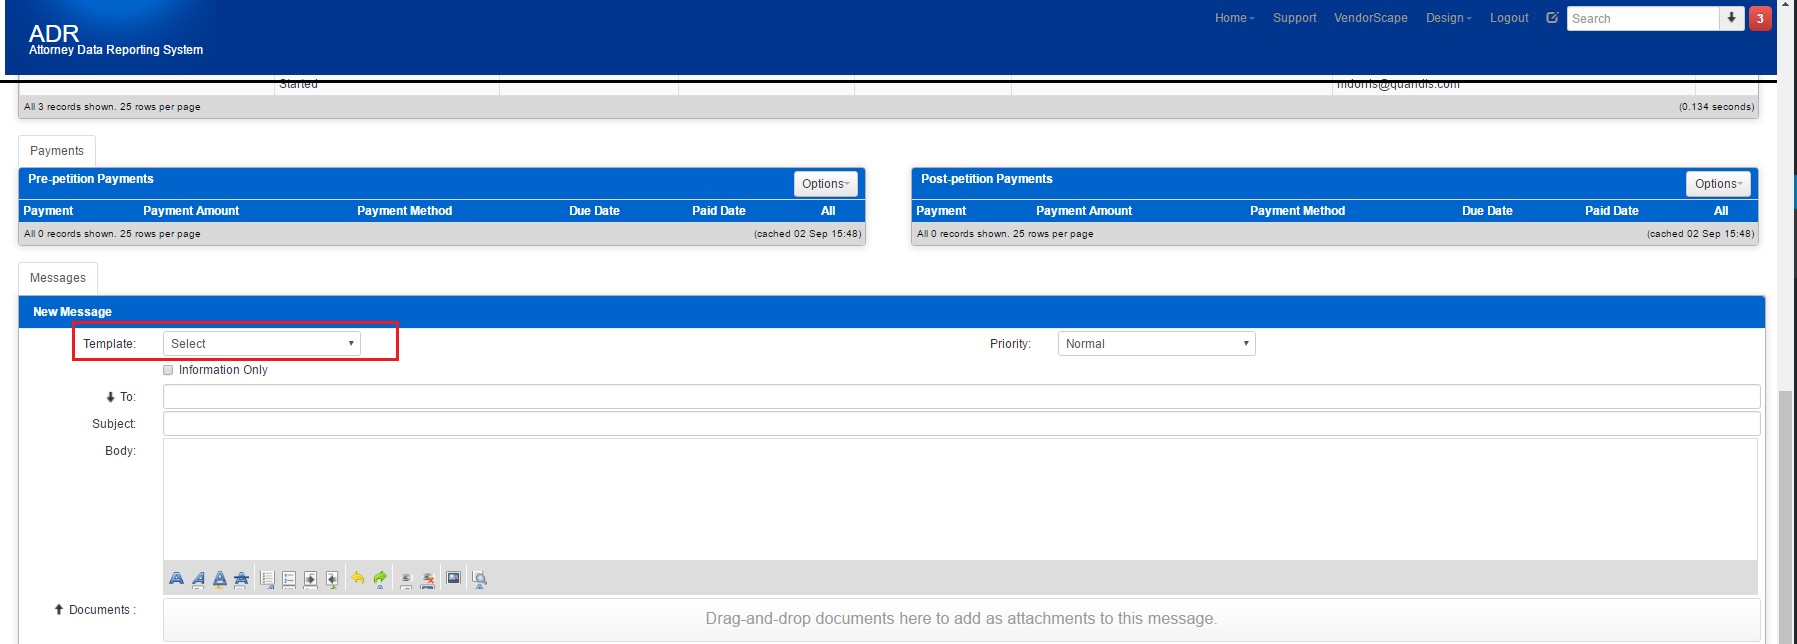
4. If the message is to be emailed to other parties, enter the email address in the to field. Separate multiple recipients with a comma (,)
5. Send the message via email by clicking on Save.
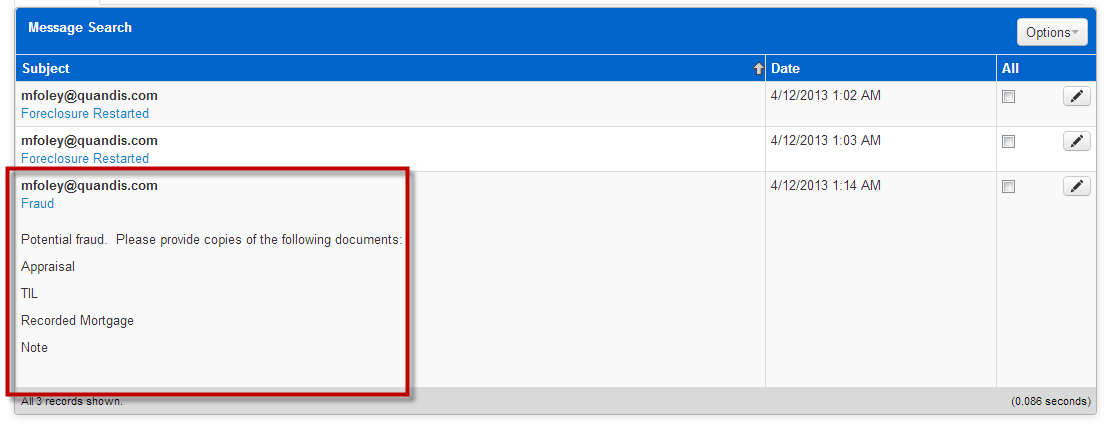
6. The message is populated in the Messages panel.
7. Click the subject hyperlink to view the details of the message.
14 Worklist
14.1 Managing the Smart Worklist
The Smart Worklist assigns Tasks to users that need to be completed or re-projected. See Section 6 for information on Foreclosure Task management, and section 10 for information on Bankruptcy Task management. Tasks appear in the user’s Queue.
Access Worklists by choosing Home > Worklists
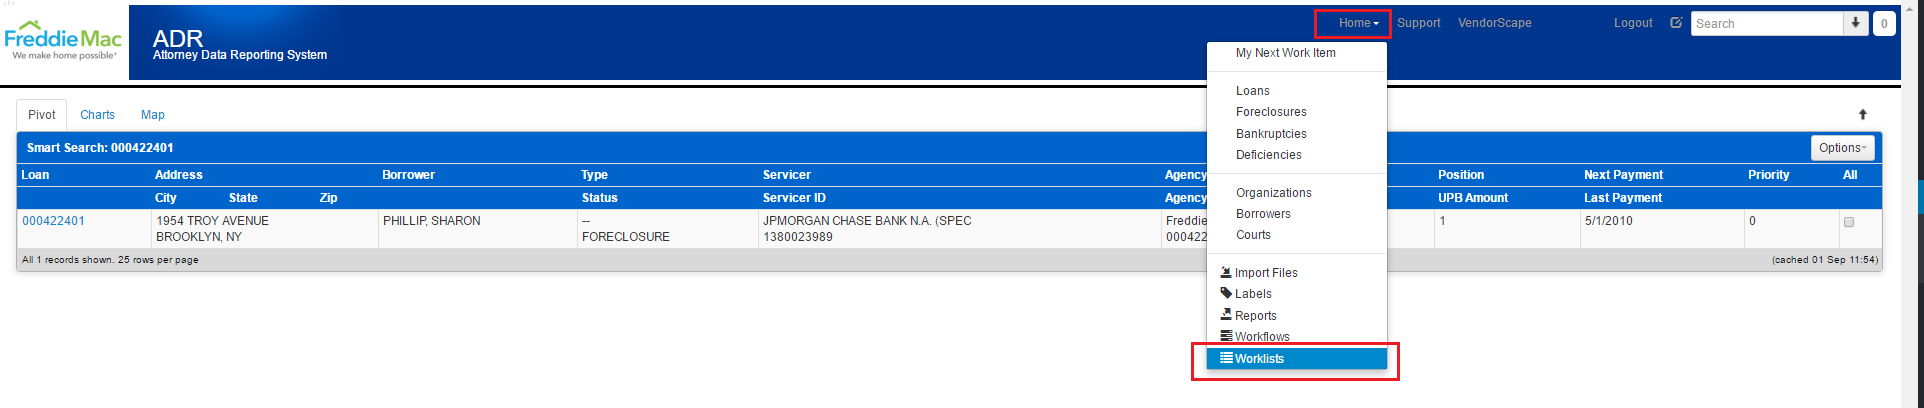
Only users with the role of Manager can complete the below functions
14.1.1 Viewing the Smart work list Table
- Select Home > Worklists.
2. To view the list of tasks available in the Smart Worklist, select “By Worklist” under the Options drop down of the “Summary by Worklist” panel.
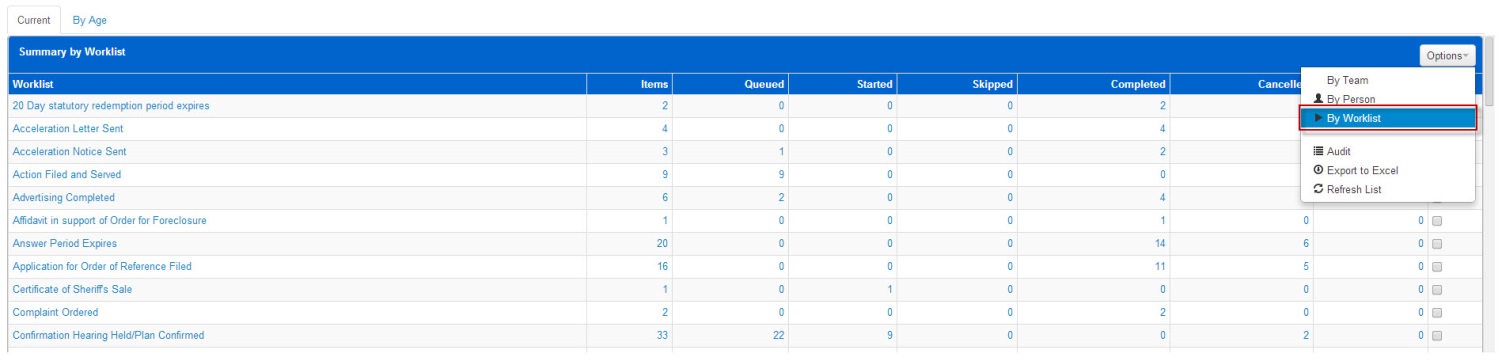
3. You can sort “By Team” or “By Person” to view tasks assigned to different teams and users.
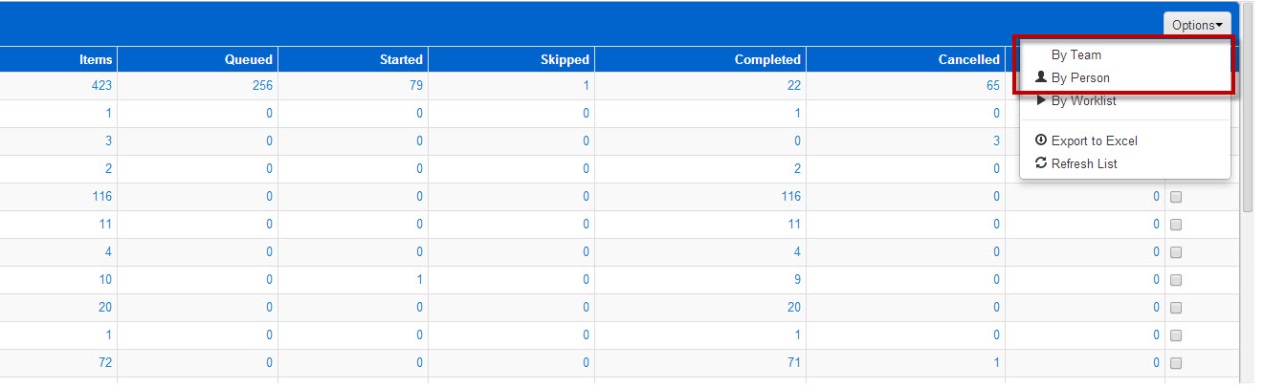
4. Selecting the name of the task or a number under a column (Items, Queued, Started, etc.) will open a second panel.
14.1.2 Re-Queue Smart Worklist items
- Re-queuing an item is to remove the “Completed” or “Cancelled” date from a task so that it may be moved into the worklist.
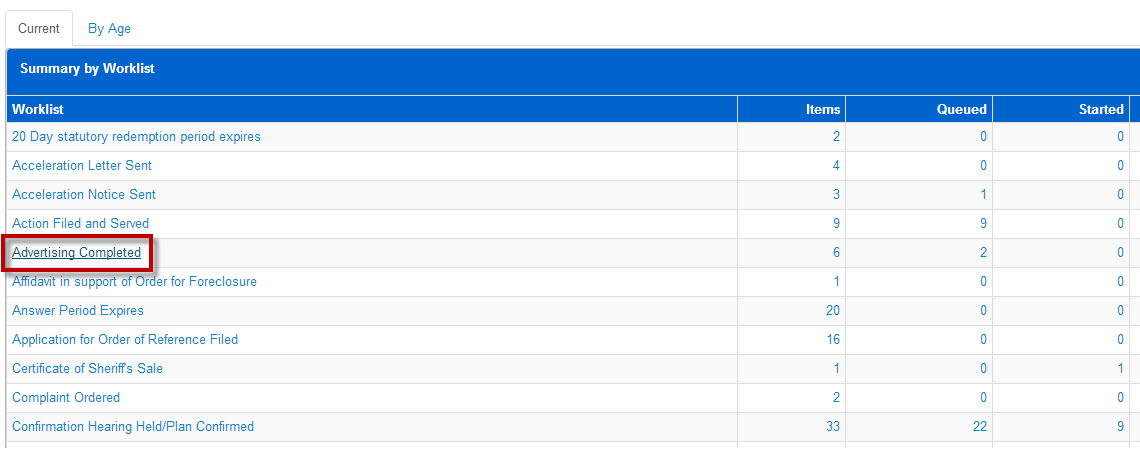
- Select a task from the “Worklist” column in the “Summary by Worklist” panel.
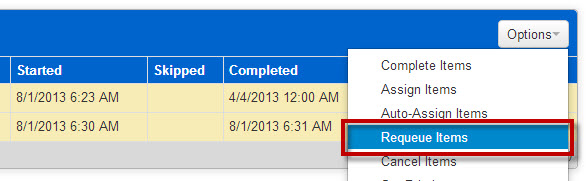
3. In the “Items” panel, select the tasks that need to be re-queued by selecting the corresponding checkbox

4. After the tasks have been selected, click “Requeue Items” from the Options drop down.
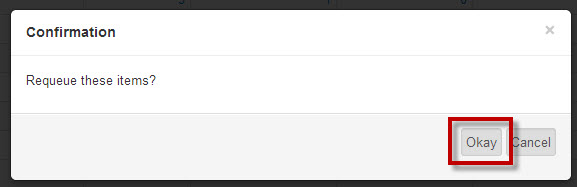
5. Select “Okay” from the Confirmation window to complete the selected items.
6. Note the selected items no longer have a date in the “Completed” column.

7. These tasks can now be assigned, completed, or cancelled.
14.1.3 Assign Smart Worklist items
- After selecting a task, review the “Items” panel at the bottom of the page

2. Select each task you wish to assign by selecting the checkbox to the corresponding task. Selecting “All” will select all tasks

3. Once the proper tasks have been selected, click “Assign Items” from the Options drop down.

4. In the “Smart Worklist Items” panel, you may select the proper team and/or user.
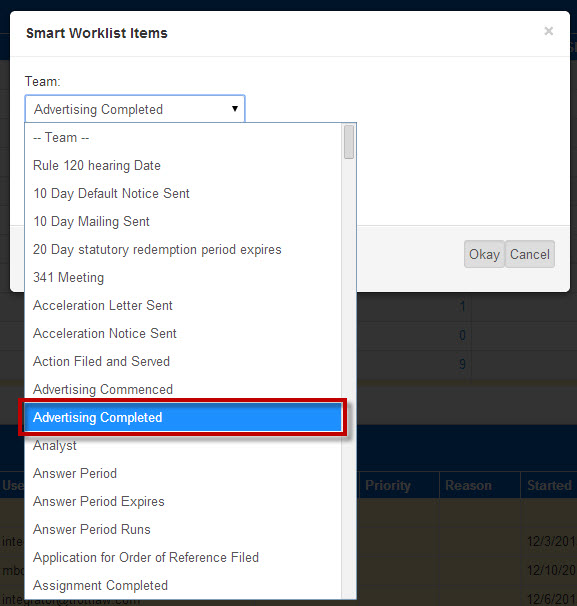
5. Once the team and/or user have been assigned, click “Okay”.
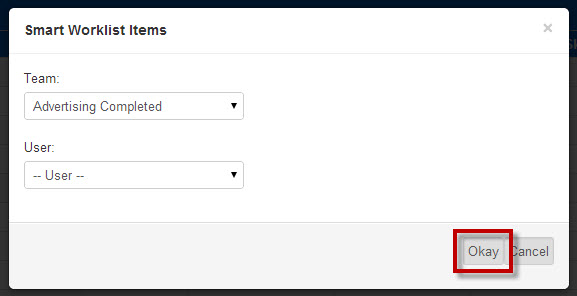
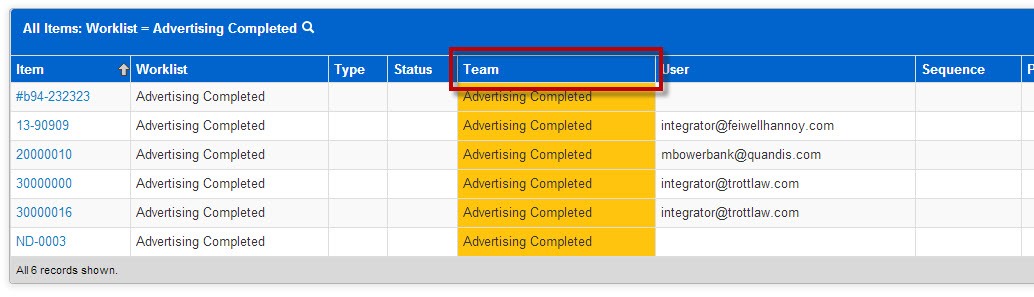
6. The panel refreshes and the proper “Team” has been assigned.
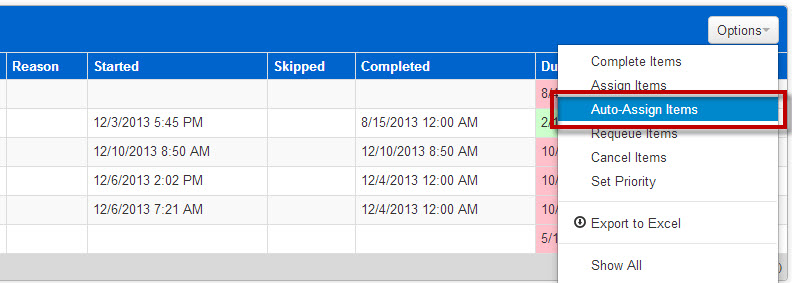
7. The “Auto-Assign Items” located in the Options drop down will automatically assign the selected tasks.
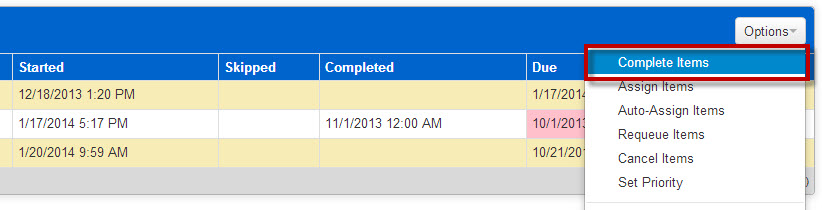
14.1.4 Complete an Item in the Smart Worklist
NOTE: Performing this function forces the worklist item into completion, it does not complete the underlying step tied to the task. This should only be done if any items are found in the worklist in error. For example, the Foreclosure case that the worklist item is tied to has been closed, but the item is still active in the list. Please use this worklist feature with caution.
- Completing an item on the Smart Worklist will remove it from the “Show Pending” view of the worklist. If the task remains incomplete in the active file, it will remain incomplete until a user accesses the file to complete the task.
- Select a task from the “Worklist” column in the “Summary by Worklist” panel.
- In the “Items” panel, select the tasks that need to be completed by selecting the corresponding checkbox.

4. After the tasks have been selected, click “Complete Items” from the Options drop down.
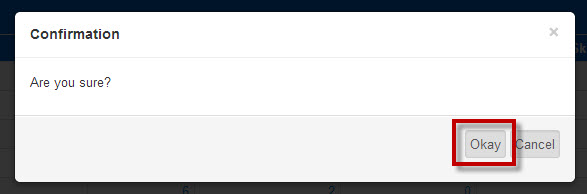
5. Select “Okay” from the Confirmation window to complete the selected items.
6. Note the selected items now have a completed date under the “Completed” column.
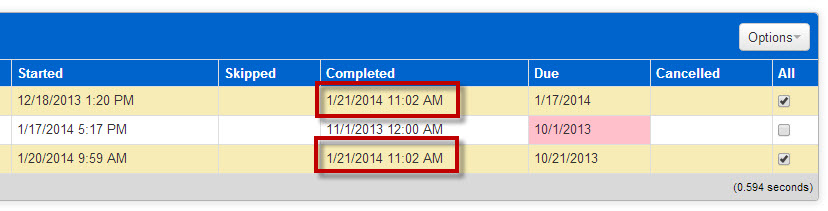
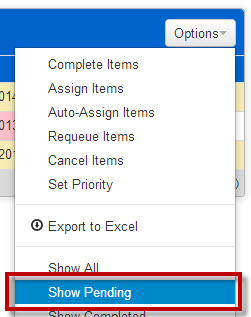
7. Completed items will not be shown under items in a “Pending” status, which can be selected from the Options drop down menu.
14.1.5 Cancel an item in the Smart Worklist
NOTE: Performing this function forces the worklist item into cancelation, it does not cancel the underlying step tied to the task. This should only be done if any items are found in the worklist in error. For example, the Foreclosure case that the worklist item is tied to has been closed, but the item is still active in the list. Please use this worklist feature with caution.
- Cancelling an item on the Smart Worklist will remove it from the “Show Pending” view of the worklist. If the task remains incomplete in the active file, it will remain incomplete until a user accesses the file to complete the task.
- Select a task from the “Worklist” column in the “Summary by Worklist” panel.
3. In the “Items” panel, select the tasks that need to be cancelled by selecting the corresponding checkbox

4. After the tasks have been selected, click “Cancel Items” from the Options drop down.
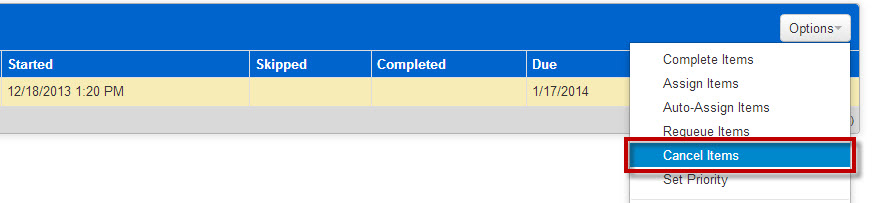
5. Once “Cancel Items” has been selected, the panel will automatically refresh and the task will have a “Cancelled” date.

6. Cancelled items will not be shown under items in a “Pending” status, which can be selected from the Options drop down menu.

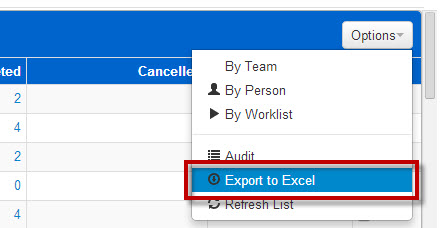
14.1.6 Export the Smart Worklist
- Select Manage Worklists from the Worklist drop down.

2. Locate the “Summary by Worklist” panel. Select “Export to Excel” under the Options drop down of the panel.
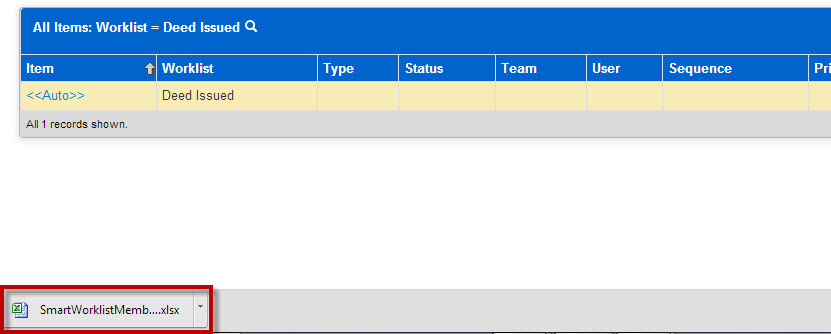
3. The excel file will automatically download. Once the download is complete, locate the file and select the file name to open it in Microsoft Excel.
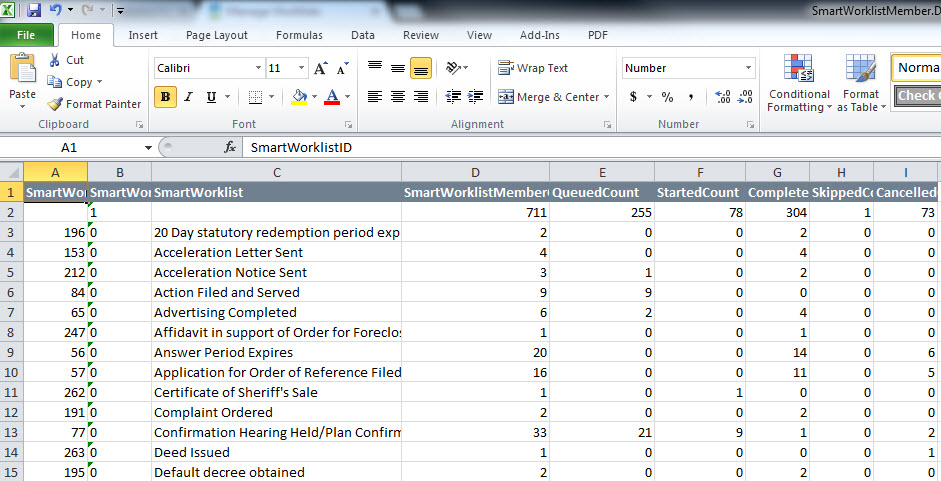
4. After selecting the file, you may review the worklist in Microsoft Excel.
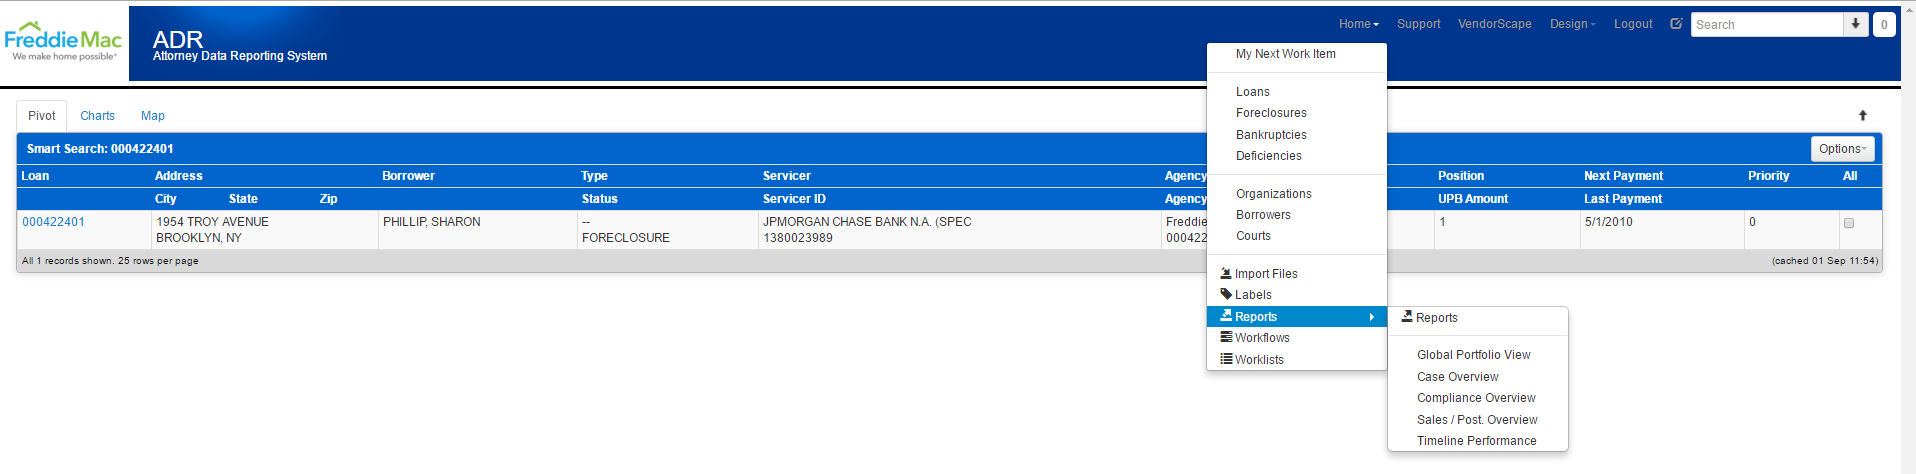
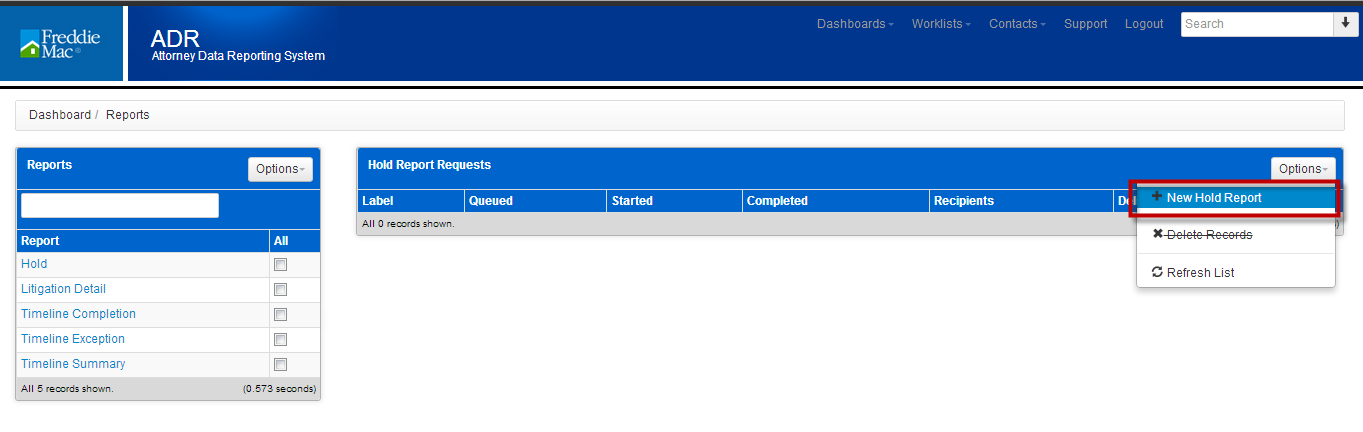
15 Reports
15.1 Generating a Report
- Select Reports from the Home dropdown menu.
2. You are directed to the Report Request page
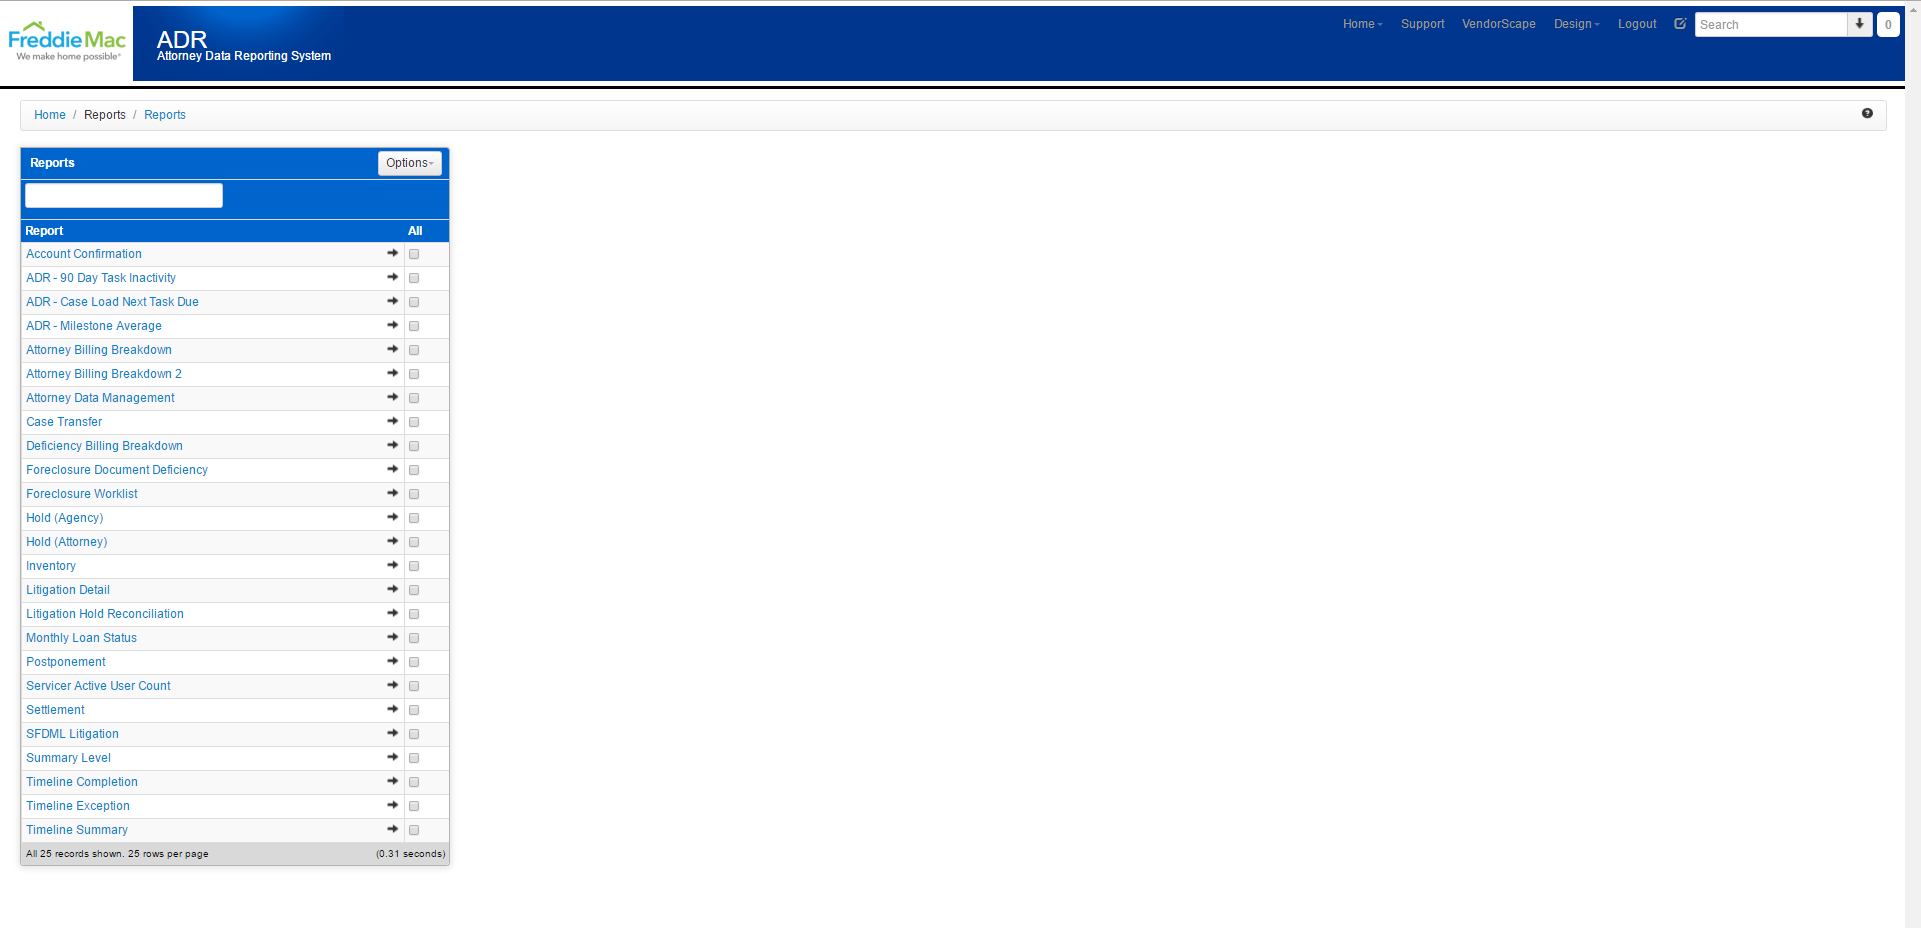
3. Click on the hyperlink for the report you need to generate.
4. The Report Request panel is presented.

5. Select New Hold Report from the Options drop down menu.
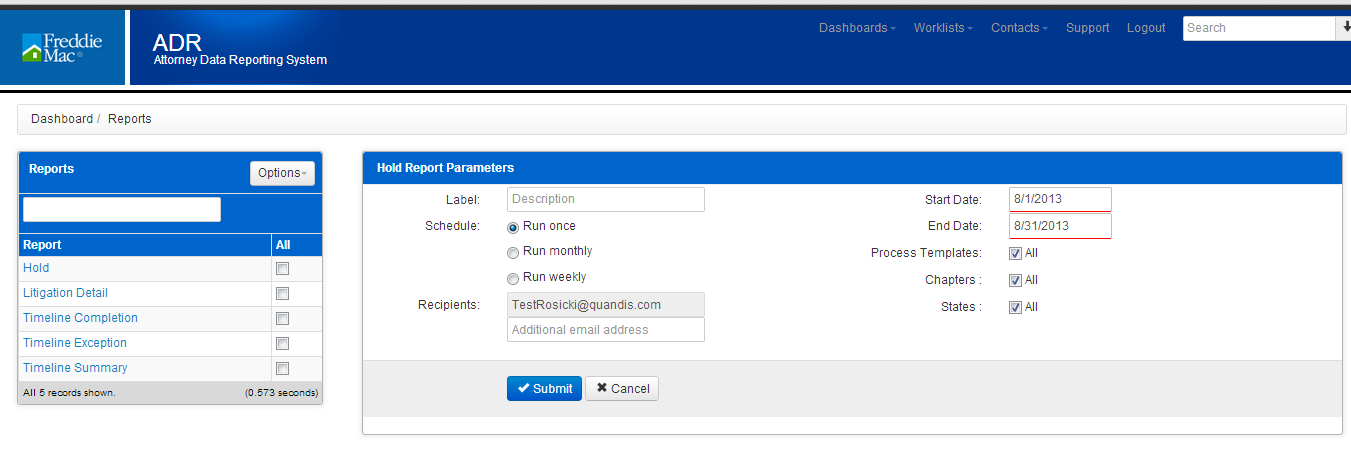
6. Enter a name for the report you are generating
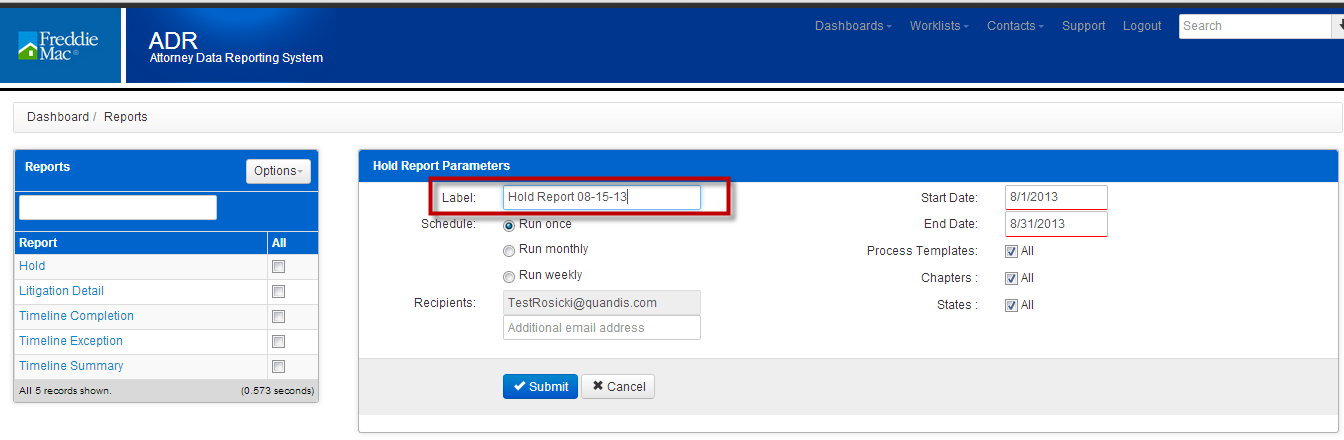
7. Determine the frequency of the report by selecting the appropriate radio button in the schedule section.

If the report is to be generated one time, select Run Once.
If the report is to be generated monthly, click the Run Monthly radio button and select the date the and time the report should be generated
If the report is to be generated weekly, click the Run Weekly radio button and select the day(s) the report is generated.
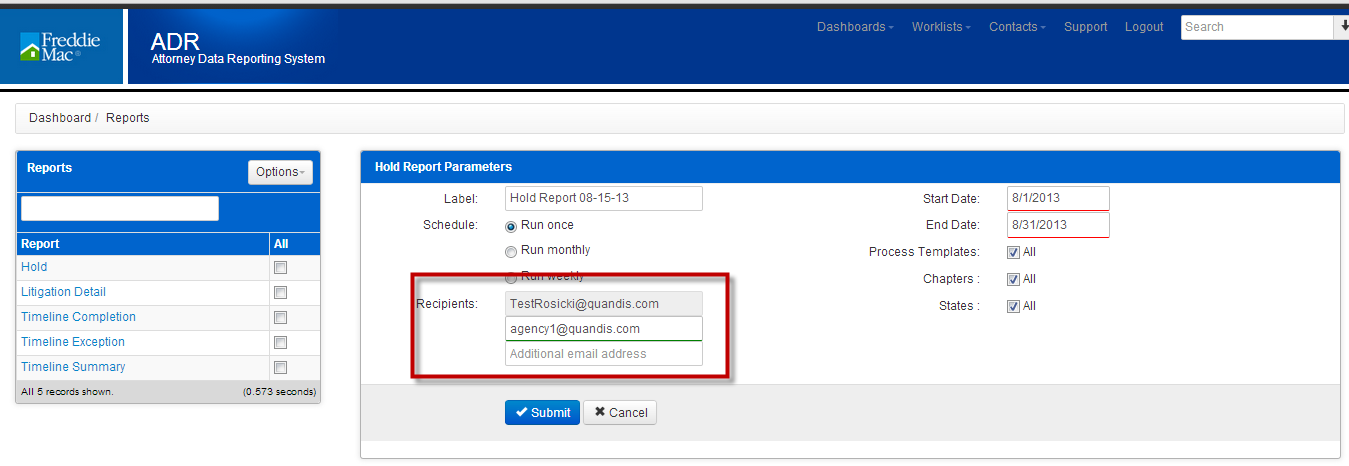
8. The Recipient field is populated with your email address. If other users should be notified of the report’s availability, enter the email addresses in the additional recipients’ field.
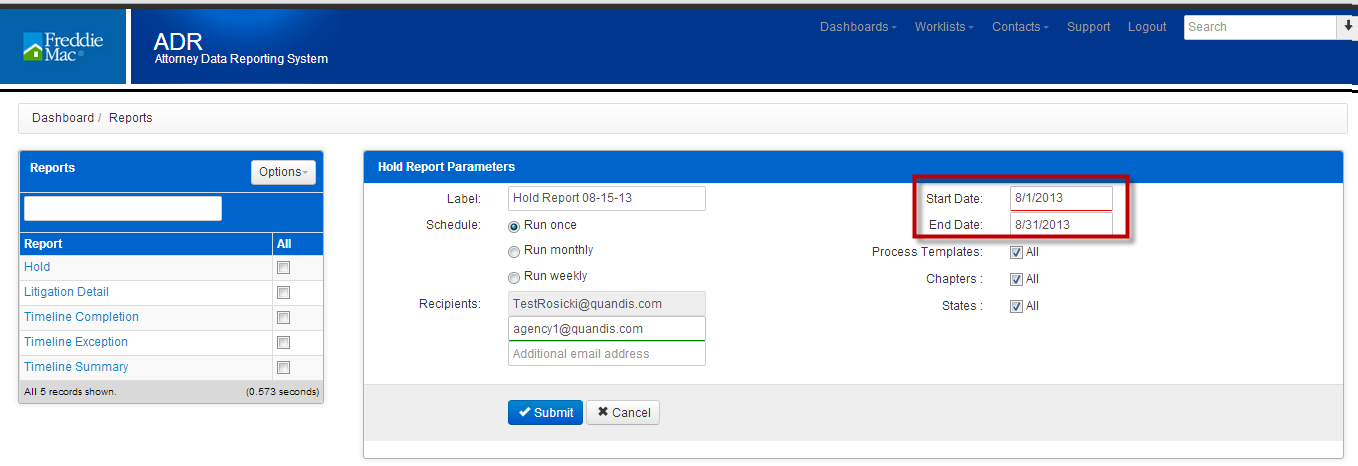
9. Enter a start date for the report and an end date for the report.
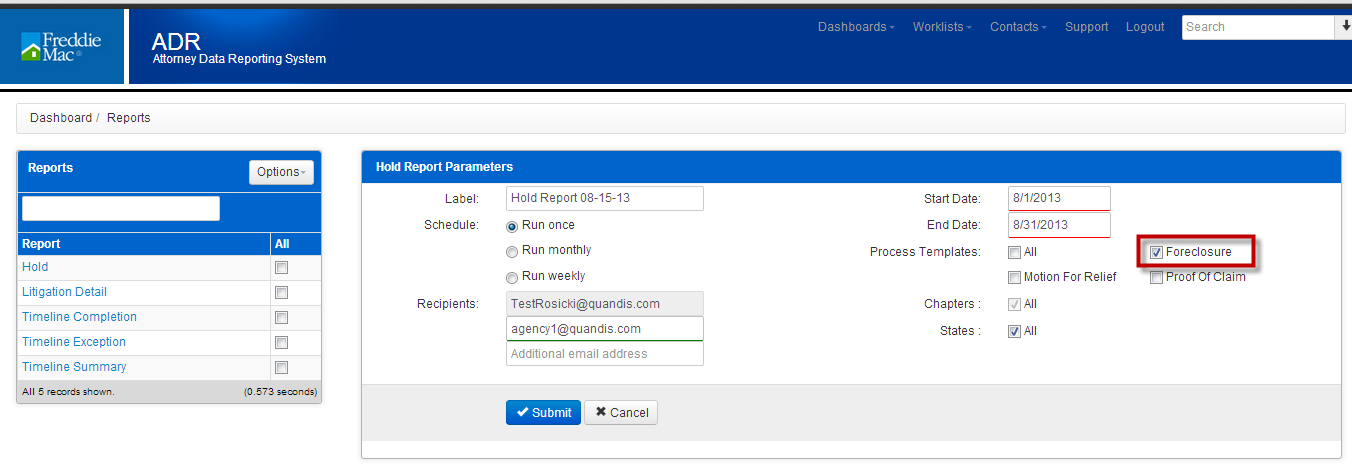
10. The Process Templates field will default to All. This means the report will include all Foreclosures on hold, all Motion for Relief actions that are on hold and all Proof of Claim actions that are on hold.
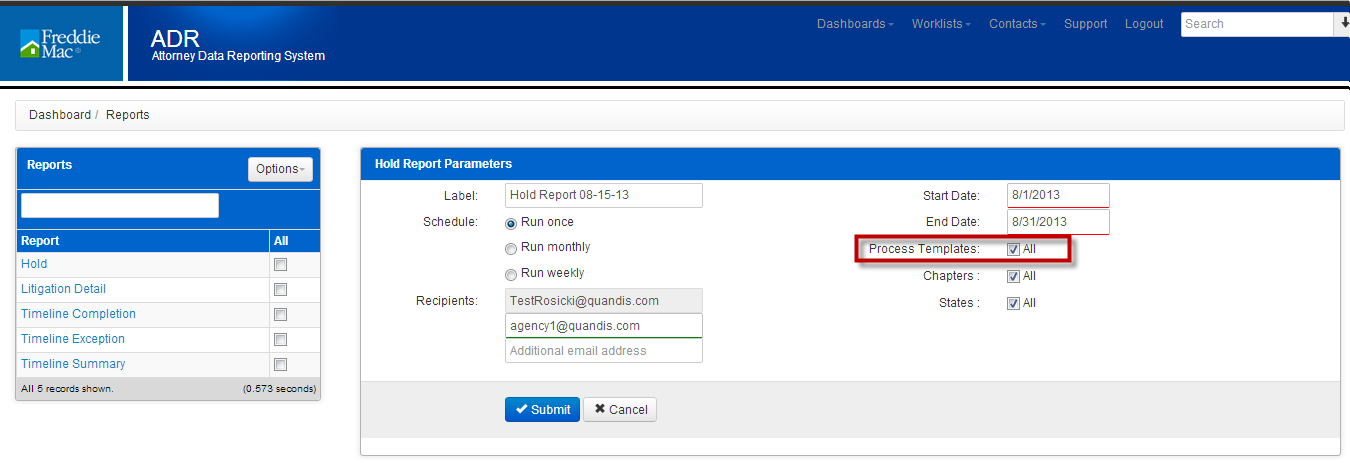
11. If you want to limit the report to Foreclosures, click the check box next to all.
12. The template selection expands and is highlighted in red as a process is not selected.

13. Check the box next to Foreclosure. (Notice how the check box next to Chapters is grayed out. The Chapters check box is specific to Bankruptcy processes).
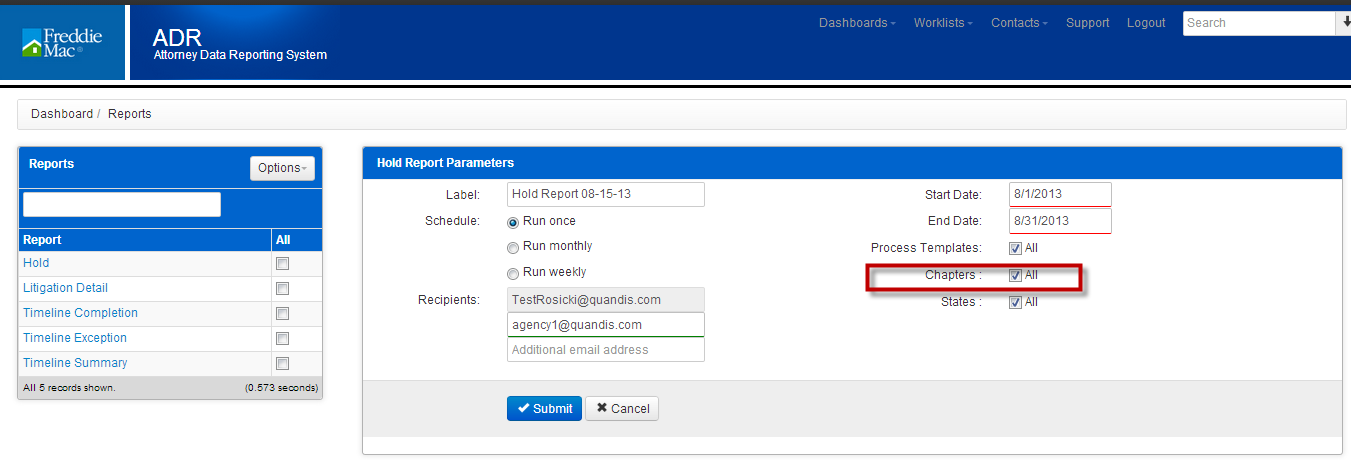
14. The Chapters check box defaults to check.
15. If you are reviewing bankruptcies and want to limit your report to a specific chapter, click the check box next to all.
The Chapters section is highlighted in red as there is not a chapter selected.
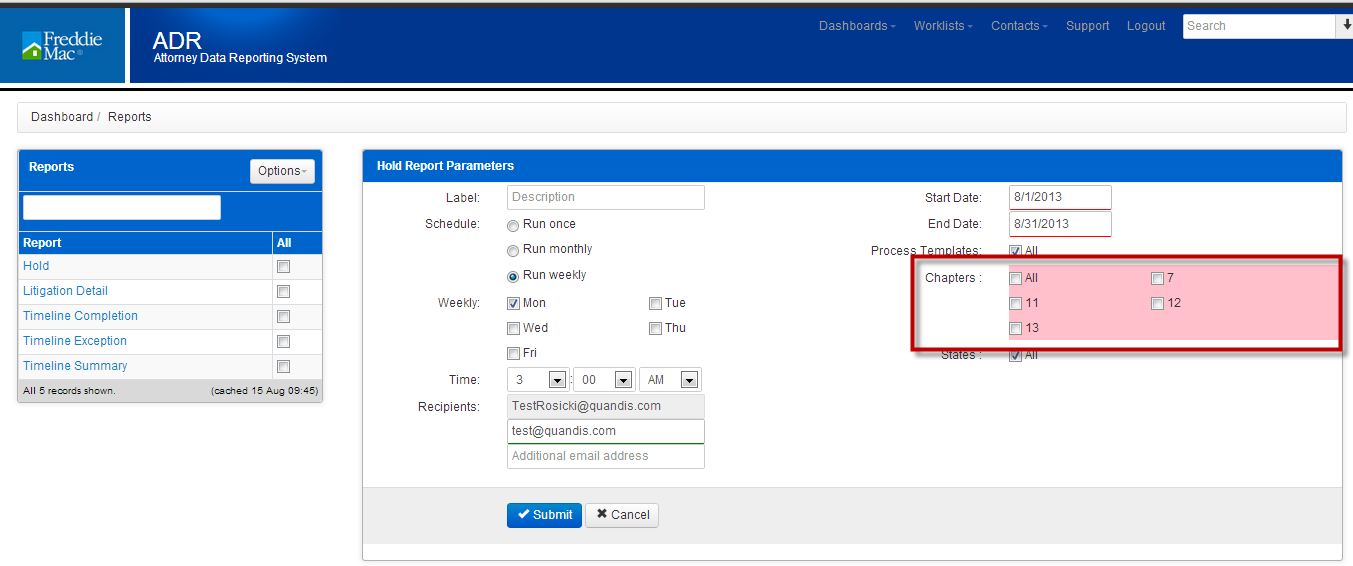
16. Check the box next to the Chapter.

17. The States check box defaults to check. The report will generate based on the state location for the organizations which you have access.
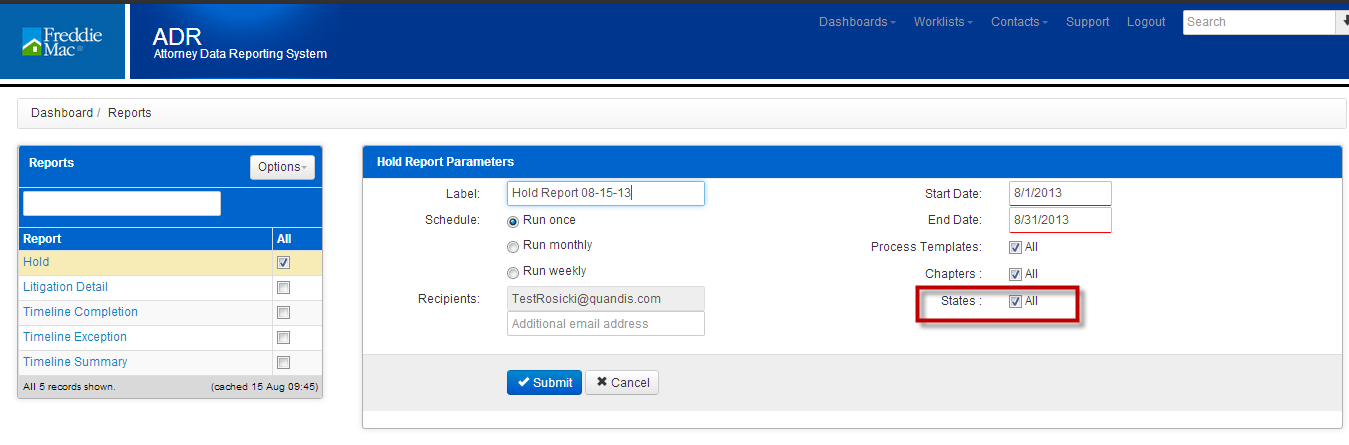
18. You may run the report for a specific state by checking the box next to State.
19. The State section is highlighted in red as there is not a state selected.
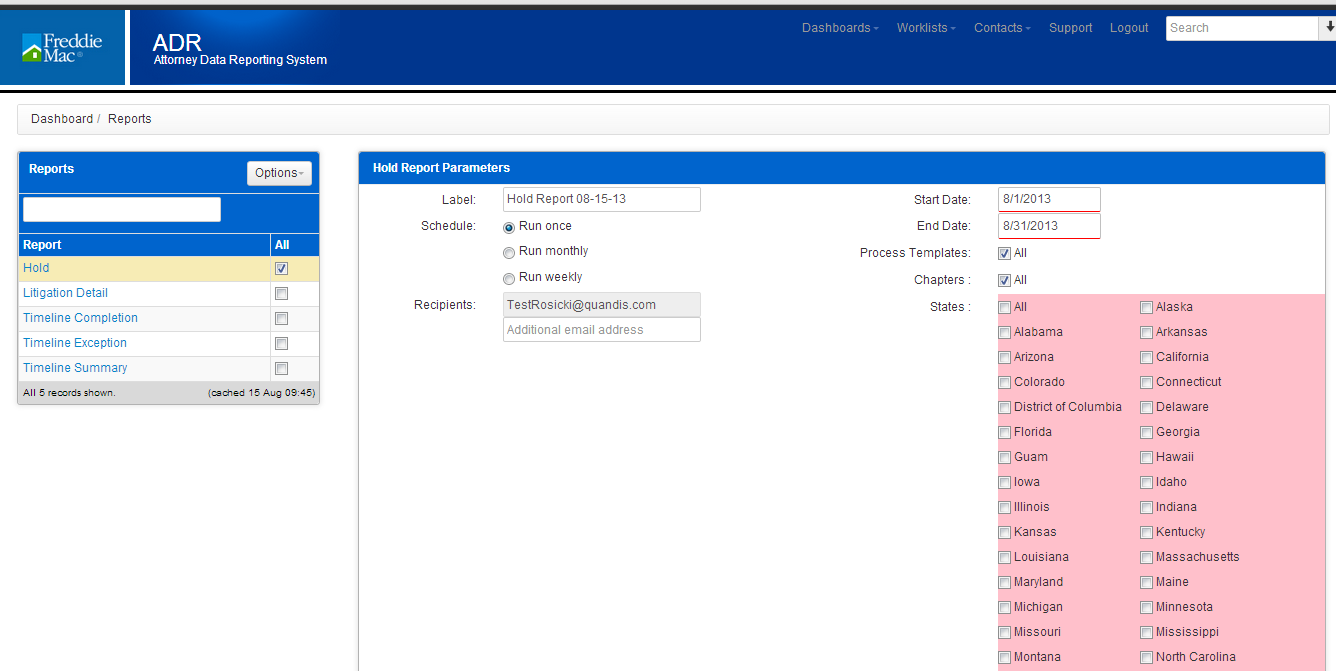
20. Check the box next to the state(s) that should be reported.
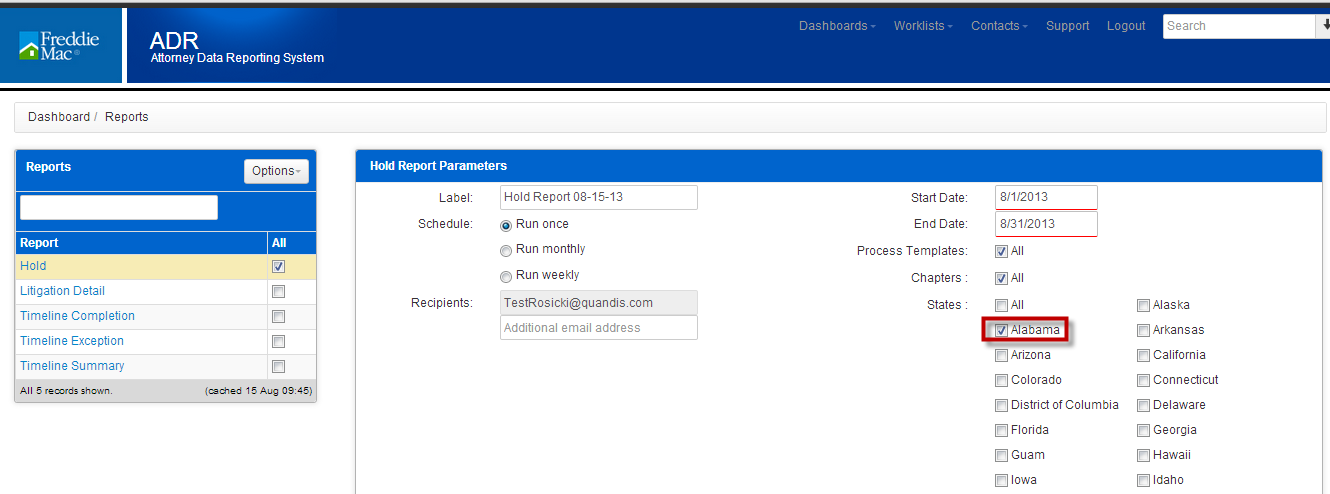
21. Click Submit.
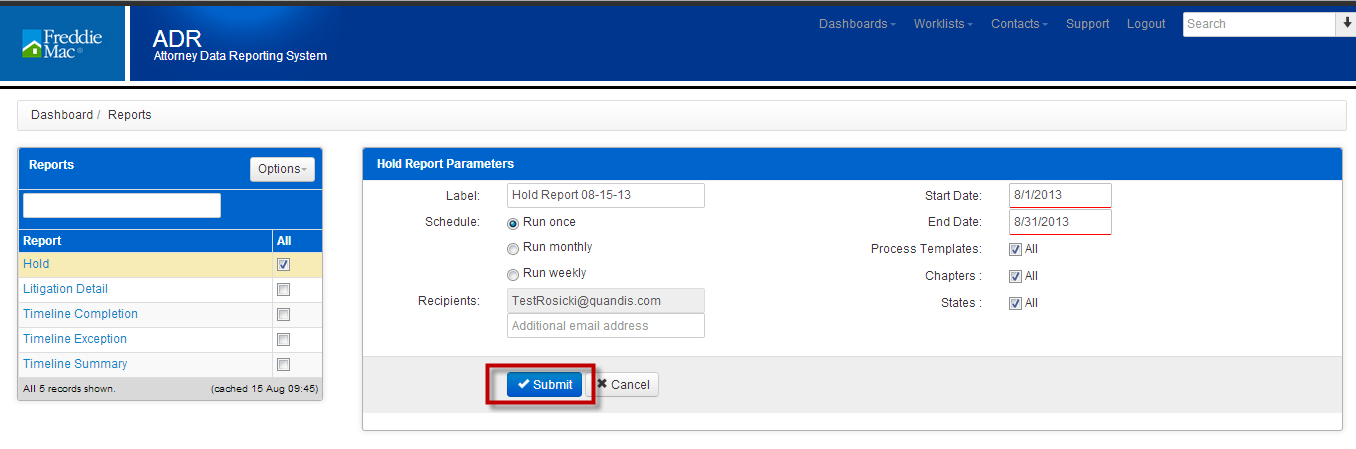
22. You are directed to the Report Request page.
23. When the report has generated and is ready to view the delivered date will be populated.

15.2 Viewing a Report
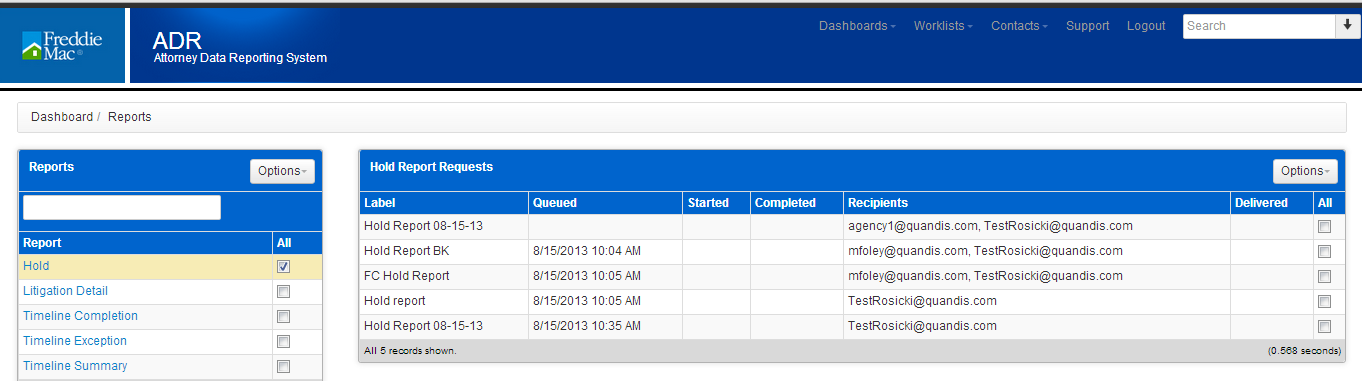
15.2.1 Report Request Page
- Click on the bars next to the report name.

2. The report request appears in the Report panel.
3. Click on the report name hyperlink.
4. The report will open in an excel spreadsheet.
15.2.2 Email
- The email will be from no-reply@quandis.com
- The subject line of the report will be the name of the report, the date it was generated and the time the report was generated.
- Click on the report name hyperlink contained in the email.
4. If you are not logged into the system, you will be directed to the log in page. If you are logged into the system, the report will be available for you to download.
5. Once you enter user name and password on the log in page, the report will be presented to you to download.
15.3 Report Definitions
15.3.1 Hold Report
The hold report is a report for all process that have been placed on hold or removed from hold based on the start date and end date.
The fields on the report are as follows:
a. State-The state the property is located.
b. Case Type-This is the same as the Process Template. This field will either be displayed as Foreclosure, Motion For Relief or Proof Of Claim.
c. Attorney-This field is your organization name as it appears in ADR.
d. Servicer-This is the name of the servicer as it appears in ADR.
e. Reason-This is the Reason that was selected when the hold was created.
f. Chapter-If the hold is on a Proof of Claim or Motion for Relief, the bankruptcy chapter will be listed.
g. Investor#-This is the Freddie Mac loan number.
h. Servicer #-This is the Servicer’s loan number as it appears in ADR.
i. Opened-This field represents the date the Foreclosure was opened.
j. Hold Start-This field is the start date based on the date that was entered when the hold was activated in the system.
k. Hold End-This is the date the hold was removed.
l. Days-Represents the number of days the file was/is on hold. The calculation is Hold End Date (or current date if the hold has not ended) – Hold Start Date.
m. Follow-up-This field represents the Hold’s projected end date.

15.3.2 Litigation Detail Report
The litigation report lists tasks that were either completed or remain opened based on the date range selected. Tasks that have a projected completion date will have an asterisk (*) in front of the date.
The fields are as follows:
a. Subtype-If the Decision is bankruptcy related; this field will represent the bankruptcy chapter.
b. Chapter- If the Decision is bankruptcy related, this field will be the bankruptcy chapter.
c. Decision-This relates to the Timeline Template. This will be displayed as Proof of Claim, Motion for Relief or Judicial or NonJudicial foreclosure. This is reflective of the type selected whenever the foreclosure was activated.
d. Attorney-This is your organization name as it appears in ADR.
e. Agency Loan ID-This field represents the Freddie Mac loan number.
f. Borrower-This is the name of the first borrower listed in the borrower panel.
g. Servicer-This field represents the name of the servicer as it appears in ADR.
h. DecisionStep-This is the task that needs to be completed .
i. Estimated Duration-This field represents the number of days the task should take to complete
j. Sequence-This field identifies the order in which the Decision Step takes place.
k. Completion Date-This is either the Actual Completion date or the Projected Completion date. If the date is a Projected Completion date, an Asterisk (*) will precede the date.
l. Completion Days-This represents the actual number of days to complete the task or the current number of days the task is delayed if the task does not have an actual completion date.
m. Delay count-This field is internal to Freddie Mac’s use.
n. Completion Date Format- This field is internal to Freddie Mac’s use.
o. Status-This field identifies if the Decision is Open-O, On Hold-OH or Closed-C. The status is based on the Removal Date.
p. Status Number-Please disregard this field as it is for internal use.
q. State-This field represents the state the subject dwelling is located.
15.3.3 Timeline Completion Report
The Timeline Completion report lists foreclosures or bankruptcies that have completed or have and estimated completion date for the date range selected in the report query.
The fields are as follows:
a. Decision- This relates to the Timeline Template. This will be displayed as Proof of Claim, Motion for Relief or Judicial or NonJudicial foreclosure. This is reflective of the type selected whenever the foreclosure was activated.
b. Organization- This is your organization name as it appears in ADR
c. Agency Loan ID- This field represents the Freddie Mac loan number.
d. Borrower-This field is the first borrower that is listed in the borrower panel on the loan summary page
e. Days to Complete- This represents the actual number of days to complete the foreclosure or the current number of days the foreclosure has been open if there is not an actual completion date.
f. Date Closed-This is the date the foreclosure was closed.
15.3.4 Timeline Exception Report
The Timeline Exception report lists tasks that are out of compliance and need to be completed.
The fields are:
a. Decision-This relates to the Timeline Template. This will be displayed as Proof of Claim, Motion for Relief or Judicial or NonJudicial foreclosure. This is reflective of the type selected whenever the foreclosure was activated.
b. Organization- This is your organization name as it appears in ADR.
c. Decision Step- This is the task that needs to be completed .
d. Event Phase
e. Agency Loan ID- This field represents the Freddie Mac loan number.
f. Borrower-This field is the first borrower that is listed in the borrower panel on the loan summary page.
g. Attorney Case ID-This field represents your case number .
h. Days on Hold-The information in this field represents the number of days the action was on hold.
i. Days to Complete-This field represents the number of days the decision step has been opened.
j. Estimated Days-Represents the number of days allowed to complete the task based on the Timeline Template
k. Days Late-This field is the total number of days the task is late.
l. Status- This field identifies if the Decision is Open-O, On Hold-OH or Closed-C. The status is based on the Removal Date.
m. State-This field represents the state the property is located.
n. SubType-The sub type field will indicate the bankruptcy chapter if the decision step listed is a bankruptcy.
15.3.5 Timeline Summary Report
The Timeline Summary report represents your firm’s accumulative performance, on a task by task basis. For example, in the row exception, there is a fraction. The numerator represents the case(s) that identify the exception count and the denominator represents the total number of loans that are included in the report.
15.3.6 Case Load Next Task Due
The ADR Case Load Next Task Due is a report that shows all active cases assigned to each firm that the requester has access to. It shows the next task that is due for each case as well as additional information.
The fields are:
A. FMLoan – Freddie Mac loan number
B. AttorneyFirm – Attorney firm
C. Servicer – The loan’s servicer
D. ServicerLoan – Servicer loan number
E. CaseType – Type of case, foreclosure or bankruptcy
F. CaseID – The firm’s internal “Case Number”
G. Address – The property’s address
H. City – City location of the property
I. State – State location of the property
J. PostalCode – Postal code for the property
K. CaseOpen – The “Start Date” for the case, set by the firm
L. NextDueTask – The case’s next task that requires completion
M. TaskEstimatedCompletion – The estimated completion date for the case’s next task
N. TaskProjectedCompletion – The projected completion date for the case’s next task
O. ActiveDelays – YES/NO confirming if case is on hold
P. ActiveDelayProjectedCompletion – Projected completion date of the hold (if applicable)
16 Dashboards
16.1 Export To Excel (CSV)
ADR users have the ability to export case lists as a spreadsheet to Excel. This can be done by accessing any panel that contains a list (messages, file types, borrower data, etc).
- For example, if you were to choose Home > Foreclosures, you will see a panel with all file types you have access to. File types being On Hold, Closed, Open, etc. In the example below, we have chosen 6 files under the Open column (click the number in the column you wish to view, in this case, we clicked “6”).
- Once selected, the results appear in the panel on the bottom half of the page. Notice the “…” in the top right corner of this panel.
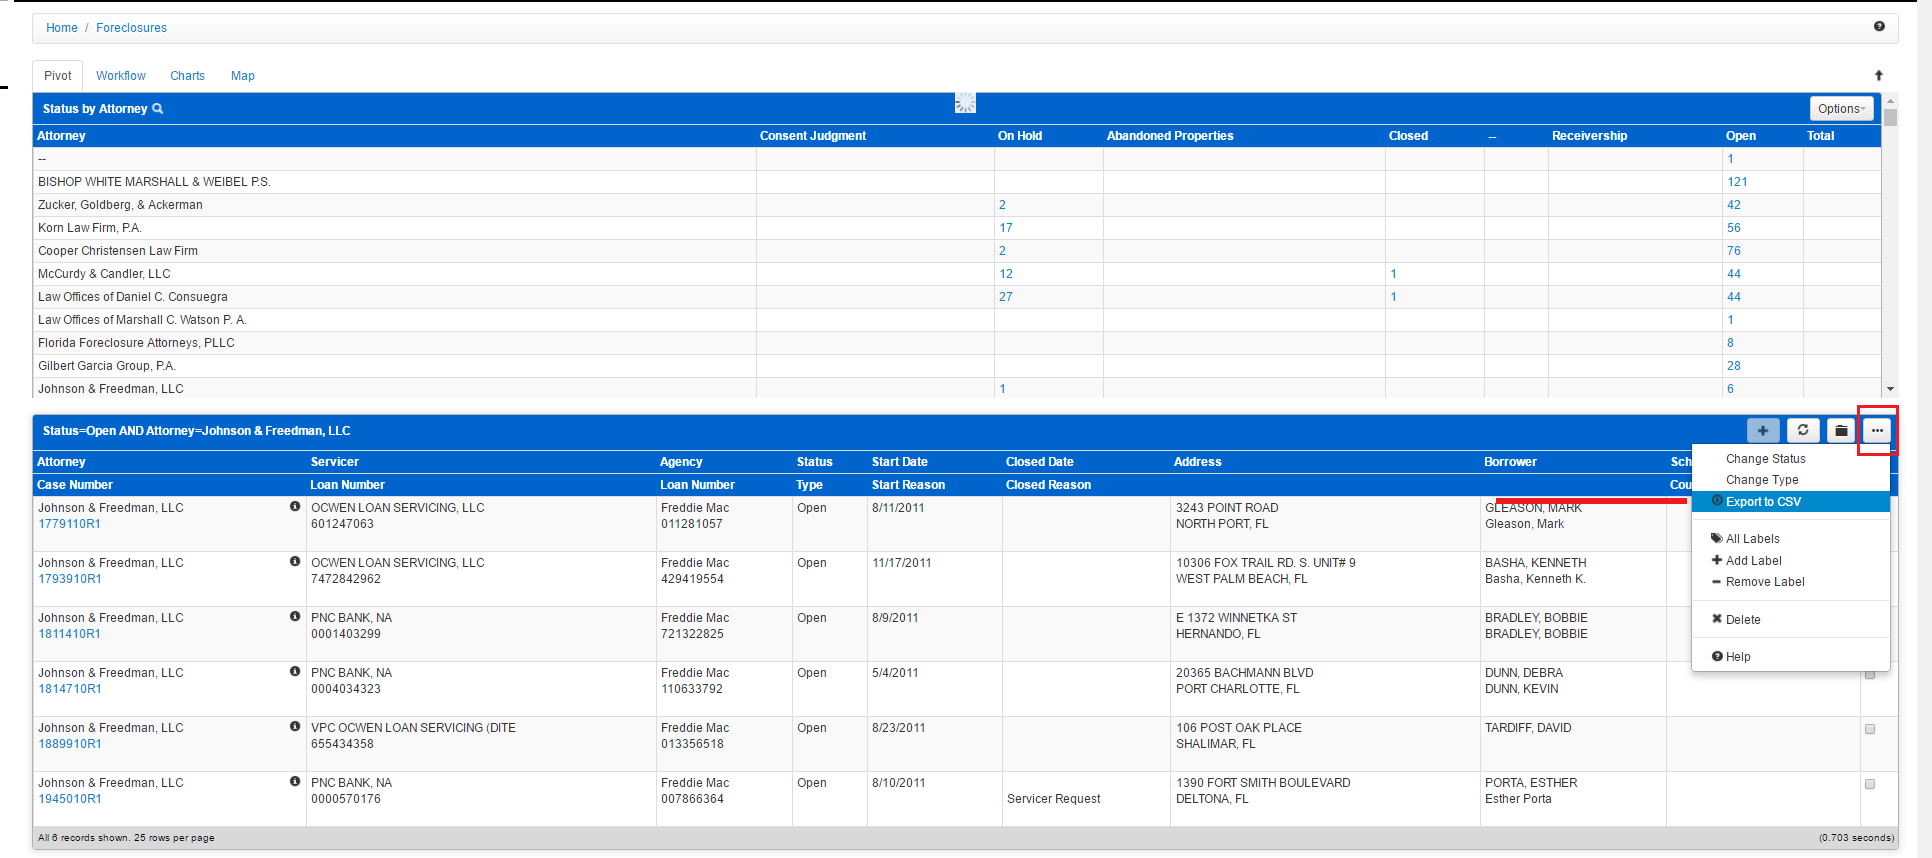
3. From there, click “Export to CSV” which will then trigger the process of downloading an Excel file.
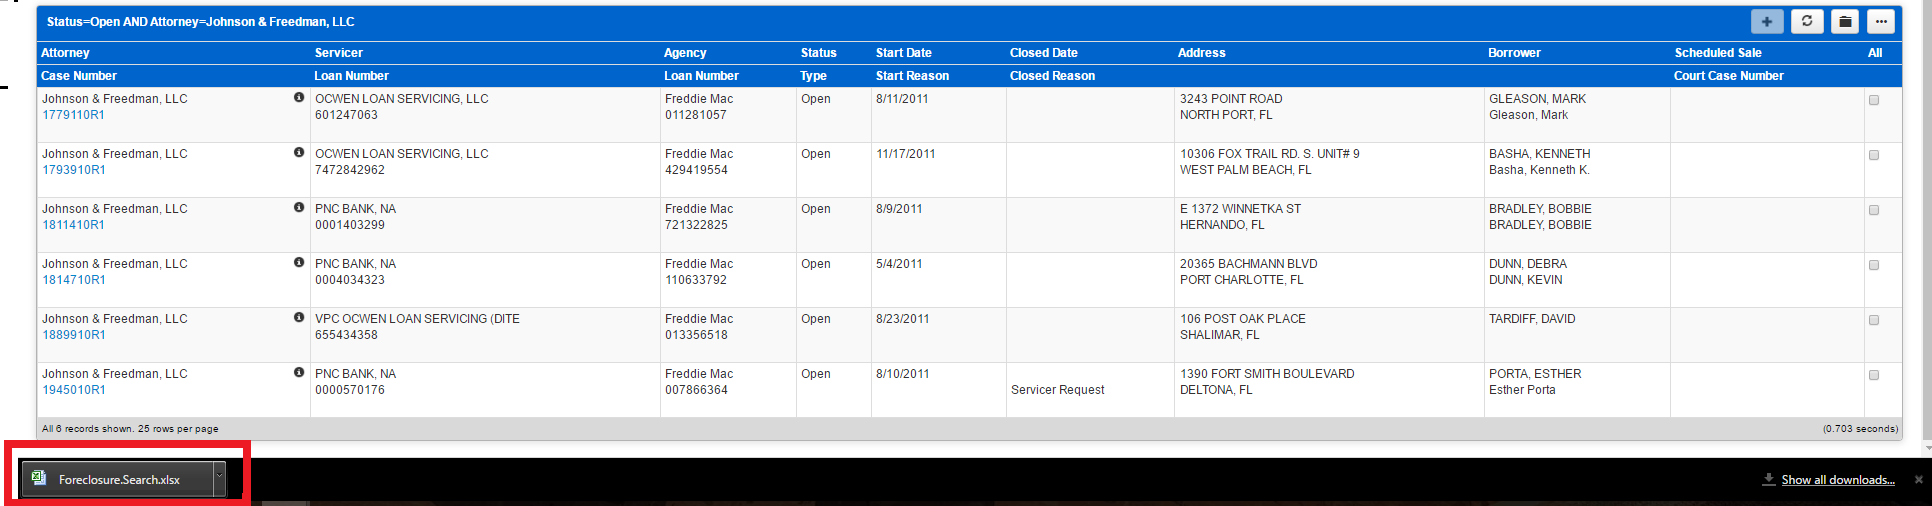
4. You may find this file in the Downloads folder, or if you are using Google Chrome, you may see it in your task bar at the bottom of your browser page, like the image shown above. Keep in mind that this function works in every panel with the “…” and the “Export to CSV” option.
16.2 Advanced Search Filtering
- Users can filter their dashboard using the Advanced Search options (the arrow icon) located next to the Search bar.
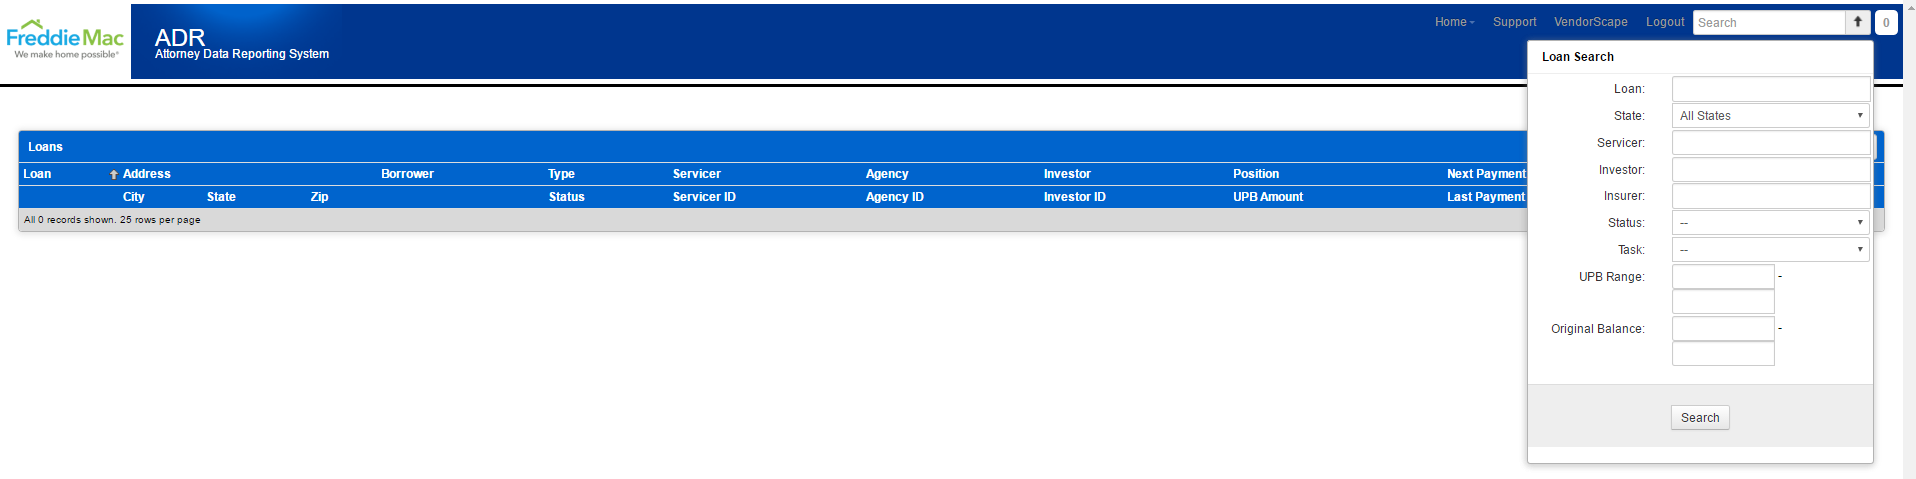
2. Using one of the available search fields, you may look up files or loans by Servicer, State, Investor Number (Freddie Mac Number) or Status. However, should you wish to keep it simple, you may just enter the 9-digit Freddie Mac Loan Number (Investor Number) in the Search Box and ignore the Advanced Loan search by ignoring the Arrow icon all together.
17 State Workflow
- Workflow Steps are included to show all steps per state.
- Struck through items have been deprecated
- Bold items have been added
- Items with both strike through and bold in the same cell have been renamed
| Process – State | Workflow Step |
| Foreclosure – AK Judicial | Foreclosure File Received |
| Complaint Filed | |
| Service of Process Completed | |
| Judgement | |
| Sale Scheduled | |
| Foreclosure Sale Held | |
| Certificate of Sale Recorded | |
| Foreclosure Case Closure | |
| Foreclosure – AK Non Judicial | Foreclosure File Received |
| Notice of Default Recorded | |
| Publication/Posting of Sale completed | |
| Sale Scheduled | |
| Foreclosure Sale Held | |
| Deed Recorded | |
| Foreclosure Case Closure | |
| Foreclosure – AL Judicial | Foreclosure File Received |
| Complaint Filed | |
| Service of Process Completed | |
| Judgement Filed | |
| Sale Scheduled | |
| Foreclosure Sale Held | |
| Foreclosure Case Closure | |
| Foreclosure – AL Non Judicial | Foreclosure File Received |
| Sale Scheduled | |
| Foreclosure Sale Held | |
| Deed Recorded | |
| Foreclosure Case Closure | |
| Foreclosure – AR Judicial | Foreclosure File Received |
| Complaint Filed | |
| Service of Process Completed | |
| Court Decree/Judgement | |
| Sale Scheduled | |
| Foreclosure Sale Held | |
| Foreclosure Case Closure | |
| Foreclosure – AR Non Judicial | Foreclosure File Received |
| Notice of Default Filed | |
| Sale Scheduled | |
| Foreclosure Sale Held | |
| Deed Recorded | |
| Foreclosure Case Closure | |
| Foreclosure – AZ Judicial | Foreclosure File Received |
| Complaint Filed | |
| Service of Process Completed | |
| Sale Scheduled | |
| Foreclosure Sale Held | |
| Certificate of Sheriff’s Sale | |
| Deed Issued | |
| Foreclosure Case Closure | |
| Foreclosure – AZ Non Judicial | Foreclosure File Received |
| Record Notice of Trustee’s Sale | |
| Trustee Sale Scheduled | |
| Foreclosure Sale Held | |
| Foreclosure Case Closure | |
| Foreclosure – CA Judicial | Foreclosure File Received |
| Complaint Filed | |
| Service of Process Completed | |
| Judgment Entered | |
| Sale Scheduled | |
| Foreclosure Sale Held | |
| Redemption Period Expires | |
| Deed Recorded | |
| Foreclosure Case Closure | |
| Foreclosure – CA Non Judicial | Foreclosure File Received |
| Record Notice of Default | |
| Posting and Publishing of Sale/NOS Mailings | |
| Sale Scheduled | |
| Foreclosure Sale Held | |
| Deed Recorded | |
| Foreclosure Case Closure | |
| Foreclosure – CO Non Judicial | Foreclosure File Received |
| Sale Scheduled/NED Recorded | |
| Notice of Election and Demand Sent to Public Trste | |
| Court Order Obtained Authorizing Sale | |
| Sale Scheduled | |
| Foreclosure Sale Held | |
| Foreclosure Case Closure | |
| Foreclosure – CT Judicial | Foreclosure File Received |
| Service of Process Completed | |
| Complaint Filed | |
| Motion for Judgment of Foreclosure Filed | |
| Foreclosure by Sale Decree Entered | |
| Foreclosure Sale Held | |
| Deed Recorded | |
| Foreclosure Case Closure | |
| Foreclosure – DC Judicial | Foreclosure File Received |
| Complaint Filed | |
| Service of Process Completed | |
| Initial Scheduling Conference | |
| Foreclosure Mediation Program | |
| Status Conference | |
| Motion for Judgment of Foreclosure Filed | |
| Judgment Entered | |
| Sale Scheduled | |
| Foreclosure Sale Held | |
| Foreclosure Case Closure | |
| Foreclosure – DC Non Judicial | Foreclosure File Received |
| Sale Scheduled | |
| Foreclosure Sale Held | |
| Deed Recorded | |
| Foreclosure Case Closure | |
| Foreclosure – DE Judicial | Foreclosure File Received |
| Complaint Filed | |
| Service of Process Completed | |
| Motion for Judgment of Foreclosure Filed | |
| Sale Scheduled | |
| Foreclosure Sale Held | |
| Confirmation of Sale | |
| Deed Recorded | |
| Foreclosure Case Closure | |
| Foreclosure – FL Judicial | Foreclosure File Received |
| Complaint Filed | |
| Service of Process Completed | |
| Motion for Summary Judgment Filed | |
| Judgment Entered | |
| Sale scheduled date (tied to Judgment entered) | |
| Foreclosure Sale Held | |
| Certificate of Title Issued | |
| Foreclosure Case Closure | |
| Foreclosure – GA Non Judicial | Foreclosure File Received |
| Sale Scheduled | |
| First Publication | |
| Mail Notice of Sale to Borrower | |
| Foreclosure Sale Held | |
| Deed Recorded | |
| Foreclosure Case Closure | |
| Foreclosure – HI Judicial | Foreclosure File Received |
| Complaint Filed | |
| Service of Process Completed | |
| Motion for Summary Judgment and Decree of FC Filed | |
| Confirmation of Sale | |
| Deed Recorded | |
| Foreclosure Case Closure | |
| Foreclosure – HI Non Judicial | Foreclosure File Received |
| Sale Scheduled | |
| Publication and Posting of Sale Completed | |
| Foreclosure Sale Held | |
| Foreclosure Case Closure | |
| Foreclosure – IA Judicial | Foreclosure File Received |
| Complaint Filed | |
| Service of Process Completed | |
| Judgment Entered | |
| Sale Scheduled | |
| Foreclosure Sale Held | |
| Redemption Period Expires/Deed Recorded | |
| Foreclosure Case Closure | |
| Foreclosure – ID Non Judicial | Foreclosure File Received |
| File Notice of Default | |
| Sale Scheduled | |
| Publication/Posting on Property Completed | |
| Foreclosure Sale Held | |
| Deed Recorded | |
| Foreclosure Case Closure | |
| Foreclosure – IL Judicial | Foreclosure File Received |
| Complaint Filed | |
| Service of Process Completed | |
| File Motion for Judgment of Foreclosure | |
| Judgment Entered | |
| Sale Scheduled | |
| Foreclosure Sale Held | |
| Deed Recorded | |
| Foreclosure Case Closure | |
| Foreclosure – IN Judicial | Foreclosure File Received |
| Complaint Filed | |
| Service of Process Completed | |
| Judgment Entered | |
| Sale Scheduled | |
| Foreclosure Sale Held | |
| Deed Recorded | |
| Foreclosure Case Closure | |
| Foreclosure – KS Judicial | Foreclosure File Received |
| Complaint Filed | |
| Service of Process Completed | |
| Judgment Entered | |
| Sale Scheduled | |
| Foreclosure Sale Held | |
| Foreclosure Case Closure | |
| Foreclosure – KY Judicial | Foreclosure File Received |
| Complaint Filed | |
| Service of Process Completed | |
| Judgment and Order of Sale Entered | |
| Sale Scheduled | |
| Foreclosure Sale Held | |
| Confirmation of Sale | |
| Deed Recorded | |
| Foreclosure Case Closure | |
| Foreclosure – LA Judicial Exec | Foreclosure File Received |
| Petition for Seizure and Sale of Property Filed | |
| Writ of Seizure and Sale Issued | |
| Sheriff Seized Property | |
| Notice of Sale Publication started | |
| Foreclosure Sale Held | |
| Foreclosure Case Closure | |
| Foreclosure – LA Judicial | Foreclosure File Received |
| Complaint Filed | |
| Service of Process Completed | |
| Motion for Default/Summary Judgment Filed | |
| Sheriff Seized Property | |
| Sale Scheduled | |
| Foreclosure Sale Held | |
| Deed Recorded | |
| Foreclosure Case Closure | |
| Foreclosure – MA Judicial | Foreclosure File Received |
| Complaint Filed | |
| Service of Process Completed | |
| Order of Notice Received from Land Court | |
| Sale Scheduled | |
| Foreclosure Sale Held | |
| Deed Recorded | |
| Foreclosure Case Closure | |
| Foreclosure – MD Judicial | Foreclosure File Received |
| Complaint (Order to Docket) Filed | |
| Service of Process Completed | |
| Sale Scheduled | |
| Foreclosure Sale Held | |
| Motion for Final Ratification of Sale Filed | |
| Foreclosure Case Closure | |
| Foreclosure – ME Judicial | Foreclosure File Received |
| Complaint Filed | |
| Service of Process Completed | |
| Judgment Entered | |
| Period of Redemption Expires | |
| Sale Scheduled | |
| Foreclosure Sale Held | |
| Deed Recorded | |
| Foreclosure Case Closure | |
| Foreclosure – MI Judicial | Foreclosure File Received |
| Complaint Filed | |
| Service of Process Completed | |
| Publication of the Notice of Foreclosure | |
| Sale Scheduled | |
| Foreclosure Sale Held | |
| Confirmation of Sale | |
| Foreclosure Case Closure | |
| Foreclosure – MI Non Judicial | Foreclosure File Received |
| Sale Scheduled | |
| Publication Complete | |
| Foreclosure Sale Held | |
| Deed Recorded | |
| Foreclosure Case Closure | |
| Foreclosure – MN Judicial | Foreclosure File Received |
| Complaint Filed | |
| Service of Process Completed | |
| Sale Scheduled | |
| Foreclosure Sale Held | |
| Foreclosure Case Closure | |
| Foreclosure – MN Non Judicial | Foreclosure File Received |
| Notice of Pendency Filed | |
| Sale Scheduled | |
| Foreclosure Sale Held | |
| Foreclosure Case Closure | |
| Foreclosure – MO Non Judicial | Foreclosure File Received |
| Sale Scheduled | |
| Foreclosure Sale Held | |
| Deed Recorded | |
| Foreclosure Case Closure | |
| Foreclosure – MS Judicial | Foreclosure File Received |
| Complaint Filed | |
| Service of Process Completed | |
| Judgment Entered | |
| Sale Scheduled | |
| Foreclosure Sale Held | |
| Foreclosure Case Closure | |
| Foreclosure – MS Non Judicial | Foreclosure File Received |
| Notice of Default Sent | |
| Substitution of Trustee Executed and Recorded | |
| Sale Scheduled | |
| Foreclosure Sale Held | |
| Deed Recorded | |
| Foreclosure Case Closure | |
| Foreclosure – MT Judicial | Foreclosure File Received |
| Complaint Filed | |
| Service of Process Completed | |
| Judgment Entered | |
| Sale Scheduled | |
| Foreclosure Sale Held | |
| Foreclosure Case Closure | |
| Foreclosure – MT Non Judicial | Foreclosure File Received |
| Sale Scheduled | |
| Notice of Trustee’s Sale served by Certified Mail | |
| Affidavits of Notice of Sale Compliance Filed | |
| Foreclosure Sale Held | |
| Deed Recorded | |
| Foreclosure Case Closure | |
| Foreclosure – NC Non Judicial | Foreclosure File Received |
| Notice of Hearing (NOH) Filed | |
| Notice of Hearing Service Completed | |
| Hearing Held | |
| Sale Scheduled | |
| Foreclosure Sale Held | |
| Deed Recorded | |
| Foreclosure Case Closure | |
| Foreclosure – ND Judicial | Foreclosure File Received |
| Complaint Filed | |
| Service of Process Completed | |
| Judgment Entered | |
| Sale Scheduled | |
| Foreclosure Sale Held | |
| Deed Recorded | |
| Foreclosure Case Closure | |
| Foreclosure – NE Judicial | Foreclosure File Received |
| Complaint Filed | |
| Service of Process Completed | |
| Sale Scheduled | |
| Foreclosure Sale Held | |
| Confirmation of Sale | |
| Deed Recorded | |
| Foreclosure Case Closure | |
| Foreclosure – NE Non Judicial | Foreclosure File Received |
| Notice of Default Recorded | |
| Sale Scheduled | |
| Foreclosure Sale Held | |
| Deed Recorded | |
| Foreclosure Case Closure | |
| Foreclosure – NH Non Judicial | Foreclosure File Received |
| Sale Scheduled | |
| Foreclosure Sale Held | |
| Deed Recorded | |
| Foreclosure Case Closure | |
| Foreclosure – NJ Judicial | Foreclosure File Received |
| Complaint Filed | |
| Service of Process Completed | |
| Default Filed | |
| Judgment Entered / Writ of Execution | |
| Sale Scheduled | |
| Foreclosure Sale Held | |
| Deed Recorded | |
| Foreclosure Case Closure | |
| Foreclosure – NM Judicial | Foreclosure File Received |
| Complaint Filed | |
| Service of Process Completed | |
| Judgment Entered | |
| Sale Scheduled | |
| Foreclosure Sale Held | |
| Deed Recorded | |
| Foreclosure Case Closure | |
| Foreclosure – NV Judicial | Foreclosure File Received |
| Complaint Filed | |
| Service of Process Completed | |
| Notice of Sheriff’s Sale and Posting of Sale | |
| Foreclosure Sale Held | |
| Deed Recorded | |
| Foreclosure Case Closure | |
| Foreclosure – NV Non Judicial | Foreclosure File Received |
| Record Notice of Default | |
| Sale Scheduled | |
| Foreclosure Sale Held | |
| Deed Recorded | |
| Foreclosure Case Closure | |
| Foreclosure – NY Co-op | Foreclosure File Received |
| Title Report Received | |
| Preliminary Title Clear | |
| Notice of Default Sent | |
| First Publication | |
| Sale Scheduled | |
| Final Title Clear | |
| Foreclosure Sale Held | |
| Foreclosure Case Closure | |
| Foreclosure – NY Judicial | Foreclosure File Received |
| Complaint Filed | |
| Service Complete | |
| Aff of Service, RJI, Attorney Affirmation Filed | |
| Mandatory Settlement Conference Completed | |
| Motion to Appoint Referee to Compute Filed | |
| Judgment of Foreclosure and Sale Entered | |
| Sale Scheduled | |
| Foreclosure Sale Held | |
| Foreclosure Case Closure | |
| Foreclosure – OH Judicial | Foreclosure File Received |
| Complaint Filed | |
| Service of Process Completed | |
| Motion for Judgment Filed | |
| Judgment Entered | |
| Sale Scheduled | |
| Foreclosure Sale Held | |
| Order of Confirmation | |
| Deed Recorded | |
| Foreclosure Case Closure | |
| Foreclosure – OK Judicial | Foreclosure File Received |
| Complaint Filed | |
| Service of Process Completed | |
| Judgment Entered | |
| Sale Scheduled | |
| Foreclosure Sale Held | |
| Sale Confirmed | |
| Deed Recorded | |
| Foreclosure Case Closure | |
| Foreclosure – OR Judicial | Foreclosure File Received |
| Complaint Filed | |
| Service of Process Completed | |
| Judgment Entered | |
| Sale Scheduled | |
| Foreclosure Sale Held | |
| Deed Recorded | |
| Foreclosure Case Closure | |
| Foreclosure – OR Non Judicial | Foreclosure File Received |
| Sale Scheduled and Notice of Default Sent | |
| Publication and Posting of Sale Completed | |
| Foreclosure Sale Held | |
| Deed Recorded | |
| Foreclosure Case Closure | |
| Foreclosure – PA Judicial | Foreclosure File Received |
| Complaint Filed | |
| Service of Process Completed | |
| Judgment Entered | |
| Sale Scheduled | |
| Foreclosure Sale Held | |
| Deed Recorded | |
| Foreclosure Case Closure | |
| Foreclosure – PR Judicial | Foreclosure File Received |
| Complaint Filed | |
| Service of Process Completed | |
| Motion for Summary Judgment Filed | |
| Judgment Entered | |
| Writ of Execution | |
| Notice of Sale | |
| Foreclosure Sale Held | |
| Sale Deed Executed | |
| Foreclosure Case Closure | |
| Foreclosure – RI Non Judicial | Foreclosure File Received |
| Expiration of 30 Day Statutory Notice Period | |
| Publication of the Notice of Foreclosure | |
| Sale Scheduled | |
| Foreclosure Sale Held | |
| Deed Recorded | |
| Foreclosure Case Closure | |
| Foreclosure – SC Judicial | Foreclosure File Received |
| Complaint Filed | |
| Service of Process Completed | |
| Order of Reference Entered and Hearing Scheduled | |
| Judgment Entered | |
| Sale Complete | |
| Redemption Period Expires | |
| Deed Recorded | |
| Foreclosure Case Closure | |
| Foreclosure – SD Judicial | Foreclosure File Received |
| Complaint Filed | |
| Service of Process Completed | |
| Judgment Entered | |
| Sale Scheduled | |
| Foreclosure Sale Held | |
| Redemption Period Expires | |
| Deed Recorded | |
| Foreclosure Case Closure | |
| Foreclosure – TN Non Judicial | Foreclosure File Received |
| Sale Scheduled | |
| Substitution of Trustee Recorded | |
| Foreclosure Sale Held | |
| Deed Recorded | |
| Foreclosure Case Closure | |
| Foreclosure – TX Home Eq | Foreclosure File Received |
| Application for Expedited Order to Allow FCL Filed | |
| Foreclosure Order and Affidavit | |
| Signed Order Received | |
| Posting to Sale Held | |
| Foreclosure Sale Held | |
| Foreclosure Case Closure | |
| Foreclosure – TX Non Judicial | Foreclosure File Received |
| Post Notice of Sale | |
| File Foreclosure Notice with County Clerk | |
| Sale Scheduled | |
| Foreclosure Sale Held | |
| Deed Recorded | |
| Foreclosure Case Closure | |
| Foreclosure – UT Non Judicial | Foreclosure File Received |
| Expiration of 3 Month Reinstatement Period | |
| Sale Scheduled | |
| Foreclosure Sale Held | |
| Deed Recorded | |
| Foreclosure Case Closure | |
| Foreclosure – VA Non Judicial | Foreclosure File Received |
| Sale Scheduled | |
| Publication and Posting of Sale Completed | |
| Foreclosure Sale Held | |
| Deed Recorded | |
| Foreclosure Case Closure | |
| Foreclosure – VI Judicial | Foreclosure File Received |
| Complaint Filed | |
| Service of Process Completed | |
| Motion for Summary Judgment Filed | |
| Judgment Entered | |
| Writ of Execution | |
| Notice of Sale | |
| Foreclosure Sale Held | |
| Sale Deed Executed | |
| Foreclosure Case Closure | |
| Foreclosure – VT Judicial | Foreclosure File Received |
| Complaint Filed | |
| Service of Process Completed | |
| Motion for Summary Judgment Filed | |
| Judgment Entered | |
| Sale Scheduled | |
| Foreclosure Sale Held | |
| Sale Confirmed | |
| Deed Recorded | |
| Foreclosure Case Closure | |
| Foreclosure – WA Judicial | Foreclosure File Received |
| Complaint Filed | |
| Service of Process Completed | |
| Judgment Entered | |
| Sale Scheduled | |
| Foreclosure Sale Held | |
| Deed Recorded | |
| Redemption Period Expires | |
| Foreclosure Case Closure | |
| Foreclosure – WA Non Judicial | Foreclosure File Received |
| Notice of Sale Recorded | |
| Sale Scheduled | |
| Foreclosure Sale Held | |
| Deed Recorded | |
| Foreclosure Case Closure | |
| Foreclosure – WI Judicial | Foreclosure File Received |
| Complaint Filed | |
| Service of Process Completed | |
| Judgment Entered | |
| Redemption Period Expires | |
| Sale Scheduled | |
| Foreclosure Sale Held | |
| Confirmation of Sale | |
| Deed Recorded | |
| Foreclosure Case Closure | |
| Foreclosure – WV Non Judicial | Foreclosure File Received |
| Trustee Sale Scheduled | |
| Notice of Sale Mailed | |
| Foreclosure Sale Held | |
| Deed Recorded | |
| Foreclosure Case Closure | |
| Foreclosure – WY Non Judicial | Foreclosure File Received |
| Sale Scheduled | |
| Foreclosure Sale Held | |
| Certificate of Sale Recorded | |
| Redemption Period Expires | |
| Foreclosure Case Closure | |
| Bankruptcy – Motion For Relief | Bankruptcy File Received |
| Relief from Stay/Discharge | |
| Bankruptcy Case Closure | |
| Bankruptcy – Proof Of Claim | Bankruptcy File Received |
| POC Filed | |
| Plan Confirmed | |
| Bankruptcy Case Closure |