ADR
Attorney Data Reporting
Servicer User Guide
Document Revision History
| Revision Date | System or Process Update | Section Updated |
| 10-15-2018 | Updated all screenshots for ADR updates and added new section for Direct Title Rollout | New sections include the following:
|
| 03-20-2019 | Updated Title Cancellation process Added Beneficiary Check Document Retrieval process Added Title Update Request process |
6.3 Title Order Cancellation 6.5.1 Beneficiary Check Document Retrieval 6.6 Title Update Requests |
| 06-25-2019 | Added Title Order Inquiries Section | 6.7 Title Order Inquiries |
Table of Contents
1 Managing Users
- 1.1 Adding Users
- 1.2 Adding a Role to a User
- 1.3 Remove a Role
- 1.4 Deactivate a User
- 1.5 Unlock a User
- 1.6 Reset a User Password
- 1.7 Adding a User to Multiple Organizations
- 1.7.1 Removing a User from an Organization
- 1.8 Re-Certification Process
2 Accessing the System
- 2.1 Logging into the System
- 2.2 Resetting Your Password
3 Loans
- 3.1 Locating a Loan
- 3.2 Reviewing a Loan Summary Page
- 3.2.1 Summary Section
- 3.2.2 Activity Section
- 3.2.3 Processes Section
- 3.2.4 Ordering Loan Modification / Deed In Lieu Title
- 3.2.4.1 Title Order via Quandis Application
- 3.2.4.2 Title Order via File Drop
4 Foreclosure
- 4.1 Foreclosure Summary Section
- 4.2 Workflow Section
- 4.3 Documents Section
- 4.4 Processes Section
5 Bankruptcies
- 5.1 Bankruptcy Summary Section
- 5.2 Workflow Section
- 5.3 Documents Section
- 5.4 Processes Section
6 Title Home
- 6.1 Title Dashboard
- 6.2 Title List
- 6.3 Title Order Cancellation
- 6.3.1 Verify Cancellation of Title Order
- 6.4 Title Summary Page
- 6.5 Title Product Retrieval
- 6.6 Title Update Requests
- 6.7 Title Order Inquiries
7 Export List to Excel or CSV
8 State Workflow
1 Managing Users
This section will guide the security administrator on how to Add Users, Add Roles to a User, Remove Roles from a User, De-Activate a User, Unlock a User, Reset a User’s Password, and Add a User to Multiple Organizations.
A user’s ability to view and or edit fields in the system is based on their role.
There are 2 roles: Security Administrator and Servicer.
The Security Administrator Role is the only role that manages users in the system.
The Servicer role is reserved for users who need to view loans associated with their company in the ADR system.
If your company is new to the ADR system, you may contact adr.support@quandis.com with the information below to request an initial user account, which will allow you to manage additional users within your Organization:
- Administrator Name
- Administrator Email Address
- Complete Address for your Company
- Phone and Fax Numbers
- List of Freddie Mac Servicer IDs associated with your Company
1.1 Adding Users
- Select Organizations from the Contacts drop down.

- Click on the Organization name hyperlink. If your company has more than one organization, you will have several listed. You are directed to the Organization Summary page.
- Select the ‘+’ symbol within the “Users” panel to add a New User.

- Enter the following fields within the Register Panel and select ‘Register’
- First Name
- Last Name
- Email Address
- System Roles – Role to be granted access
- You are directed back to the Users panel

- To activate the user, click in the user’s row to highlight the row or check the box under the All column.

- Select Activate Users from the Options drop down menu.
- Click Okay in the Confirmation dialogue box. The user is activated. All active users will have a status of “Yes” in the corresponding “Active” column

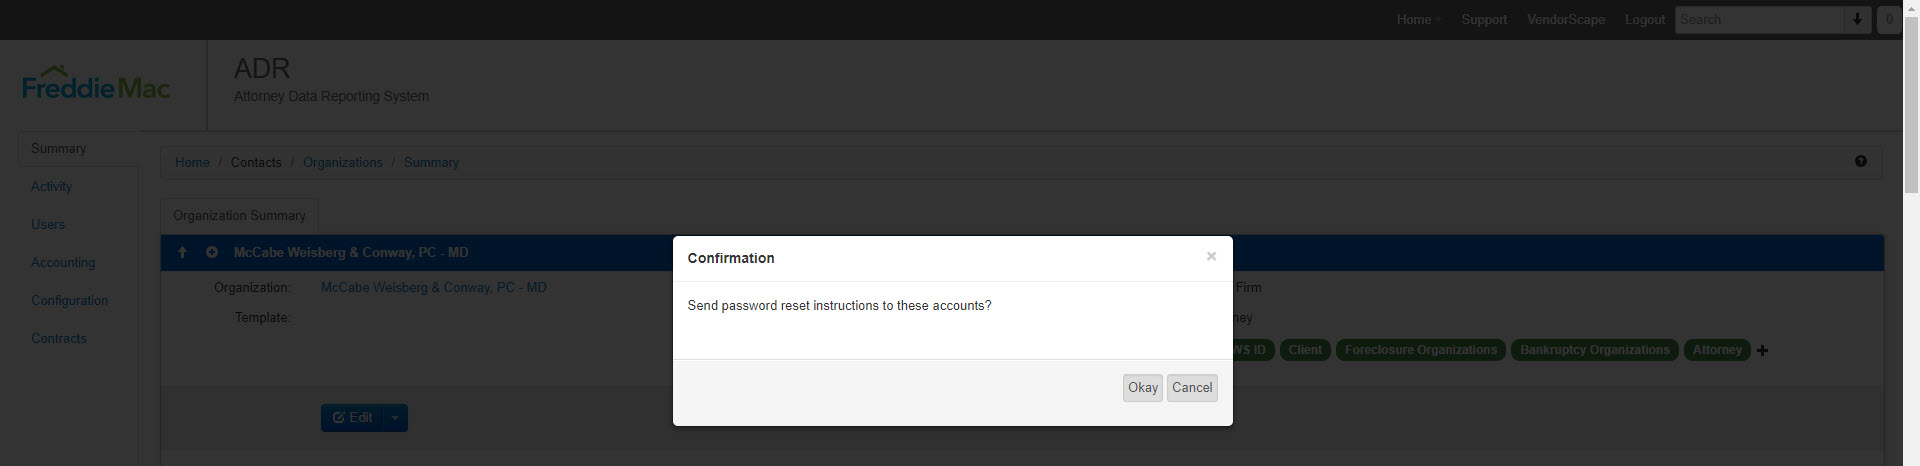
- Send the user a password reset email by selecting Send Password Reset from the Options drop down.
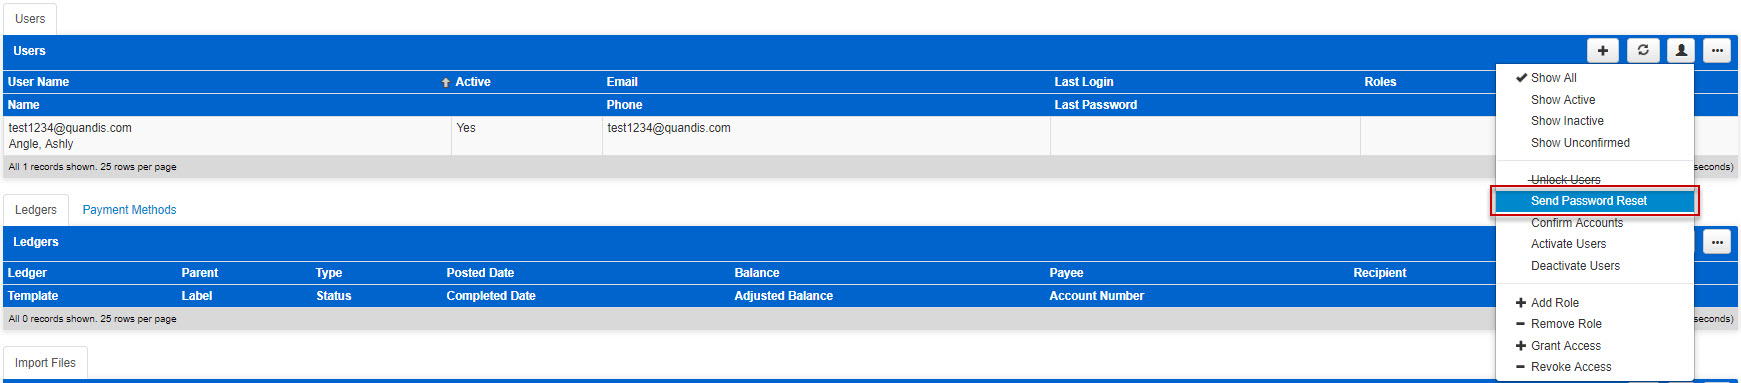
- Click Okay in the Confirmation dialogue box..
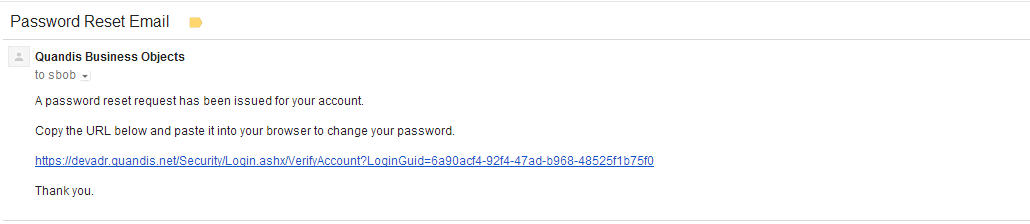
- The user will receive an email with instructions on how to set their password. Below is a sample of the email that will be received:
1.2 Adding A Role to a User
- Search for the user that requires a role to be added.
- Click into the row to highlight the user or check the box in the All column.

3. Select Add Role form the Options drop down menu.
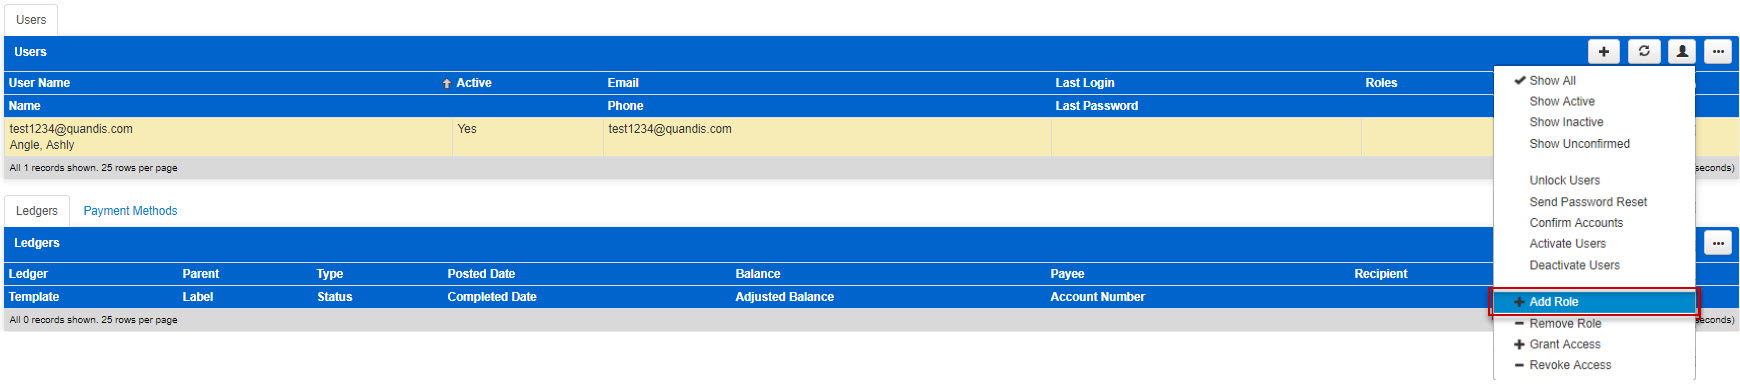
4. Select the role to be added from the Role drop down menu. In this example, the role of manager is added.

5. Click Save.
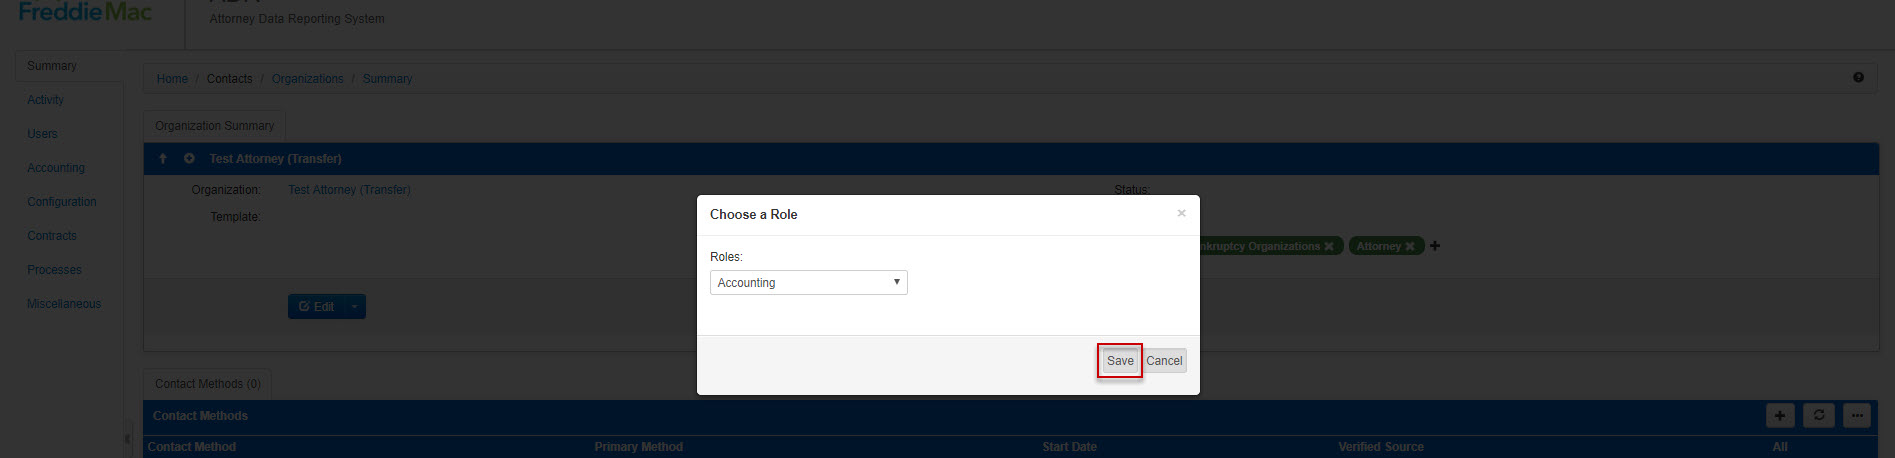
6. The role has been added. In this example, the Accounting role was added to the user.

1.3 Remove a Role
- Search for the user that requires a role to be removed.
- Click into the row to highlight the user or check the box in the All column.

3. Select Remove Role from the Options drop down.

4. Select a role to be removed from the role drop down menu. In this example, the role of Manger is going to be removed.
5. Click Save.
6. The role has been removed.

1.4 Deactivate a User
- Search for the user that needs to be deactivated. (More than one user can be deactivated at a time)
- Click into the row to highlight the user.
3. Select Deactivate Users from the Options drop down.

4. Click Okay in the Confirmation dialogue box.

5. The Active column is No.

1.5 Unlock a User
- Search for the user that needs to be unlocked. (More than one user can be unlocked at a time)
- Click into the row to highlight the user.
3. Select Unlock Users from the Options drop down.

4. Click Okay in the confirmation dialogue box.

5. The user has been unlocked.
1.6 Reset a User Password
- Search for the user that requires a password reset. (More than one user can have their password reset at a time)
- Click into the row or its checkbox to highlight the user.

3. Select Send Password Reset from the Options drop down.

4. Click Okay in the Confirmation dialogue box.

5. The user is sent an email to reset password.
1.7 Adding a User to Multiple Organizations
1. Some users will need to be granted access to multiple Servicers in the ADR system. This is due to factors including subservicing and acquisitions, to name a couple examples, and ADR recognizes each servicer/subservicer as an individual Organization having access to their own list of loans.
2. In this example, the user tservicer2@quandis.com is a member of the Wells and Test Servicer organizations.
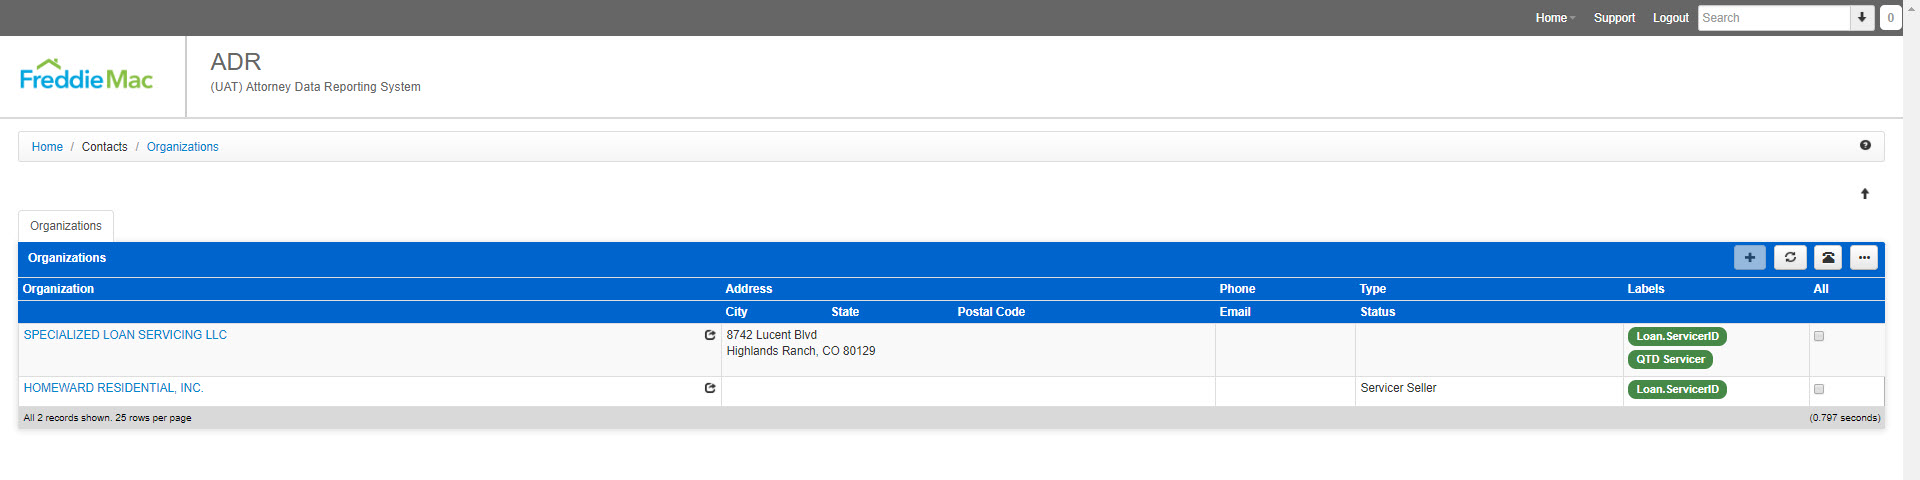
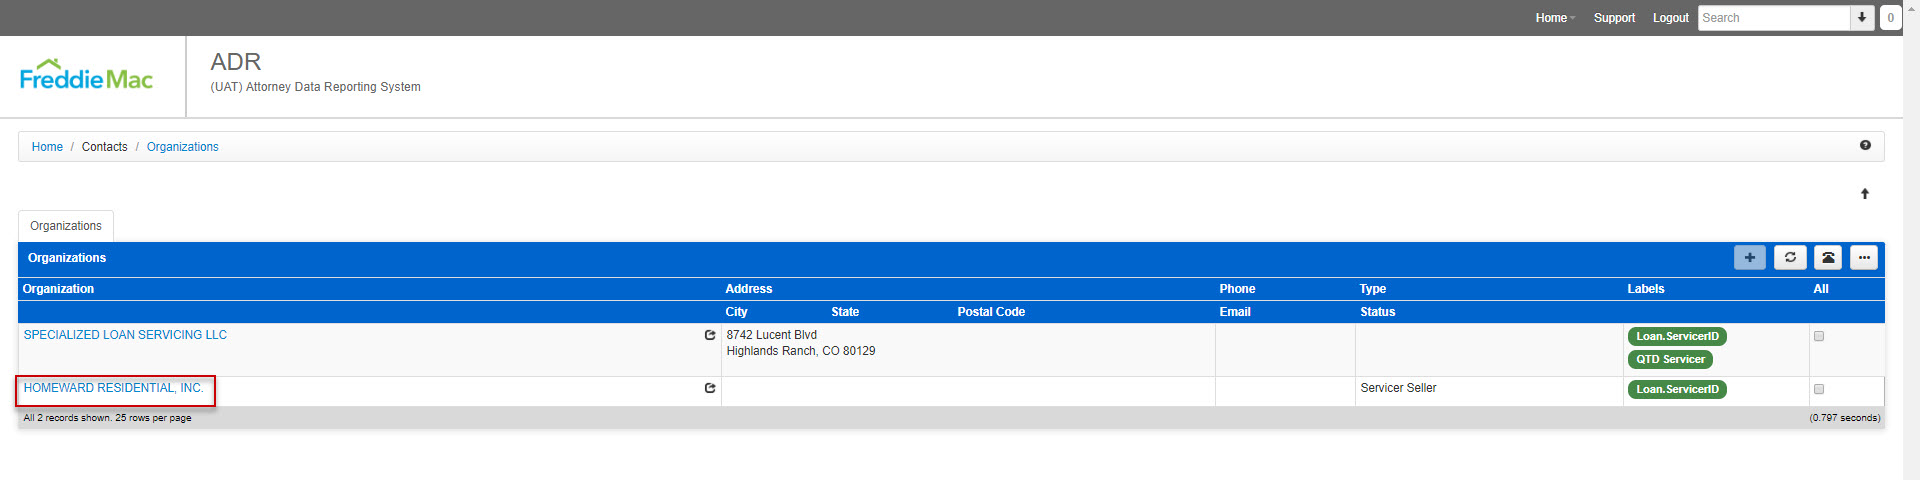
3. Continuing this example, testservicer2@quandis.com needs to be added to the HOMEWARD RESIDENTIAL, INC. organization. Select the “HOMEWARD RESIDENTIAL, INC” organization.
4. Locate the “Users” panel on the organization’s summary page. To grant this user access, select “Grant Access” from the ‘Person’ icon drop down of the Users panel.
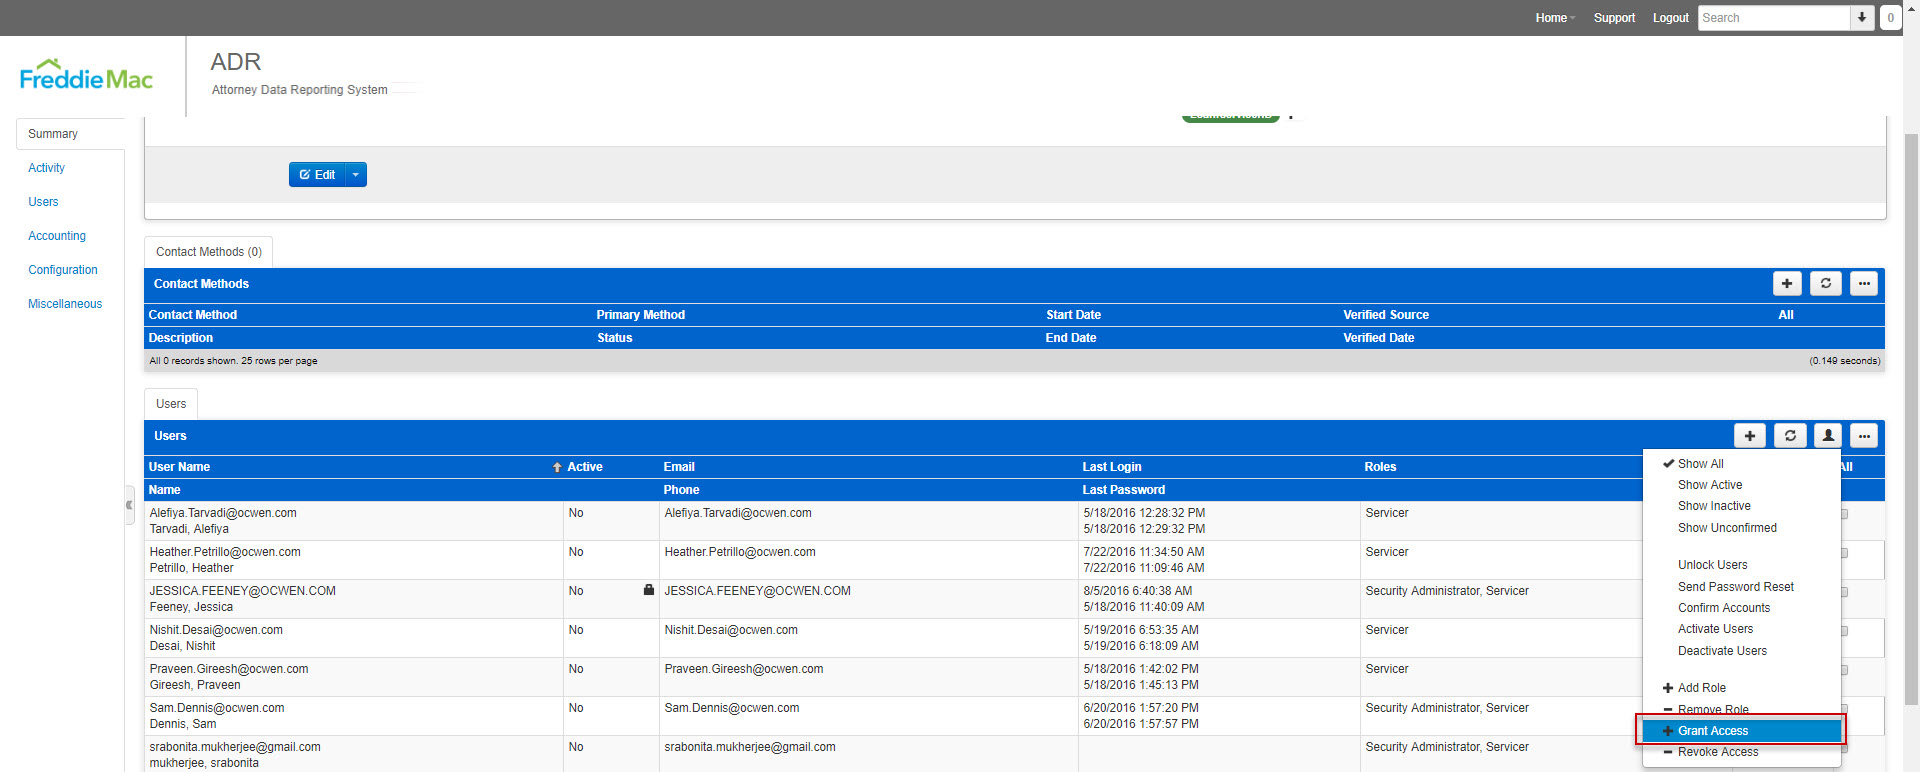
5. Select testservicer2@quandis.com from the Grant Access drop down. Select ‘Save’.

6. The user testservicer2@quandis.com now appears in the Users panel.

7. Only users that have the role of Security Administrator can complete the above.
1.7.1 Removing a User from an Organization
- Select an organization from the “Organizations” page, located under the Contacts drop down.
- Locate the Users panel and click into the row of the user you wish to remove. Select “Revoke Access” from the ‘Person’ icon drop down of the Users panel.

- Select “Okay” in the Confirmation window. The user has been removed from the organization.

1.8 User Re-certification Process
NOTE: As per Freddie Mac security guidelines, each organization will be required to re-certify user accounts at least once every 6 months. Security Administrators for the organization can certify the user from the organization’s profile. Because users are not permitted to re-certify their own account, each organization will need at least 2 Security Administrators for each organization.
1. Security Administrators will receive a daily email notification with a list of users that have not logged into the ADR website for at least 5 months.

2. Logged in as a Security Administrator, access the organization where users require re-certification by selecting Organizations under the Contacts drop down.
3. Select the organization where users require re-certification.
4. Locate the “Users” panel and select the corresponding user by clicking the checkbox on the right side of the page. You may select all users and re-certify their accounts at once, but only select “All” if all users require certification (which is confirmed in the email notification).
NOTE: Active users can be sorted by clicking on the column header “Active” with the value “True” on the top of the list.
5. After selecting the user accounts, select “Confirm Accounts” from the ‘Person’ icon drop down. Select “Okay” in the Confirmation window.
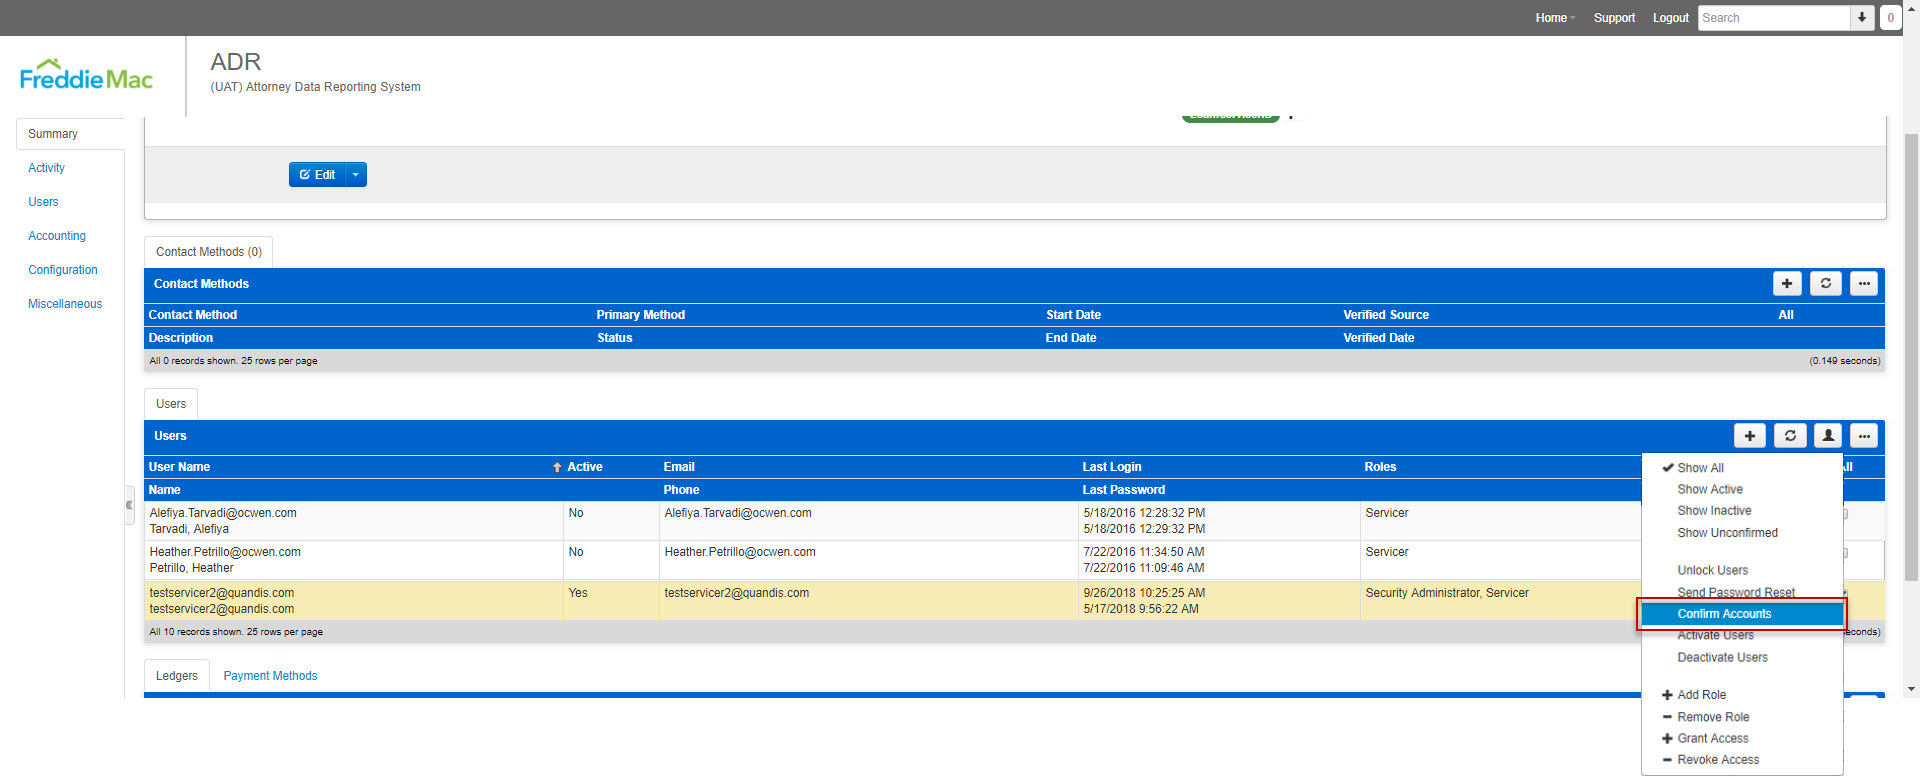
6. A confirmation message appears at the top of the page.
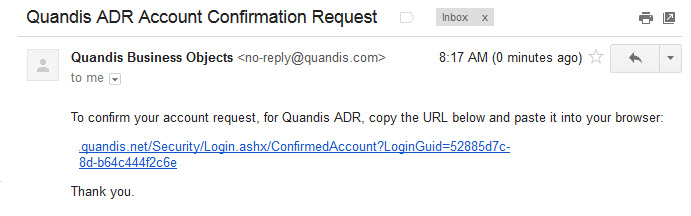
7. The user will be sent an email that provides a link to re-certify their account. The user can copy and paste the link provided in the email into their web browser to re-certify.
8. The user will receive a message that their account has been confirmed.
9. Security Administrators can confirm if the account has been re-certified by reviewing the daily email notifications that provide the list of users that require re-certification. The users that have been successfully re-certified will not appear in the list on the next day’s email list.
10. If the user has not been re-certified by the end of the 6th consecutive inactive month, their account will be deactivated. Security Administrators will need to reactivate the account. Once the account has been reactivated, confirm the account as done through the normal re-certification process. Please review Section 1.1 “Adding Users” for instructions on reactivating an account.
11. If Security Administrators are receiving email notifications that a backup Security Administrator is required, they will need to add the “Security Administrator” role to another user in their organization. Please review Section 1.2 “Adding a Role to a User” for further instructions. Users can confirm there are more than 2 Security Administrators in their organization by not receiving emails with the subject, “ADR System User Re-certification – Backup Security Administrator Needed”.
2 Accessing the System
***Please Note*** the system is compatible with the following internet browsers:
- Internet Explorer 9, 10, and 11
- Google Chrome (Version 25+)
- Firefox (Version 17+)
- Safari (Version 5+)
**Users that are not using one of the above compatible web browsers will receive an error message and be denied access to the ADR website**
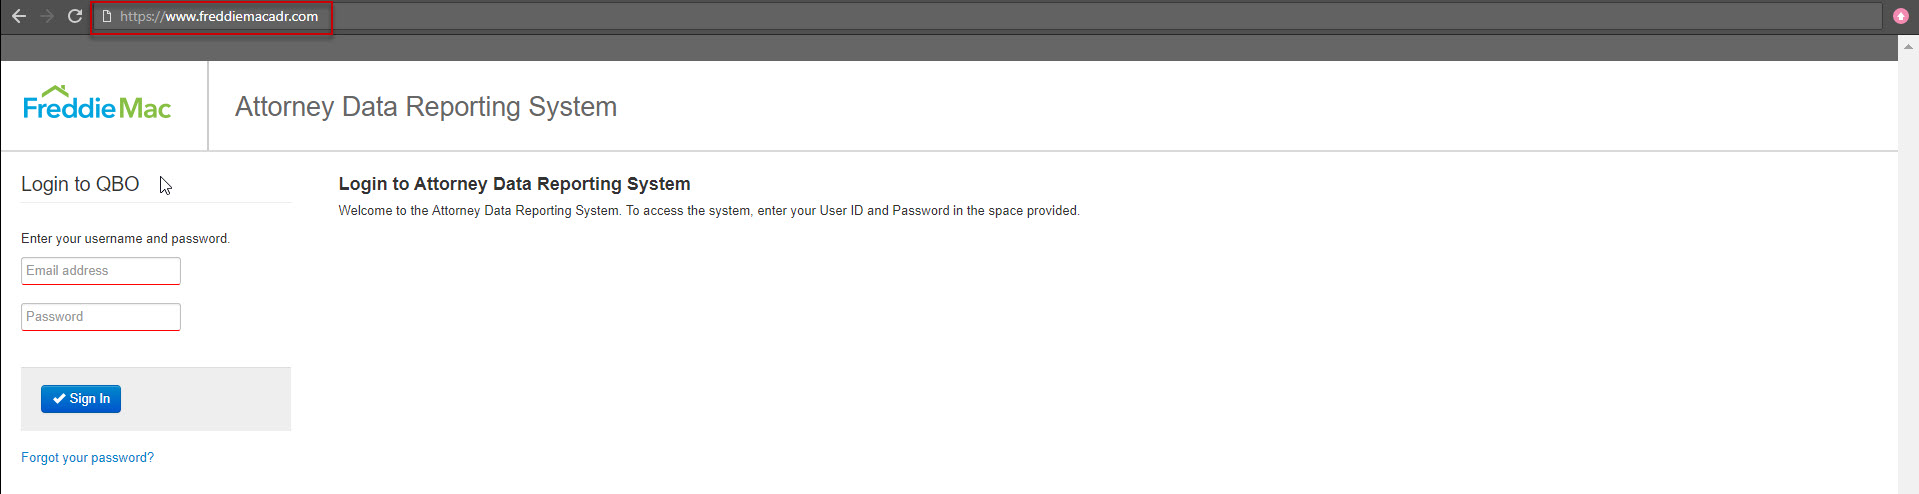
2.1 Logging Into the System
- Enter https://www.freddiemacadr.com in your address bar.
2. Enter the e-mail address, which is your user name, in the E-mail field
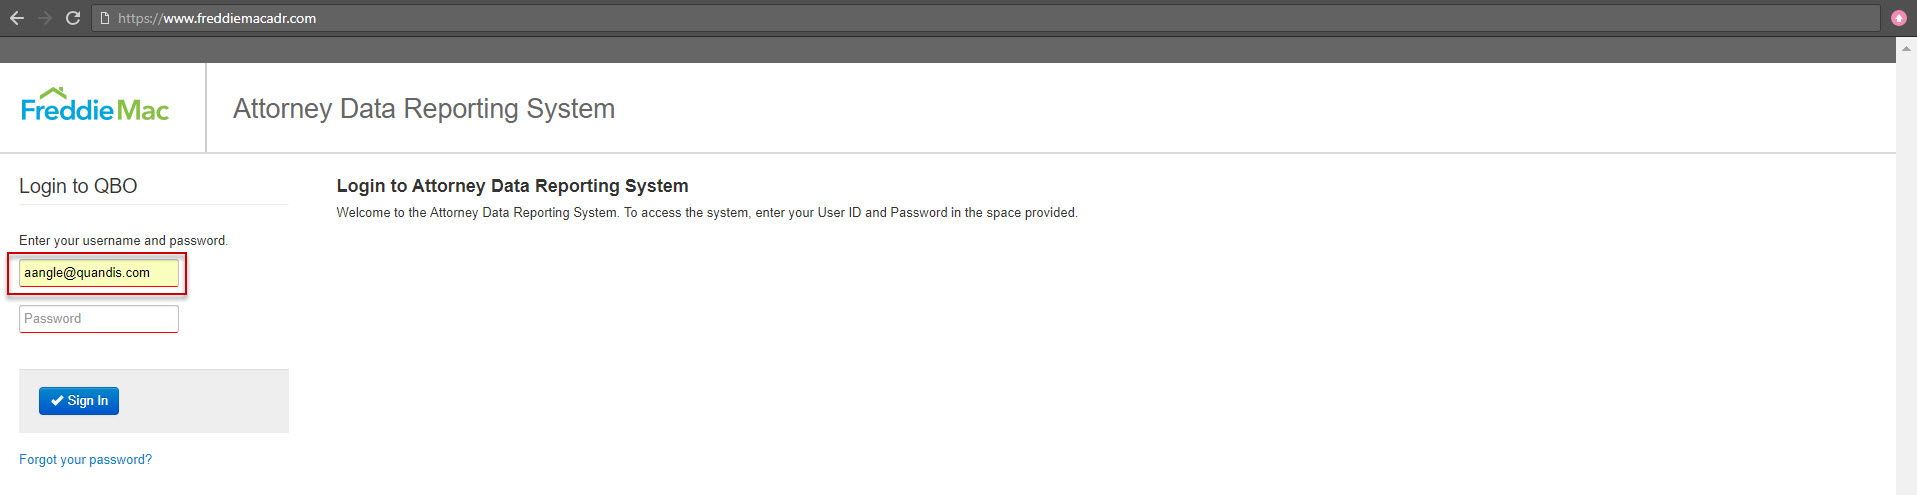
3. Enter your password in the password field.
4. Click Sign In.
5. You are directed to the Home Page.

2.2 Resetting Your Password
- A Security Administrator for your firm can send a Password Reset email to you (see Section 1.6), or you can click on the “Forgot your password?” Hyperlink.
2. You are directed to the Password reset page
3. Enter you email address in the email address field.

4. Click Reset
5. Whether you used the “Forgot your password?” link, or a Security Administrator initiated the Password Reset, you will receive an email with instructions on how to reset your password.

6. Passwords are case sensitive and must adhere to the following Freddie Mac security guidelines:
- 8 characters long
- At least one of the following special characters: ! @ # $ % ^ & * ( )
- At least one number
- At least one capital letter
- At least one lower case letter
- Your new password cannot match any of the previous 3 passwords
7. Users are required to reset their password every 90 days. Reminder notifications will be sent to the users prior to their passwords expiring. Should any user not reset their password prior to the 90-day expiration, their user account will be locked out. Upon their next attempt to login, they will be notified to contact their Security Administrator.
3 Loans
3.1 Locating a Loan
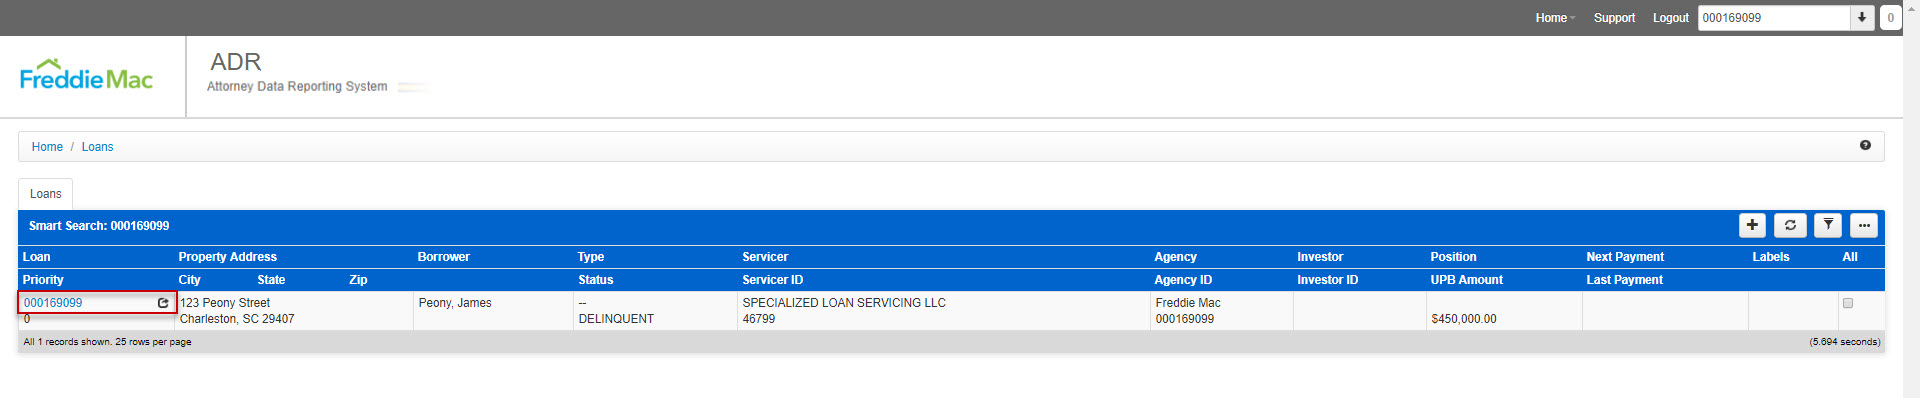
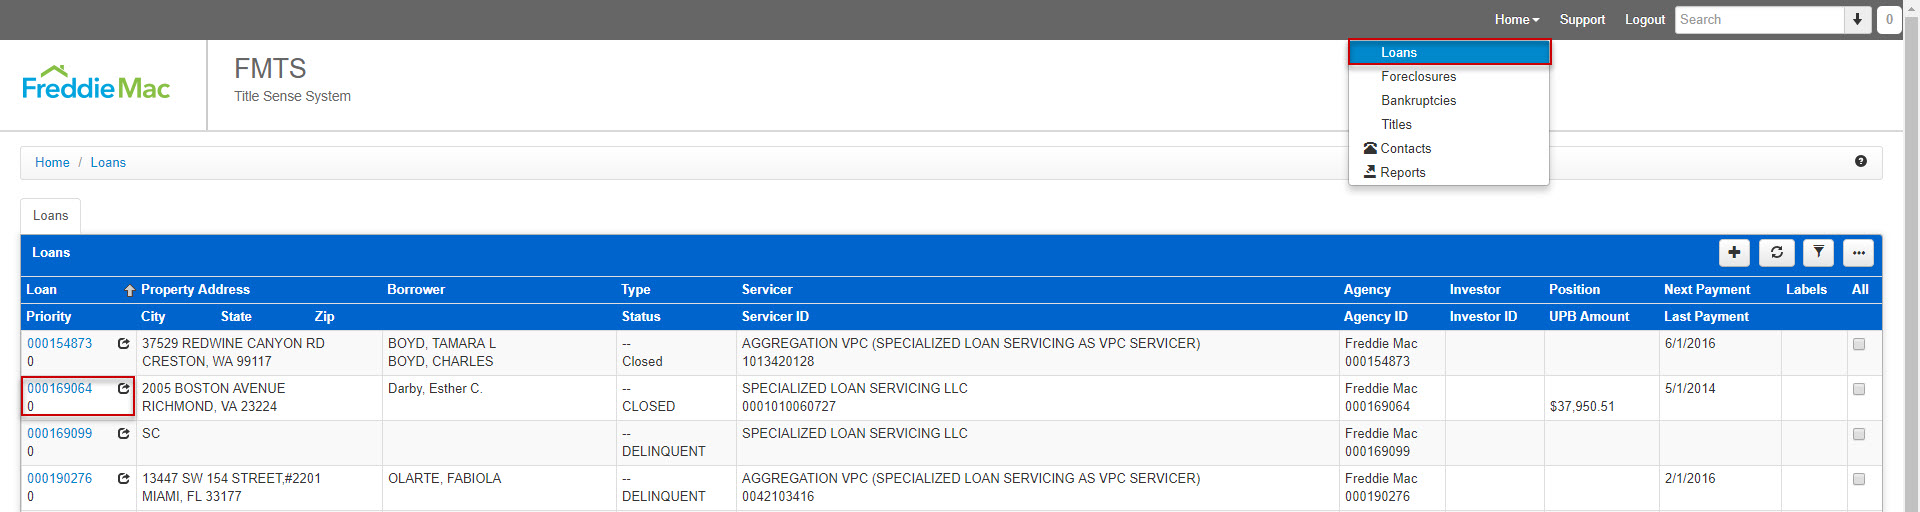
- Search for the loan you need to activate by entering the Freddie Mac loan number in the search field and click enter. Freddie Mac loan numbers are 9 characters in length and cannot be altered by users. Please note, you will want to be on the Loan Home Page, which you can access by navigating to Home > Loans.

- Your search results are presented
- You can also click on the down arrow located next to the search field.

- The loan search panel is expanded.
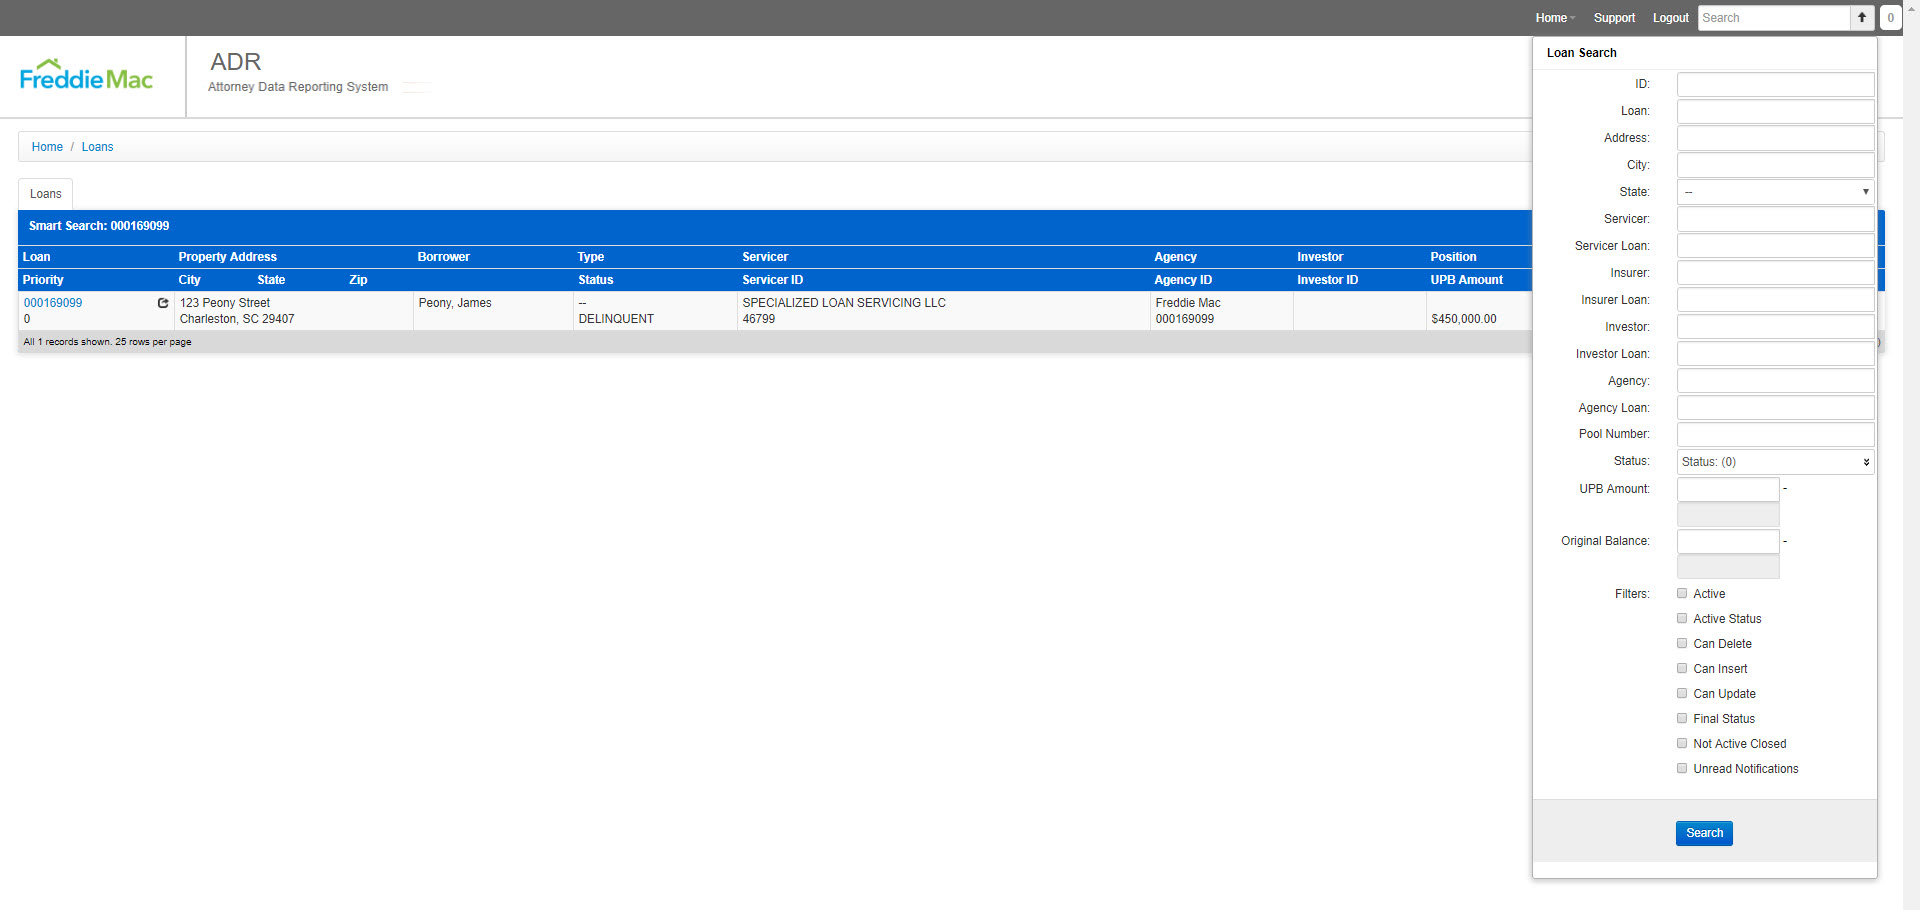
- Enter the loan number in the loan field.
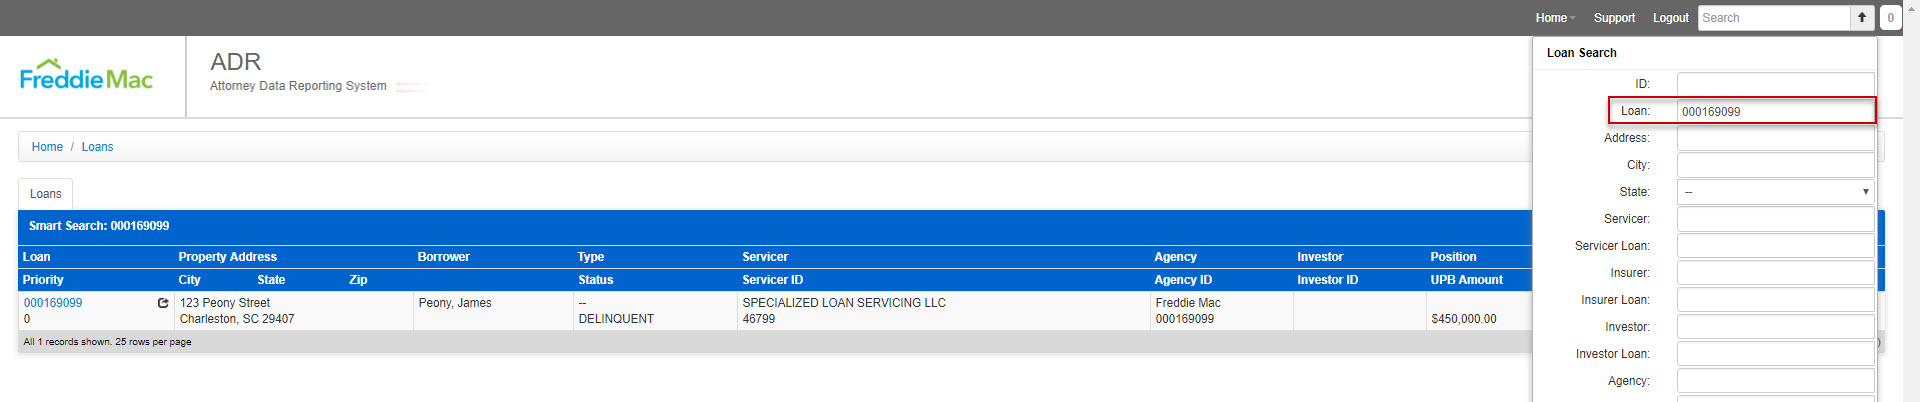
- Click Search.
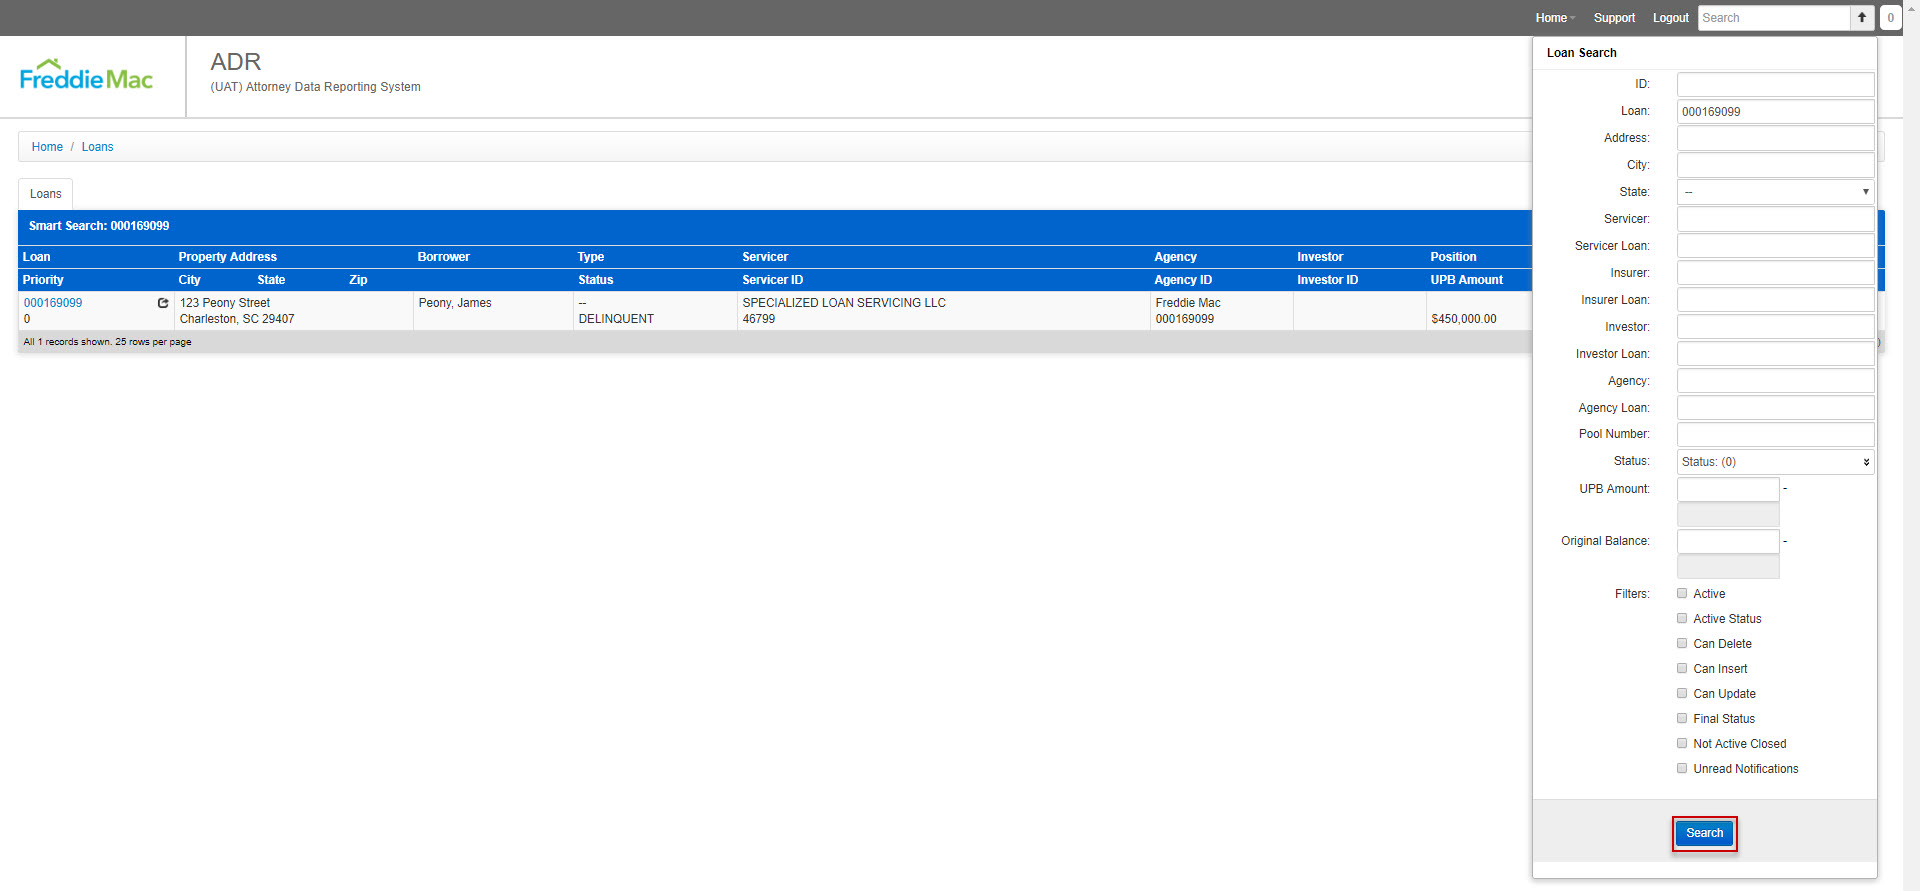
- Your search results are presented.

- Click on the Loan hyperlink in the Loan column.

3.2 Reviewing a Loan Summary Page
3.2.1 Summary Section
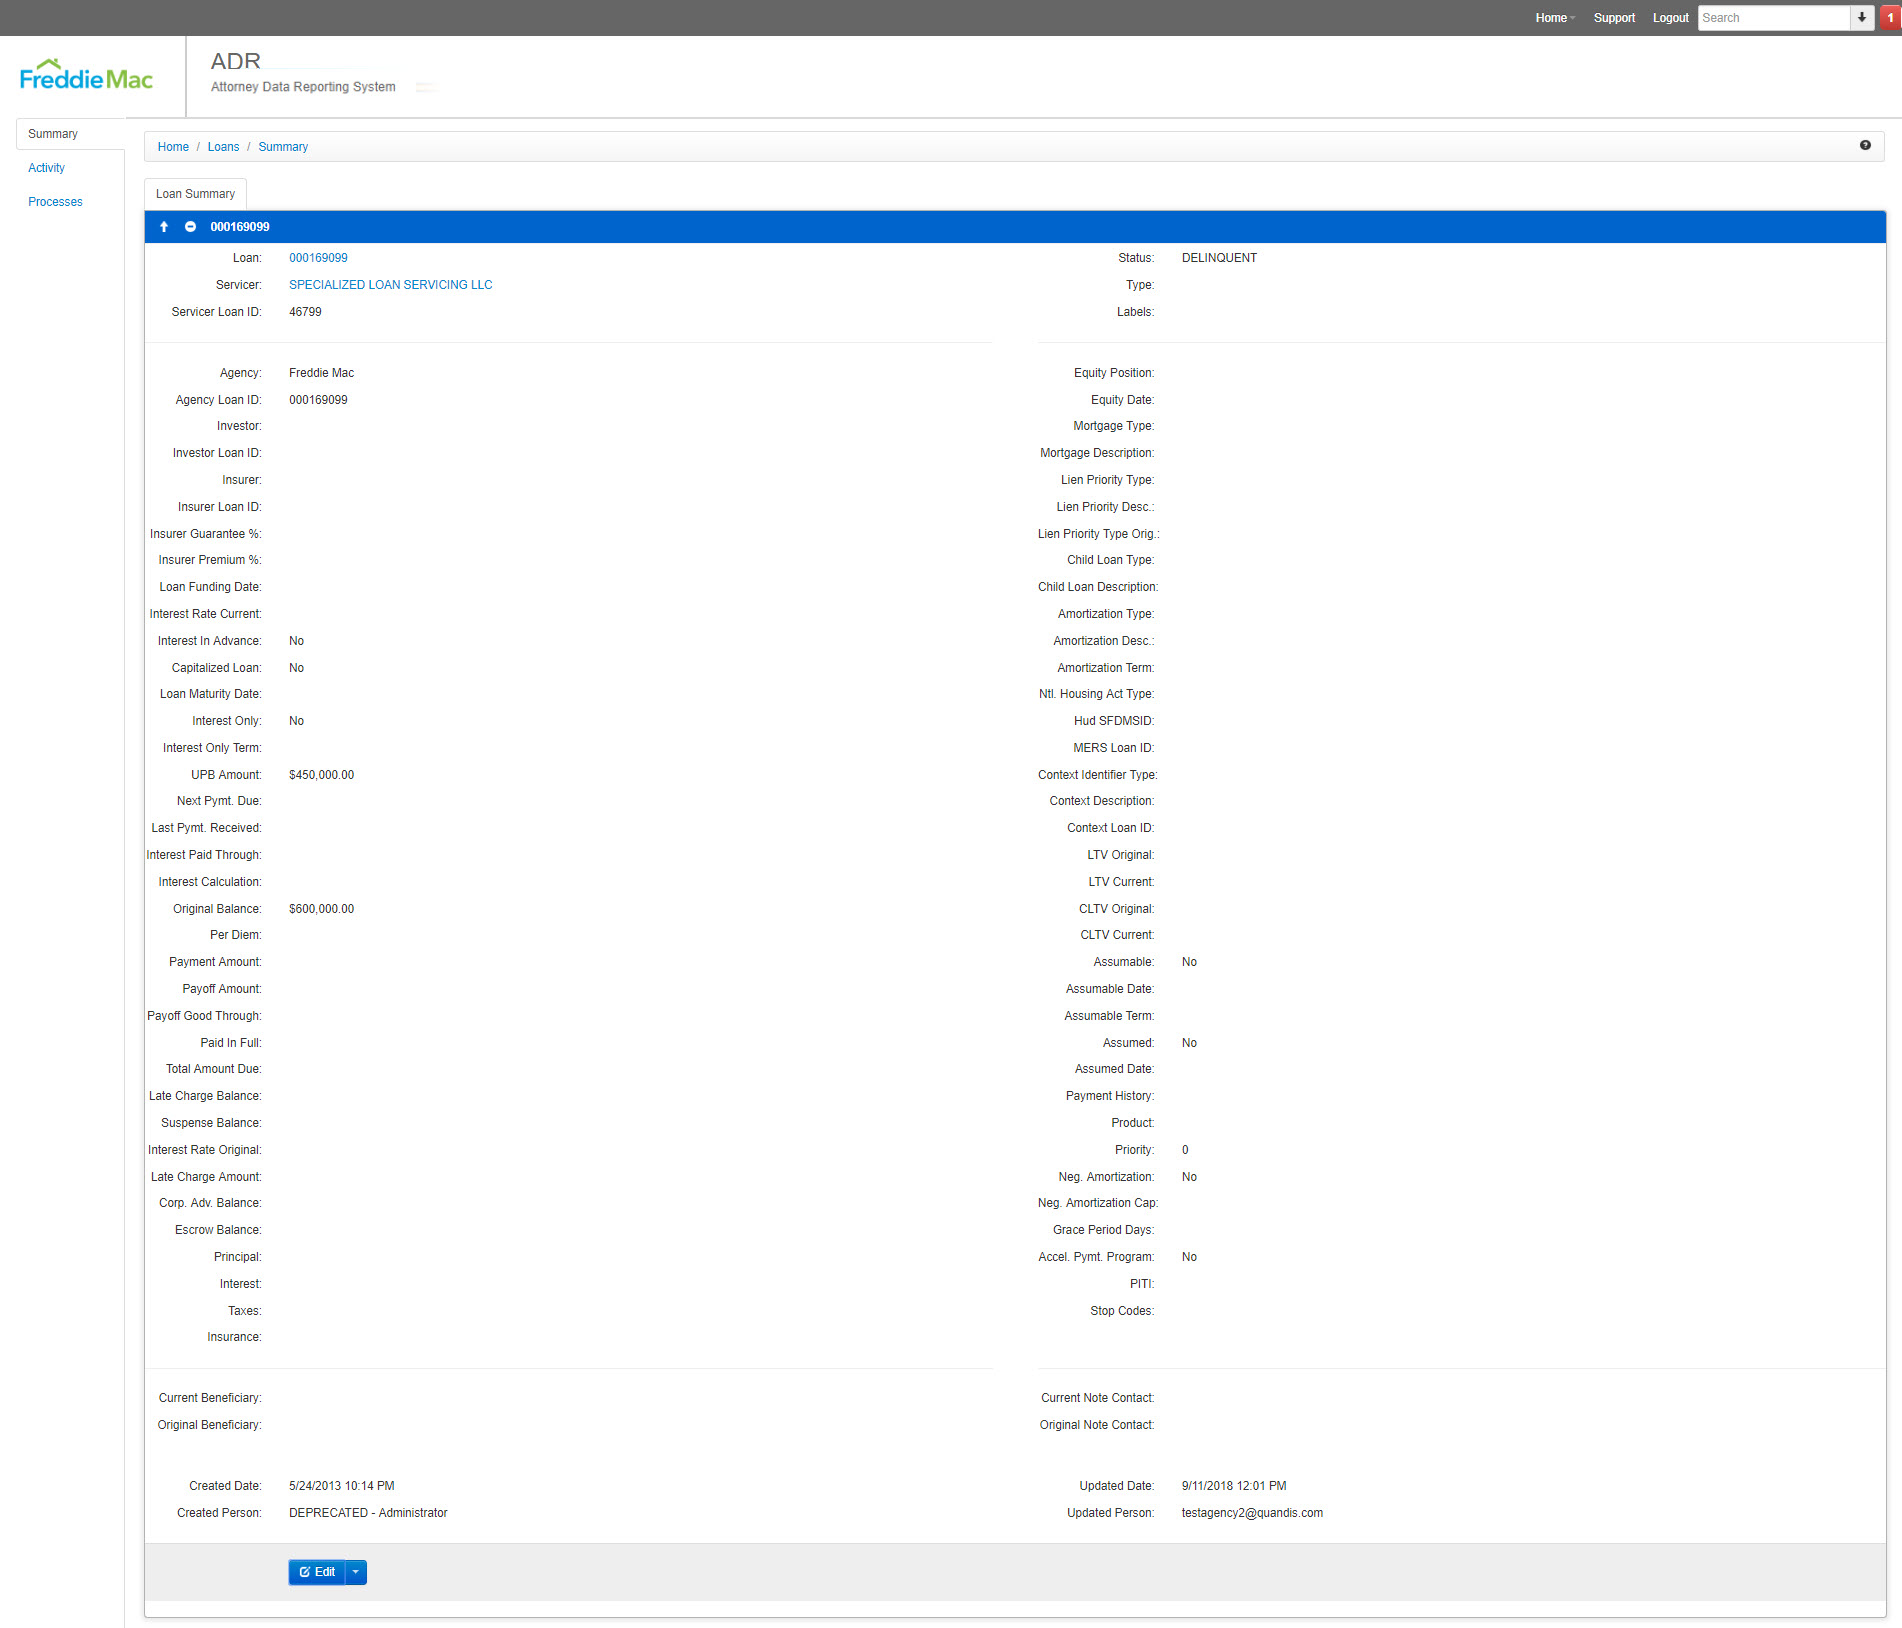
1. After searching for a loan, you may access the details of the loan by clicking on the blue hyperlink, representative by the loan number, as seen below.
2. You will be redirected to the “Loan Summary” page which provides Loan related information. Additional loan information is available by expanding the “Loan Summary” panel, which can be triggered by selecting the arrow and “+” icons on the top left corner of the panel.
3.2.2 Activity Section
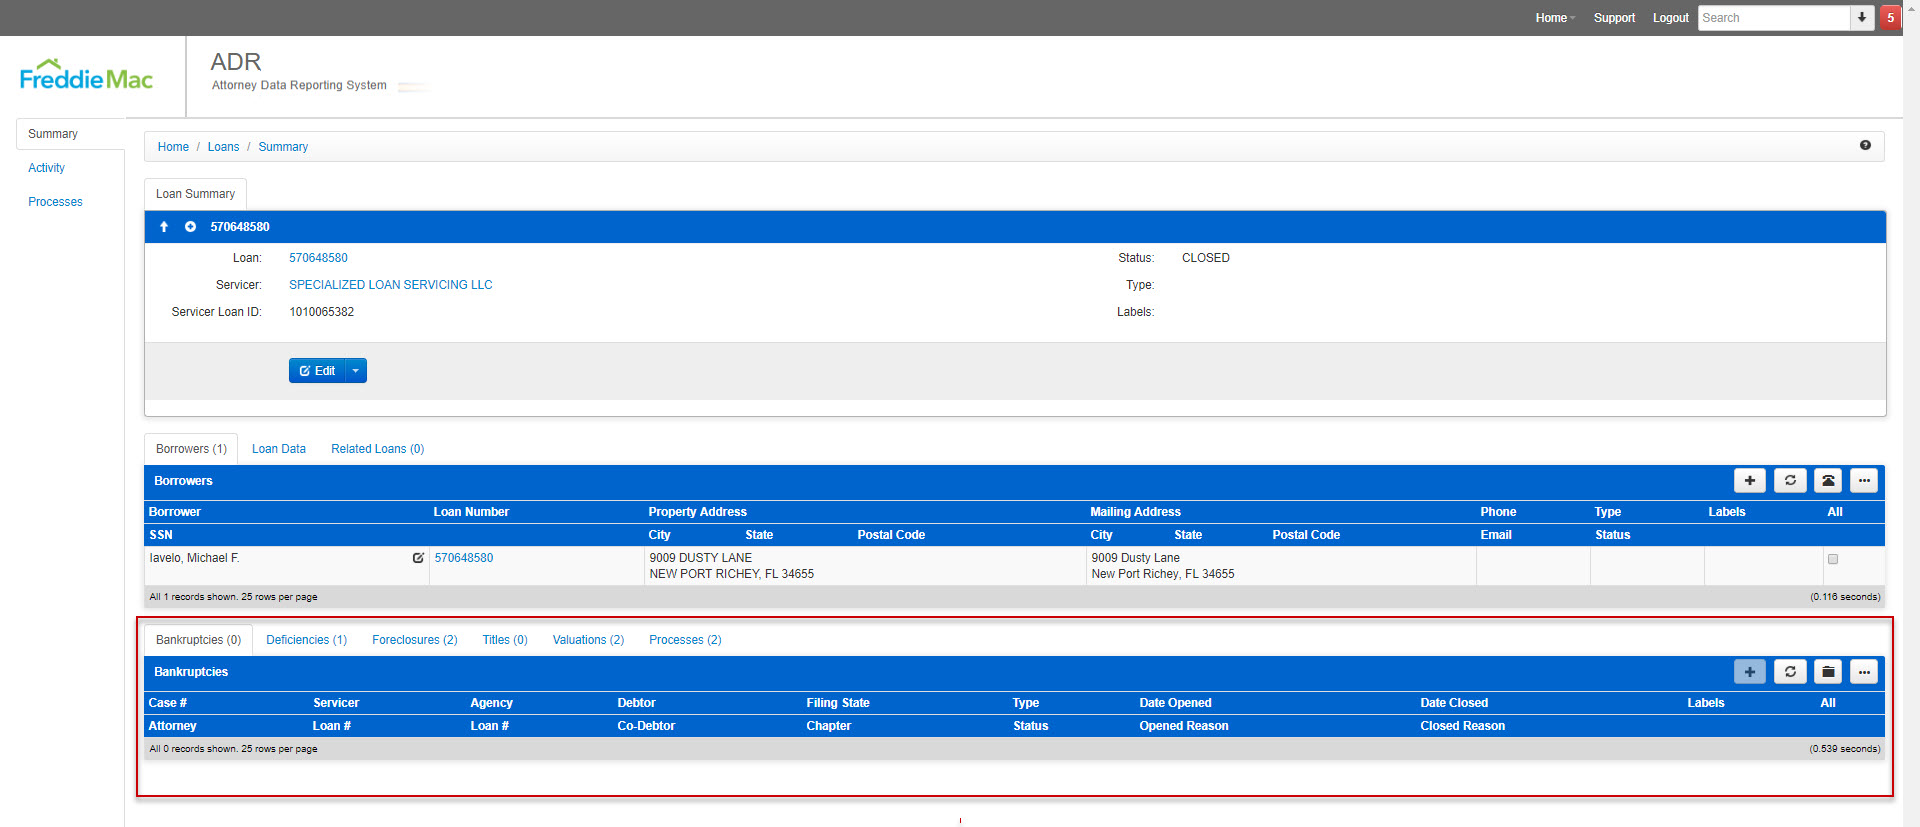
- The following panels are available within the ‘Activity’ Section.
- Borrower Panel: This information include borrower information (e.g. address, SSN, name, etc.) as well as type of borrower (primary or secondary).
- Note: SSN is fully masked
- Loan Data: This panel notes of loan data information
- Related Loans: Lists any related loans
- Borrower Panel: This information include borrower information (e.g. address, SSN, name, etc.) as well as type of borrower (primary or secondary).

3.2.3 Processes Section
- The following panels are available within the ‘Processes’ Section
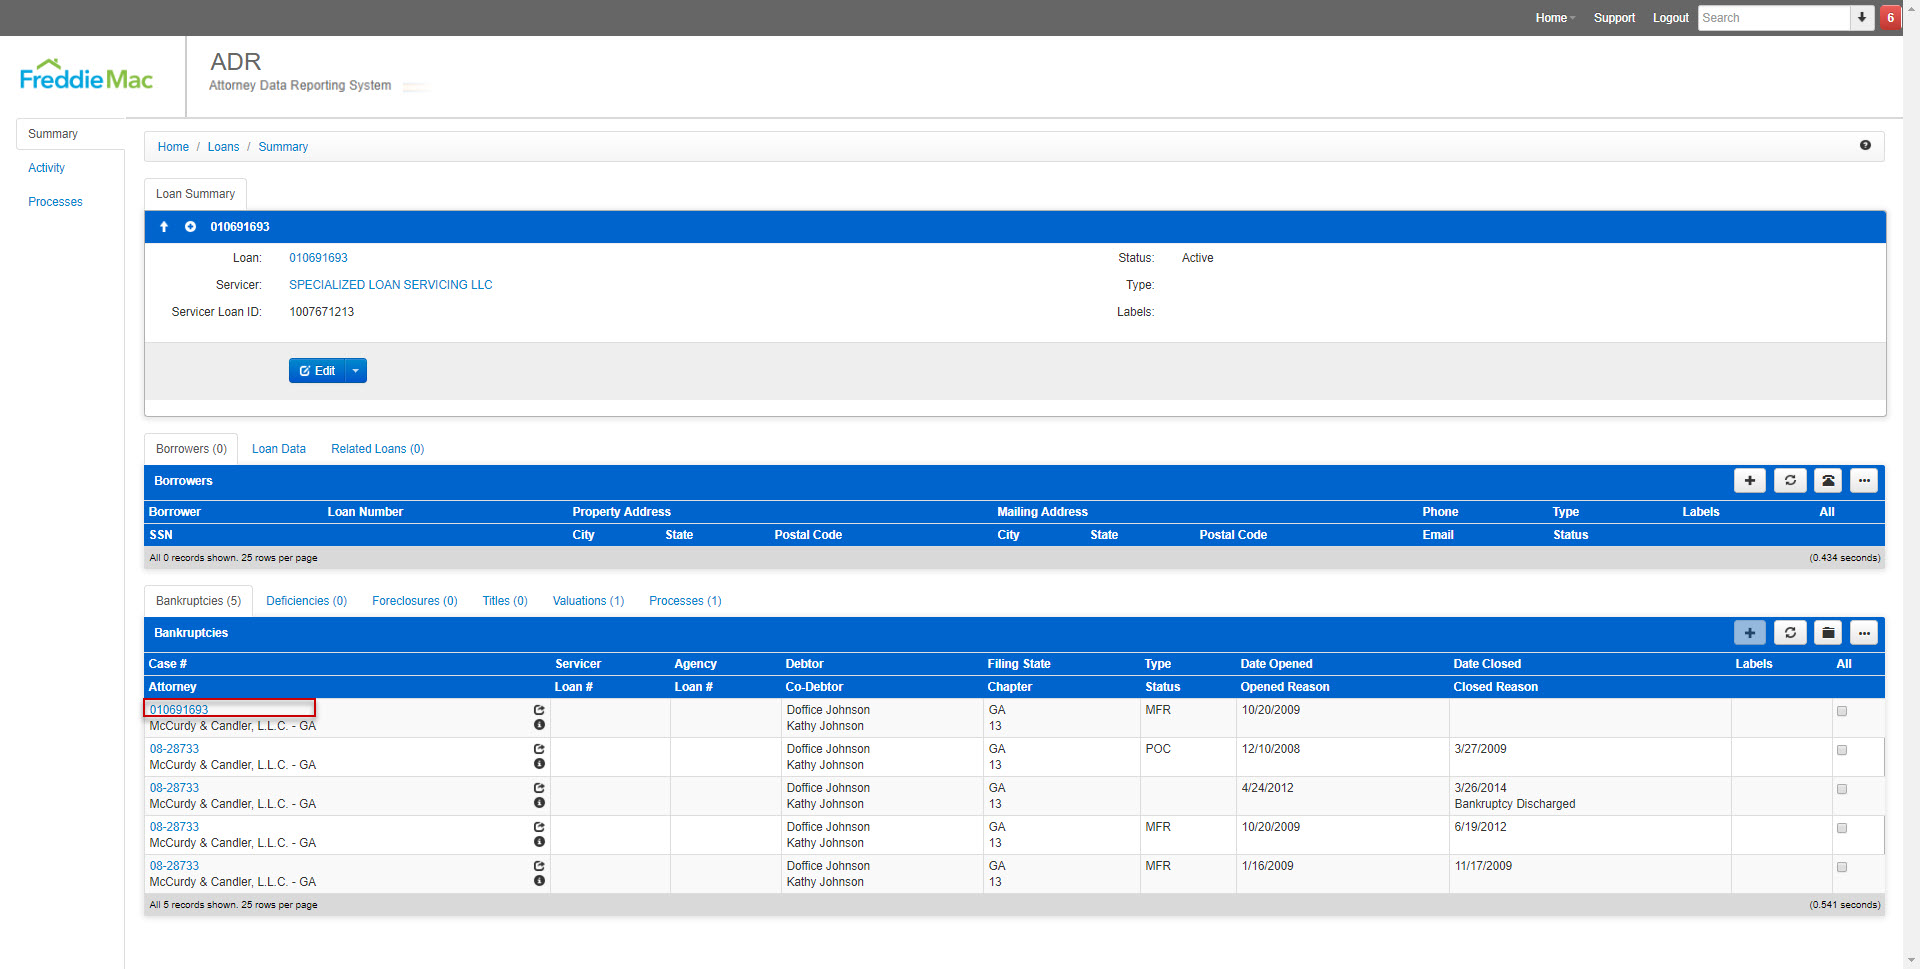
- Bankruptcies: List of Bankruptcies associated with the specific loan, selecting a case number will direct the user to the Bankruptcy Summary page.
- Deficiencies: List of Deficiencies associated with the specific loan, selecting a case number will direct the user to the Deficiency Summary page.
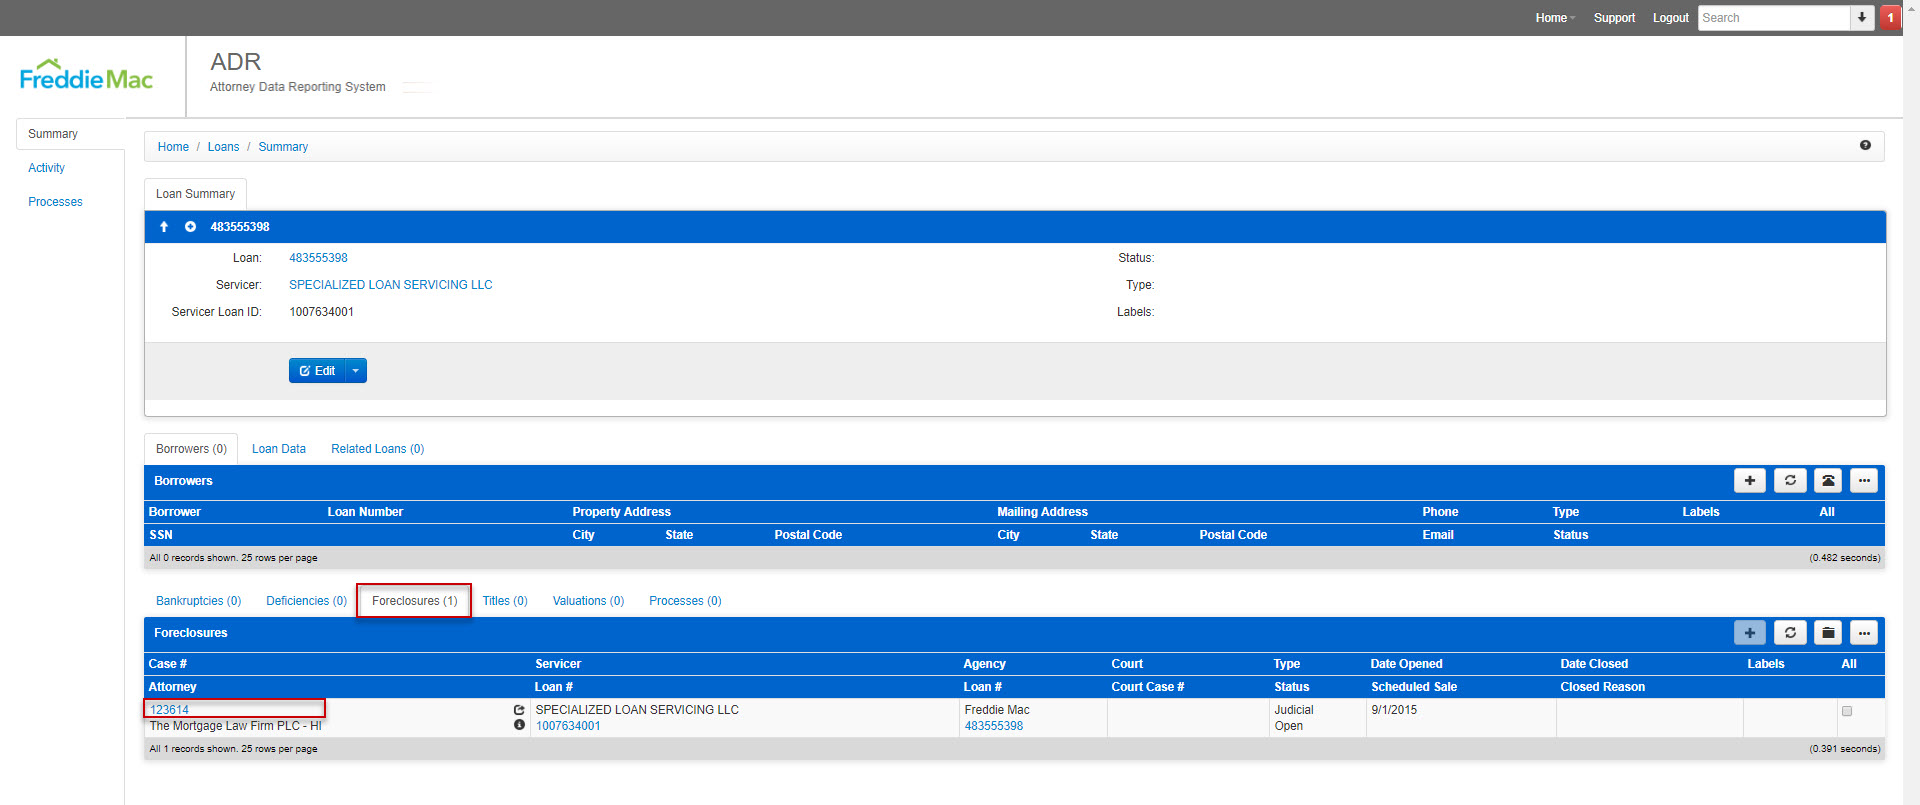
- Foreclosures: List of Foreclosure Files associated with the specific loan, selecting the hyperlink will direct you to the Foreclosure Summary page.
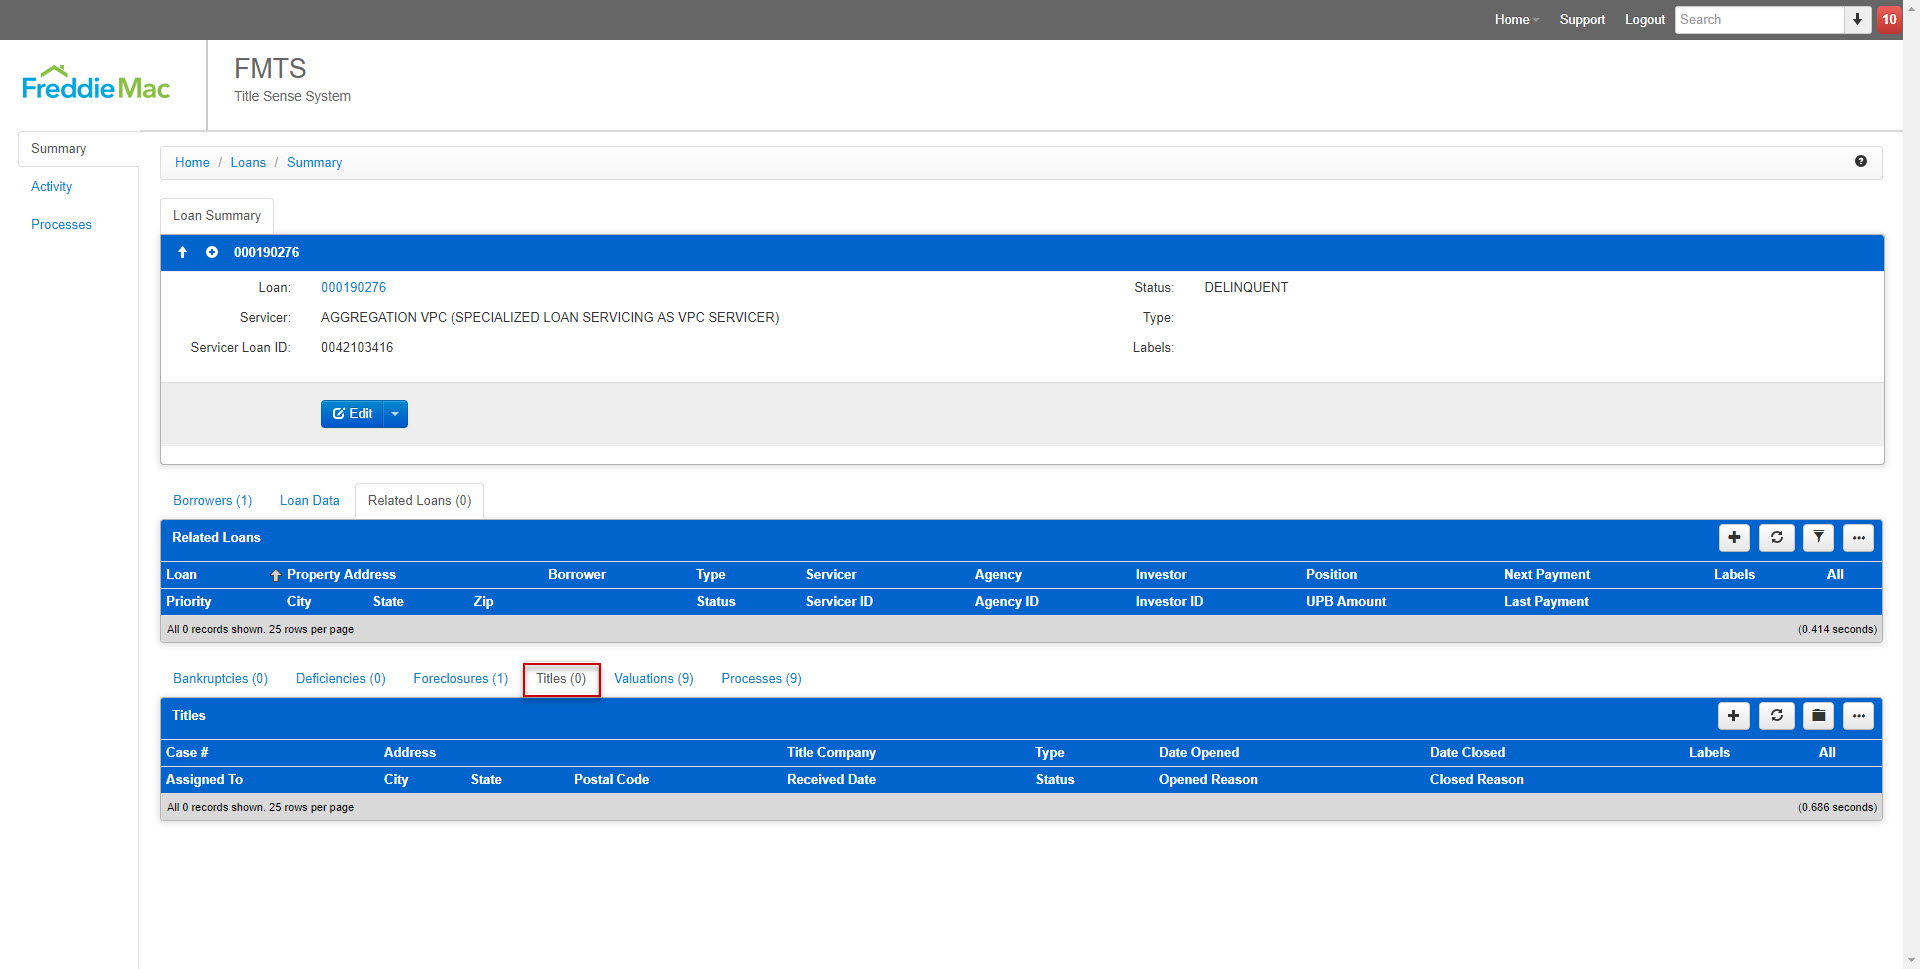
- Titles: List of Titles associated with the specific loan, selecting the hyperlink will direct you to the Title Summary page.
- Valuations: List of Valuations associated with the specific loan.
- Processes: List of Processes associated with the specific loan.
3.2.4 Ordering a Loan Modification / Deed In Lieu Title
NOTE: Freddie Mac has initiated a Direct Title Pilot in which Servicers are phased in over a period of time. Servicers will have the capability to order Loan Modification and Deed In Lieu Title Orders as they are phased into the Direct Title Pilot.
Servicers can submit Loan Modification/Deed In Lieu Title Orders using the following methods:
- Quandis Application
- FTP File Drop
3.2.4.1 Title Order via Quandis Application
- Login to https://www.freddiemactitlesense.com
- Navigate to Home > Loans
- Select the desired Loan (hyperlink under Loan column) for which you would like to order a Title.
- Once you are at the Loan Summary page, navigate to Processes > Title Tab
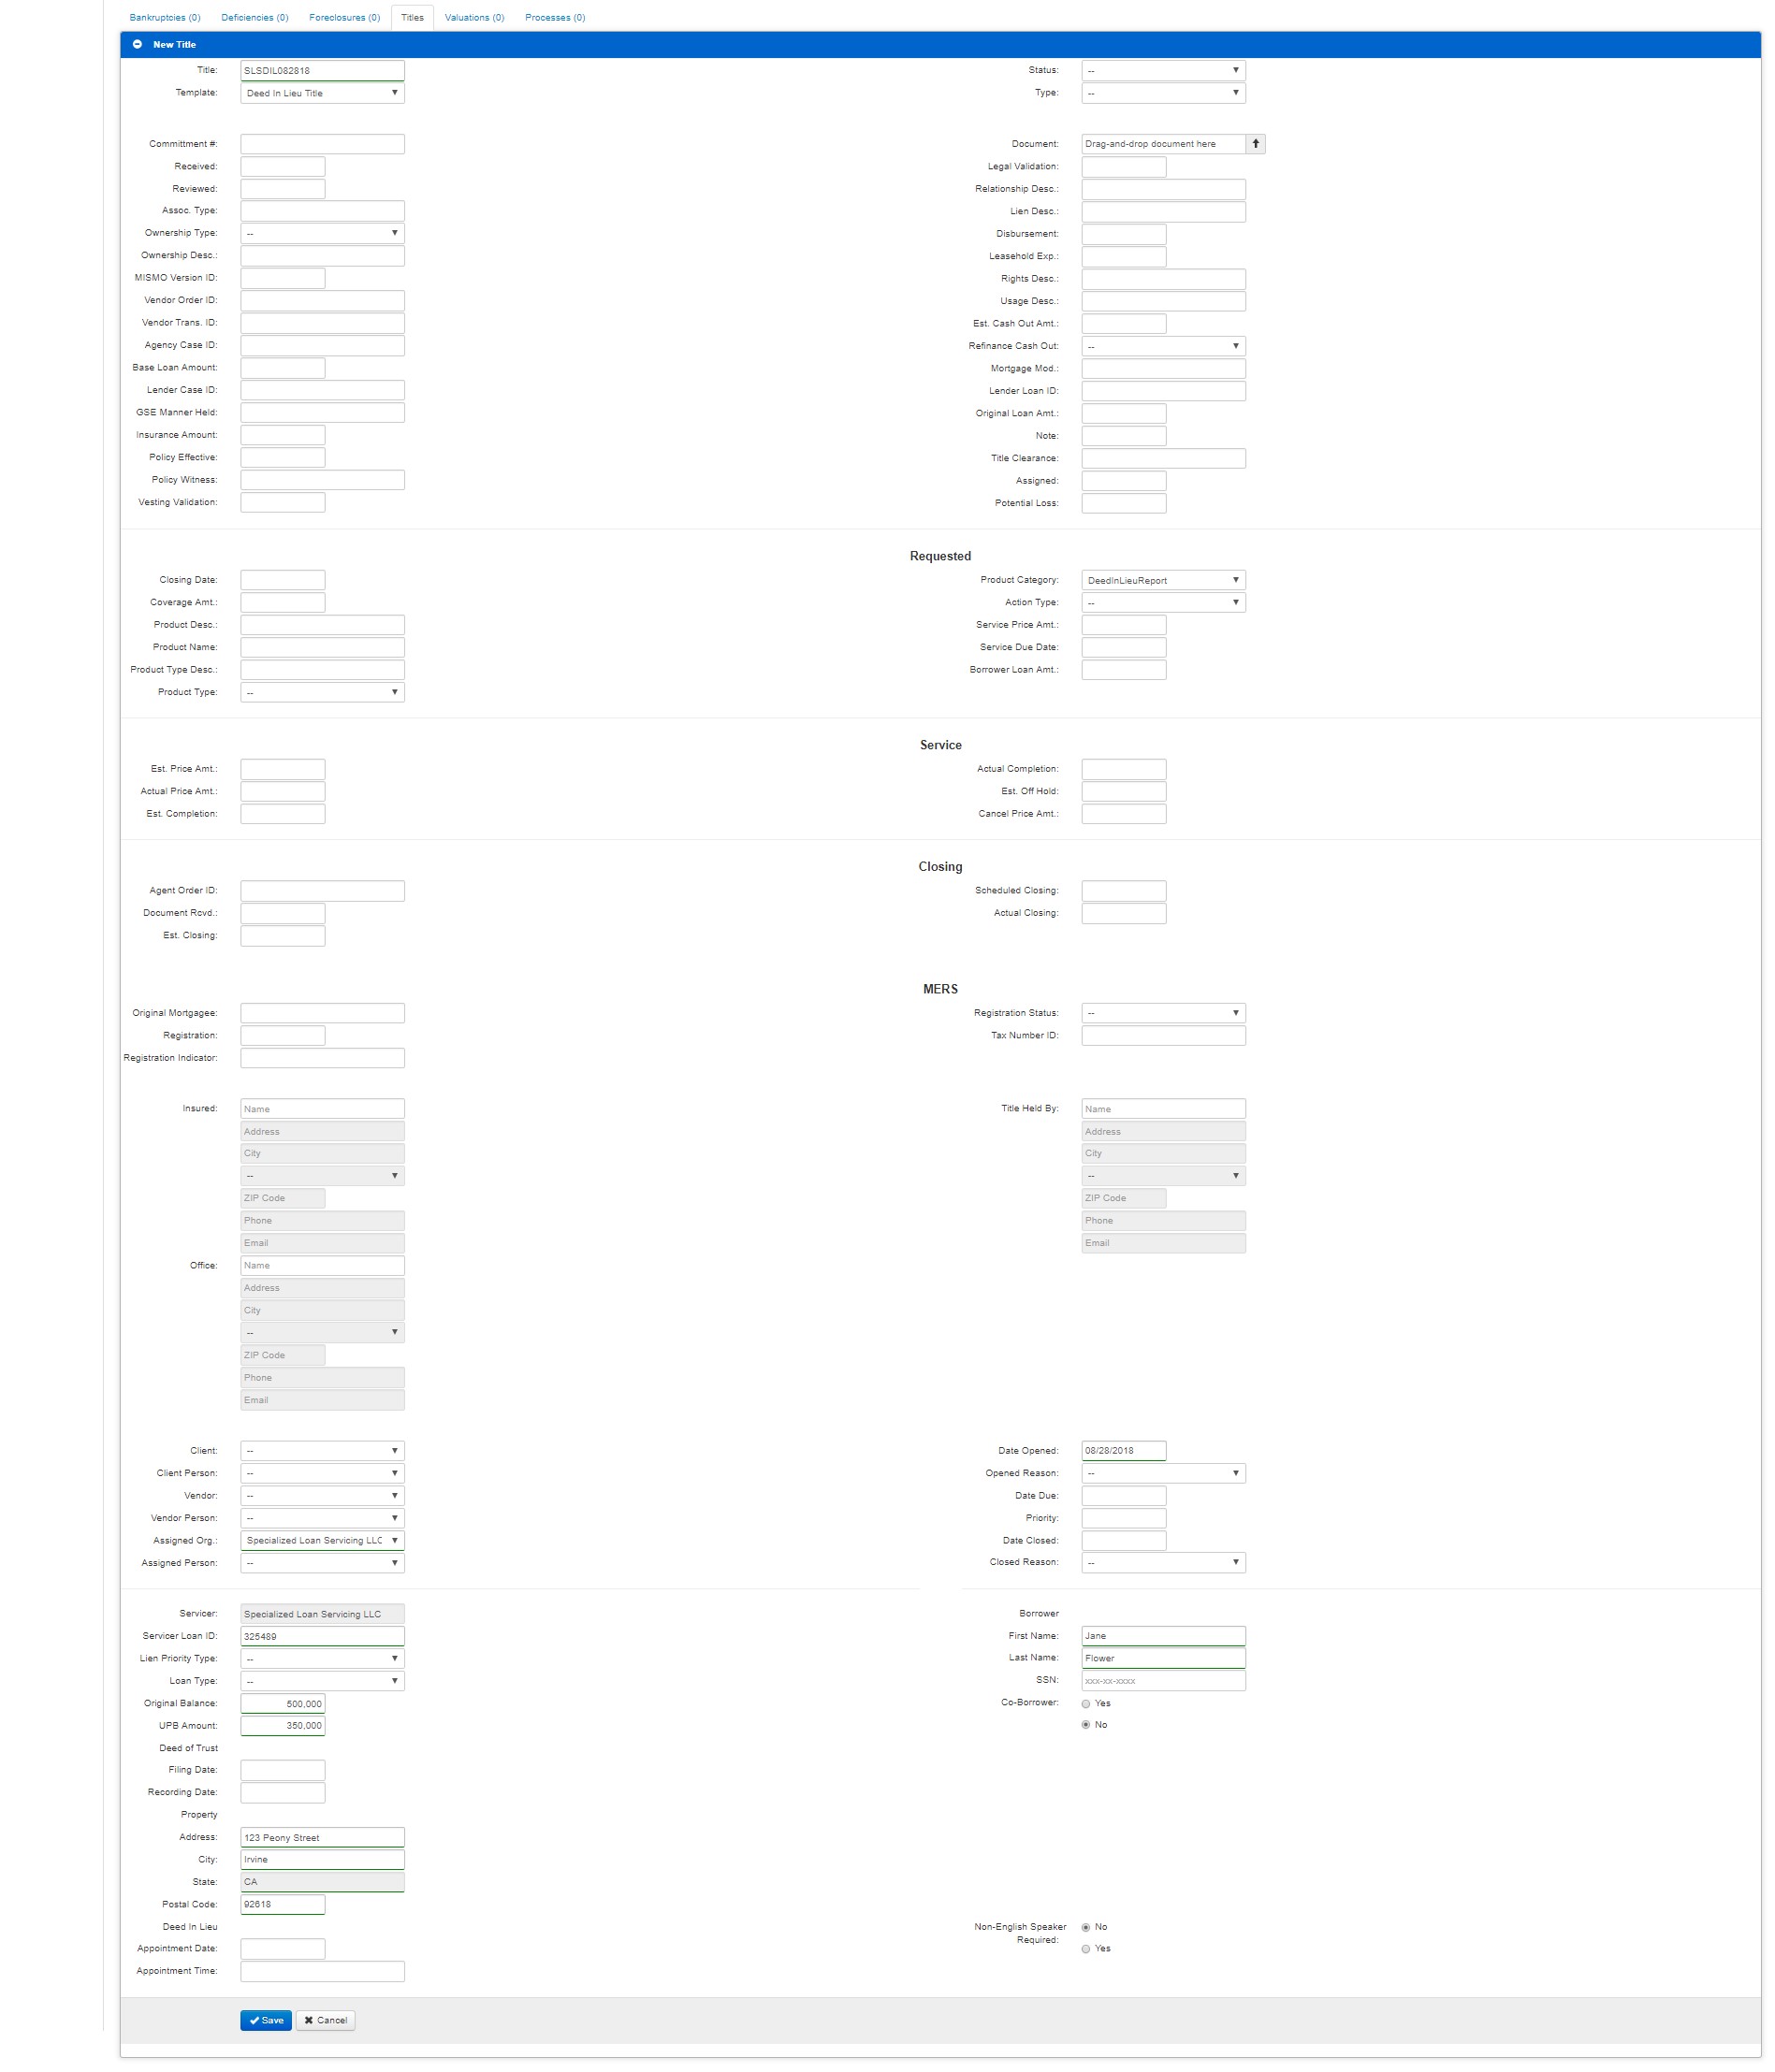
- Select the ‘+’ symbol. The following product types will appear in the dropdown list. Select the desired product type.
- New Deed In Lieu Title
- New Loan Modification Title

- A New Title form will appear. Enter all the required fields. The table below outlines the required fields for a New Title Order. Feel free to enter other data fields if available.
Note:- *Only required for Loan Modification w/Signing Service and Deed In Lieu w/Signing Service
- **Only required IF there is a Co-Borrower (‘Yes’ is selected for Co-Borrower)
Field Name Description Title Name or Title Template Product Type Product Category Product Type Category (i.e. Deed In Lieu, Deed In Lieu w/Singing Service, Loan Modification, Loan Modification w/Signing Service) Assigned Organization Assigned Organization Servicer Servicer Name Servicer Loan ID Servicer Loan ID Original Balance Original Loan Amount UPB Amount Unpaid Principal Balance Property Address Property Address Property City Property City Property State Property State Property Postal Code Property Postal Code Date Opened Date Opened Borrower First Name Borrower First Name Borrower Last Name Borrower Last Name Borrower Phone Number* Borrower Phone Number Co-Borrower First Name** Co-Borrower First Name Co-Borrower Last Name** Co-Borrower Last Name
- Select ‘Save’ to submit the order or ‘Cancel’ to exit order. Selecting ‘Save’ will trigger the Title product order for the selected loan.
- The New Title Order will appear within the Title Tab.

- The Title Order will render within the Title Tab. Within the record row the user can perform the following functions:
- Case # Hyperlink – Select ‘Case #’ hyperlink to navigate to the specific Foreclosure Title Summary
Note: Title Summary information will be covered in greater detail in Section 6 Title Home Page - Flyout – Multiple Titles can be opened on the same page, new tabs render across the panel
- Edit – User can edit inline
- Information – ‘i’ icon provides additional information related to the Title
- Case # Hyperlink – Select ‘Case #’ hyperlink to navigate to the specific Foreclosure Title Summary
3.2.4.2 Title Order via FTP File Drop
- Ordering a Title through an FTP File Drop is outline below. Servicer may choose one of the following FTP File drop options outlined below:
*See sample of predefined column headers (File Format = .xlsx)Quandis’ FTP Server Servicer’s Internal FTP Server 1. Drop file into designated folder* Drop file into internal FTP 2. Quandis Imports the excel file and process the title order request Quandis Imports the excel file and process the title order request 3. Title Company receives order Title Company receives order 4. Title Company sends Title product back to Quandis Application AND to Servicer Title Company sends product to Quandis Application AND to Servicer 5. Servicer can retrieve through the Quandis Application OR direct retrieval through Title Company Servicer can retrieve through the Quandis Application OR direct retrieval through Title Company - Pay attention to the data type for the following column:
Sample File: FTP File Drop Example- ServicerLoanID*
- AgencyLoanID*
- PostalCode*
- BorrowersPhoneNumber: Required if Product Type = Signing Service (DIL or Loan Mod)
- Attachment (Name of the attachment): Required if Product Type =
LoanModificationSigningService only
*Need to use tick mark (‘) to ensure that the values are treated like strings and not numbers. The reason for this is that Excel will make the assumption that if the whole string can be interpreted as a number it will truncate leading zeros. So for example, if you enter 004589483 it will be converted to 4589483 if a leading tick mark is not used. In the example attached, you can see the leading tick mark for ServicerLoanID, AgencyLoanID, and PostalCode column.
4 Foreclosure
4.1 Foreclosure Summary Section
- To access a Foreclosure through the Loan Summary page, select the ‘Case #’ hyperlink within Processes Section > Foreclosure Panel. This will navigate you to the Foreclosure Summary Page (see 2).
- The Summary Section includes the following panels:
Note: Select the ‘+’ icon to expand the panel and ‘-‘ to collapse the panel- Foreclosure Summary Panel: Provides Foreclosure information
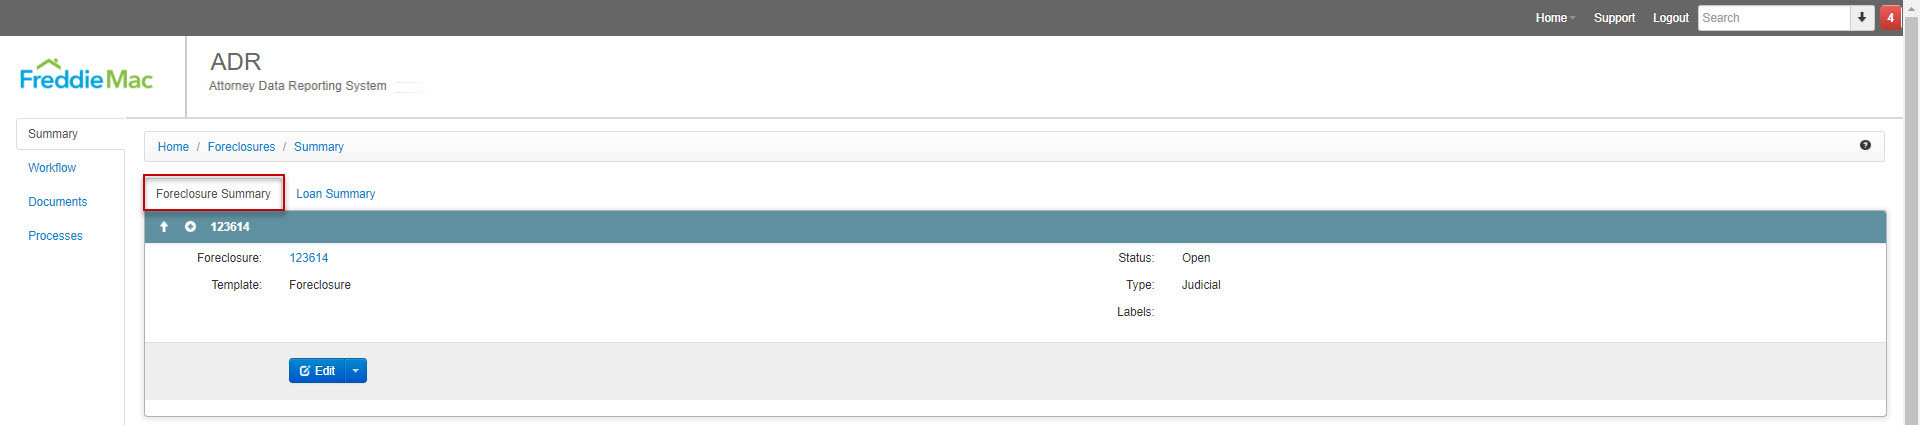
- Loan Summary Panel: Provides Loan related information associated to the Foreclosure
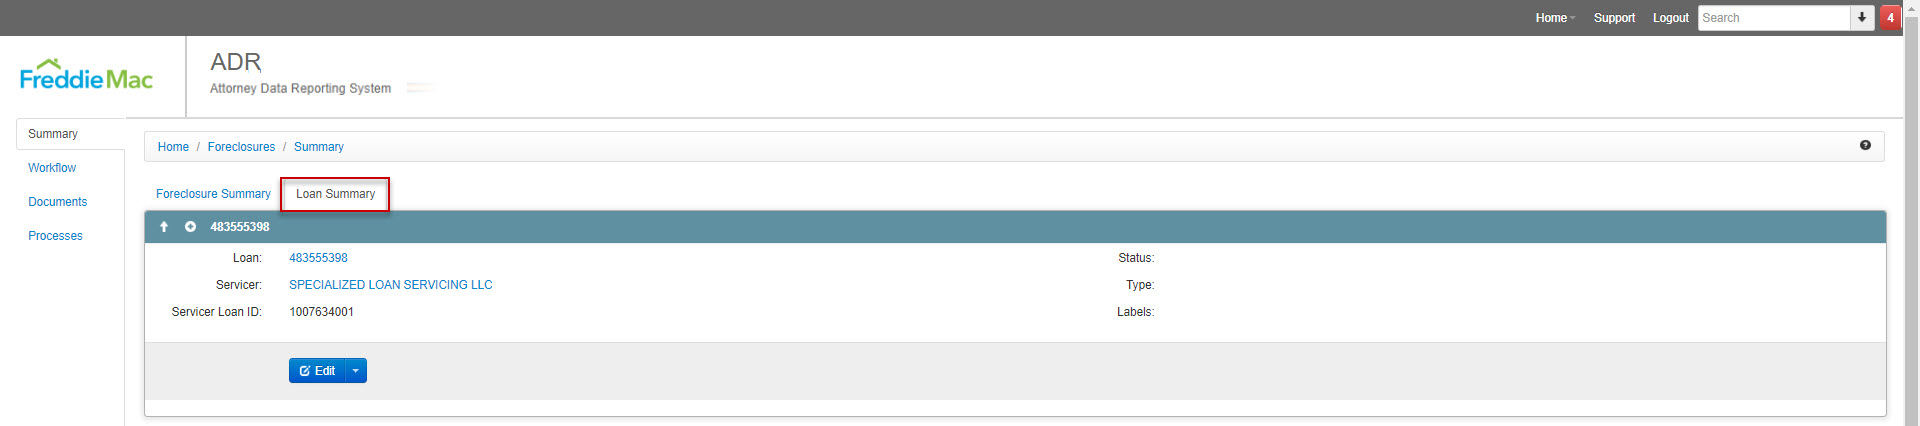
- Foreclosure Summary Panel: Provides Foreclosure information
4.2 Workflow Section
- The ‘Workflow’ Section includes the following panels:
- Tasks
- Tasks are broken down by the following dates
- Estimated Completion: The date the task is estimated to be completed, based on the timeline template determined by Freddie Mac.
- Projected Completion: The date the task is projected to be completed by the firm. This date is primarily used when the task has passed the Estimated Completion date but has not been completed.
- Actual Completion: The date the task was completed. Firms may only use current or past dates when completing tasks and entering Actual Completion dates.
- A history of each task can be viewed by selecting the ‘i’ icon beside each corresponding and applicable task.

- Tasks are broken down by the following dates
- Holds
- Provides an in-depth look at any current, active or previously closed Holds this file may have.
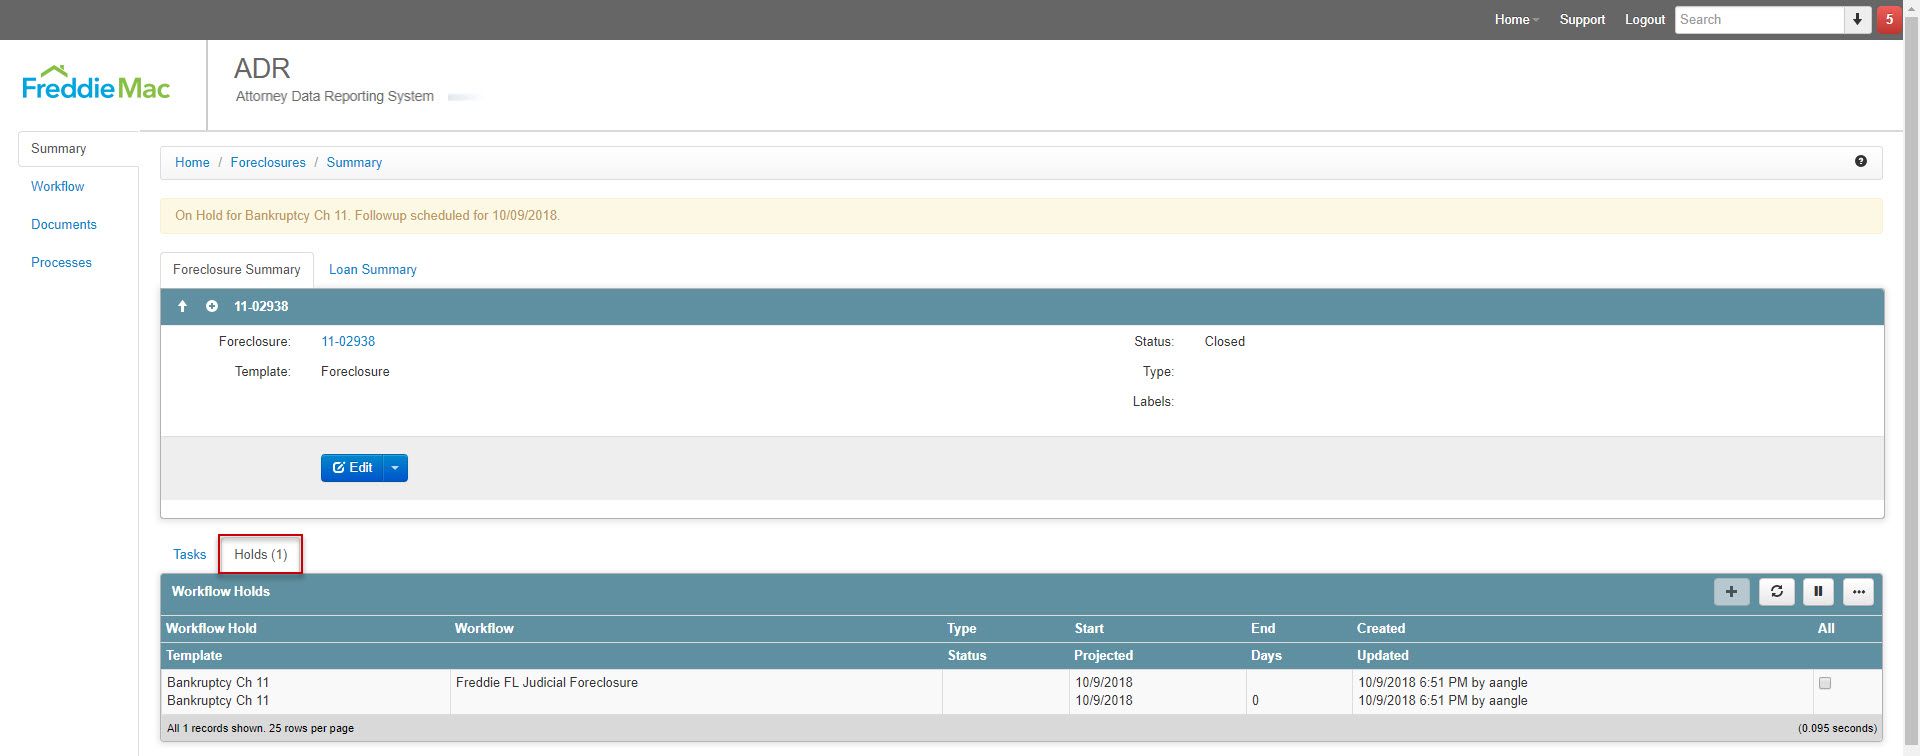
- Provides an in-depth look at any current, active or previously closed Holds this file may have.
- Tasks
4.3 Documents Section
- The ‘Documents’ Section lists any documents associated with the Foreclosure.

4.4 Processes Section
- The ‘Processes’ Section includes the following panels”
- Related Processes: Lists any Processes associated the to Foreclosure.
- Title: Lists any Titles associated to the Foreclosure.
- Valuations: Lists any Valuations associated to the Foreclosure

5 Bankruptcies
5.1 Bankruptcy Summary Section
- To access a Bankruptcy through the Loan Summary page, select the ‘Case #’ hyperlink within Processes Section > Bankruptcies Panel. This will navigate you to the Bankruptcy Summary Page (see 2).
- The Summary Section includes the following panels:
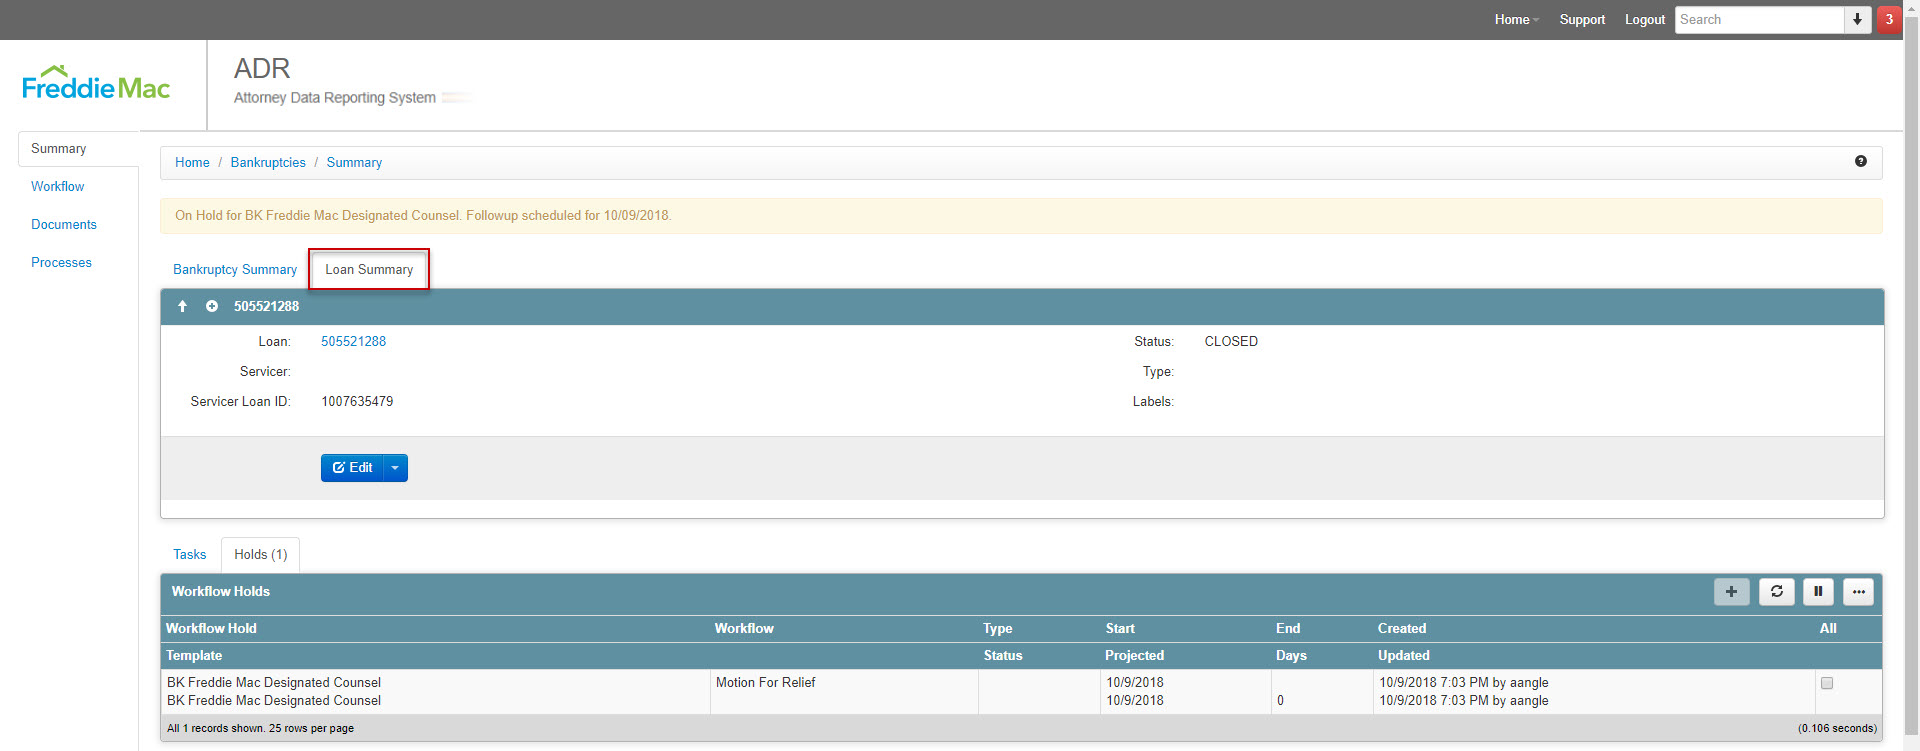
Note: Select the ‘+’ icon to expand the panel and ‘-‘ to collapse the panel- Bankruptcy Summary Panel: Provides Bankruptcy information
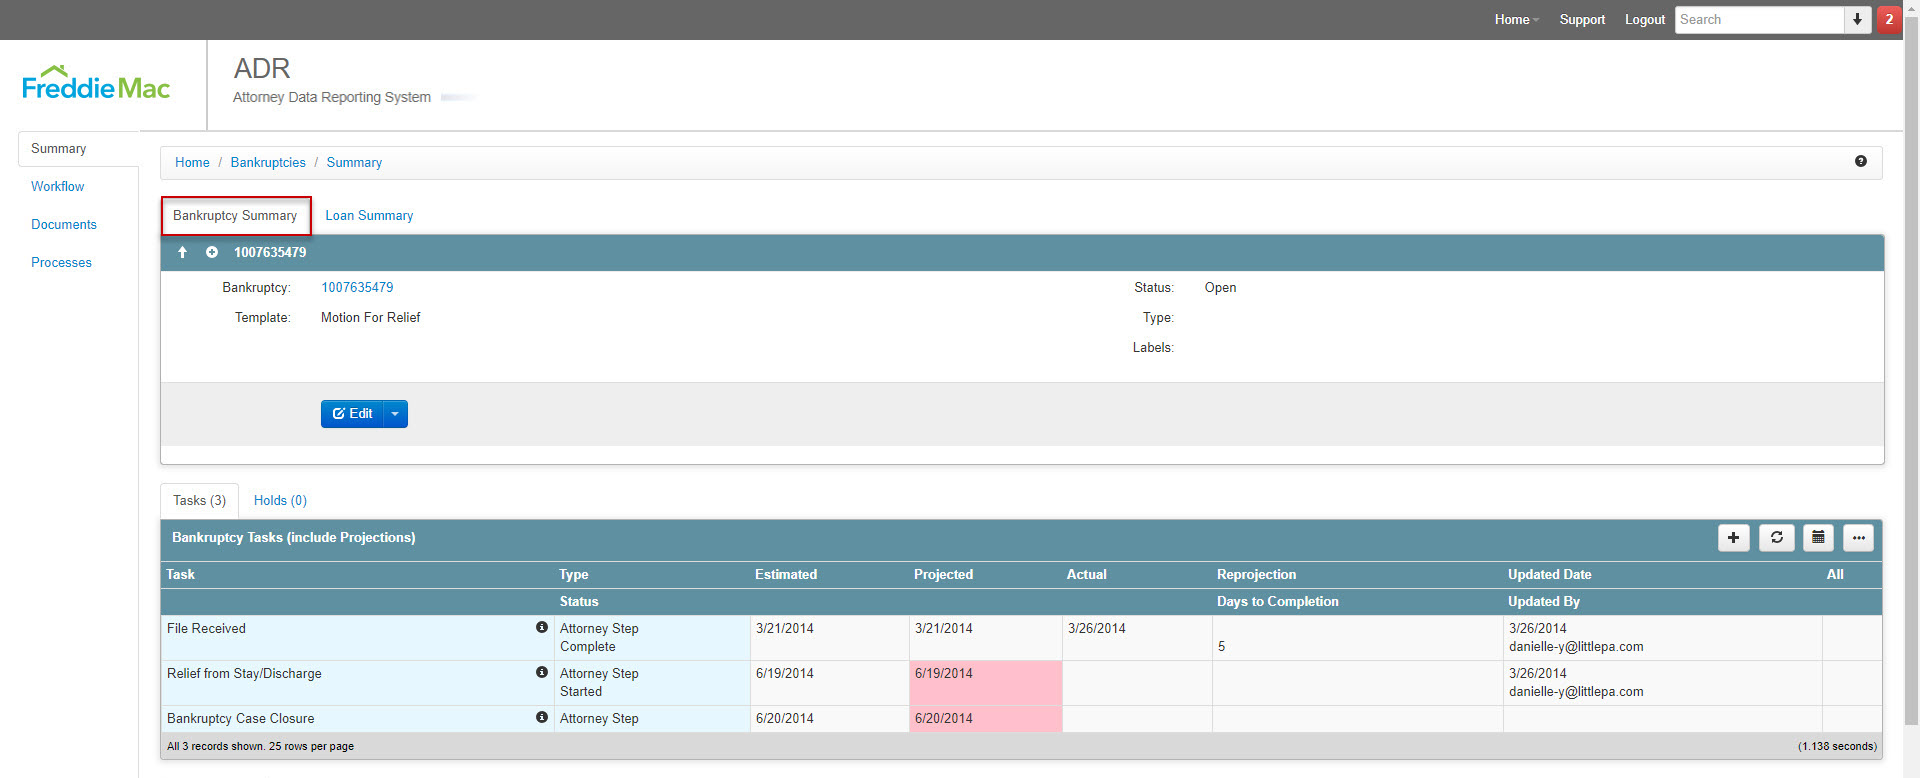
- Loan Summary Panel: Provides Loan information associated with the Bankruptcy
- Bankruptcy Summary Panel: Provides Bankruptcy information
5.2 Workflow Section
- The ‘Workflow’ Section includes the following panels:
- Tasks: The tasks panel will provide the current status of the tasks workflow along with details of each step.
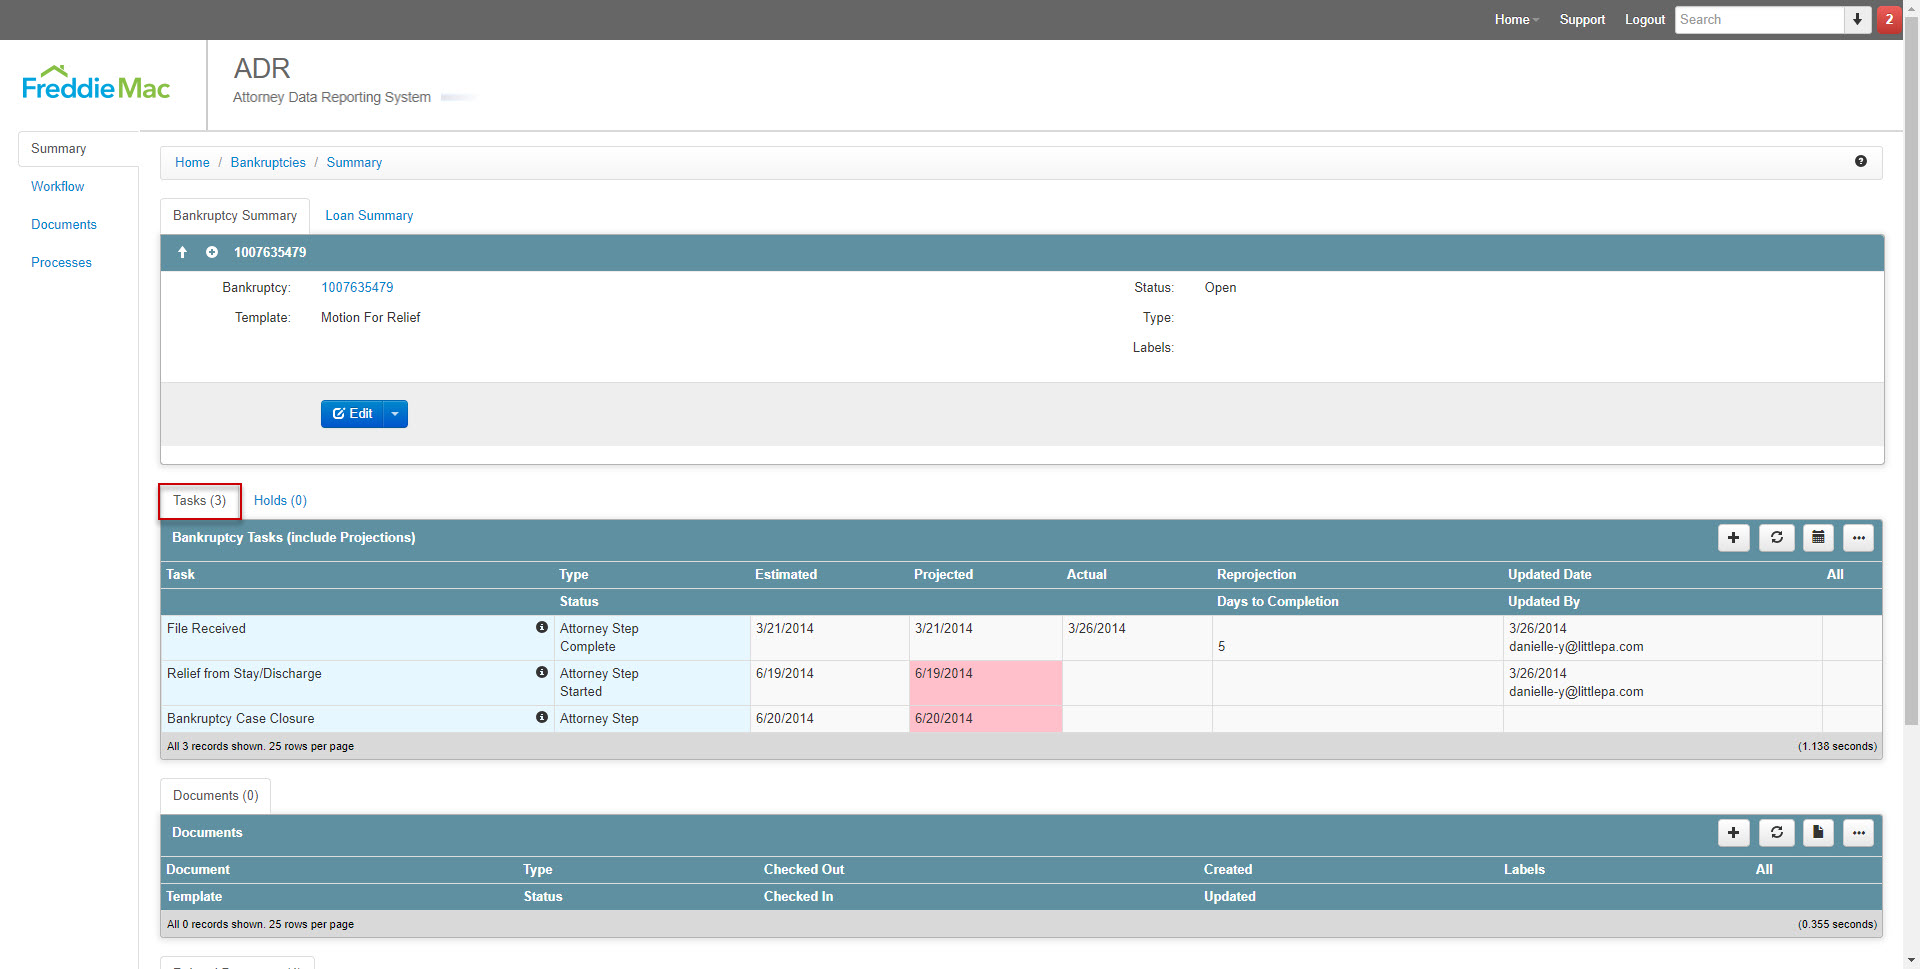
- Holds: Provides an in-depth look at any current, active or previously closed Holds this file may have.
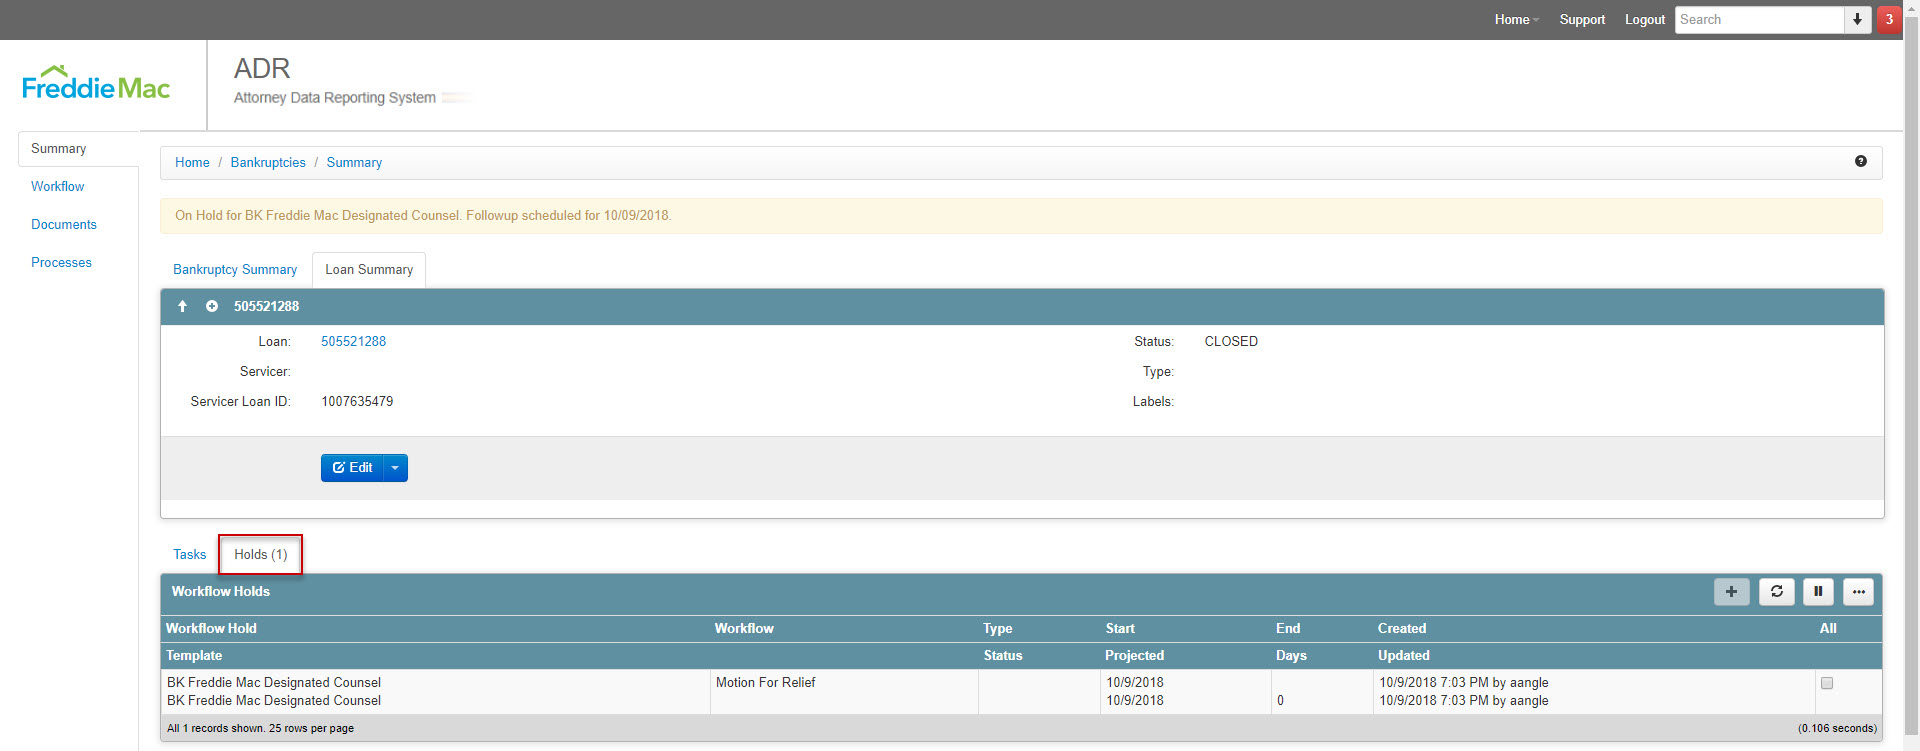
- Tasks: The tasks panel will provide the current status of the tasks workflow along with details of each step.
5.3 Documents Section
- The ‘Documents’ Section lists any documents associated with the Bankruptcy.
5.4 Processes Section
- The ‘Processes’ Section includes the following panel
- Related Processes

- Related Processes
6 Title Home
Servicers can navigate to Home > Titles to perform the following functions:
- Title Dashboard View
- Title List View
- Title Order Cancellation
- Title Summary
- Title Product Retrieval
- Title Update Requests
- Title Order Inquiries
6.1 Title Dashboard
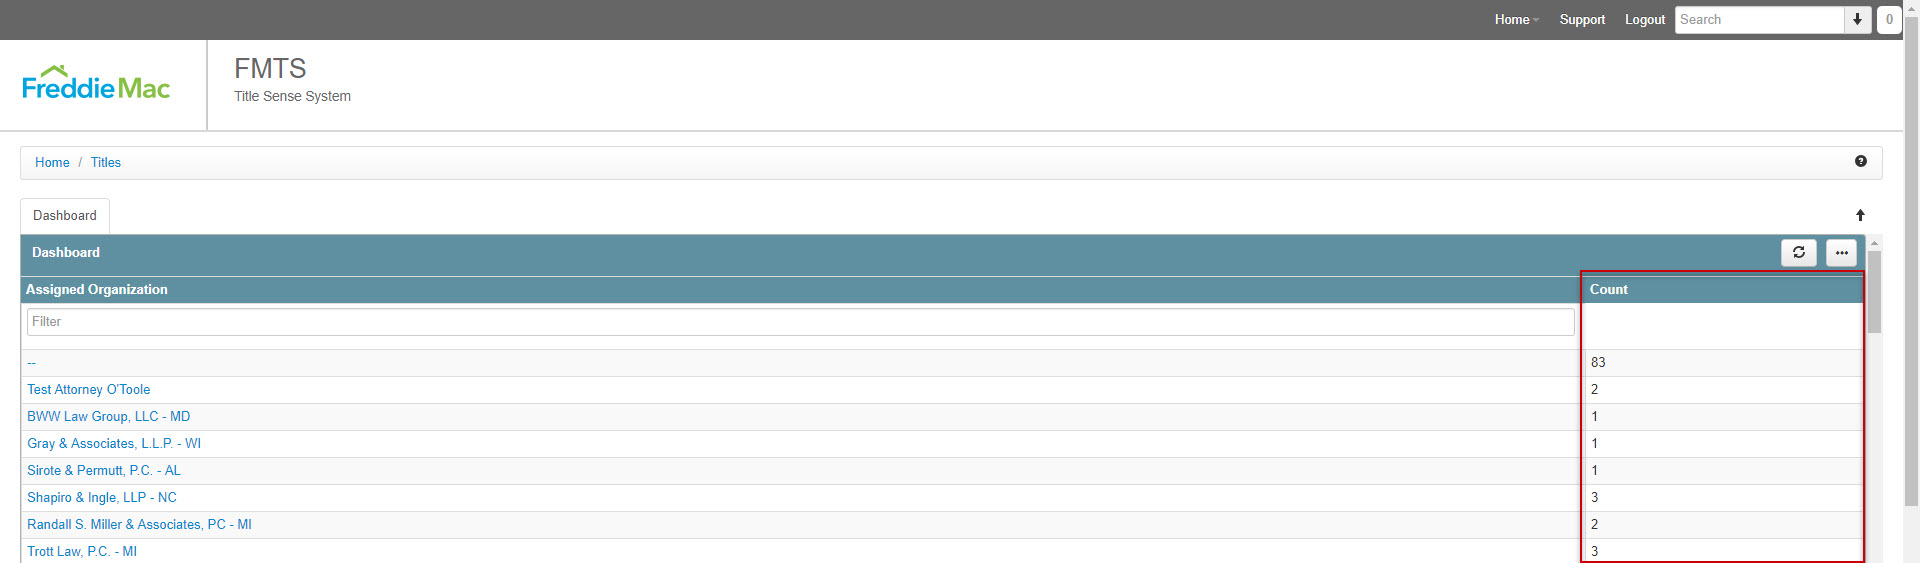
- Navigate to Home > Titles to navigate to the Title Home page
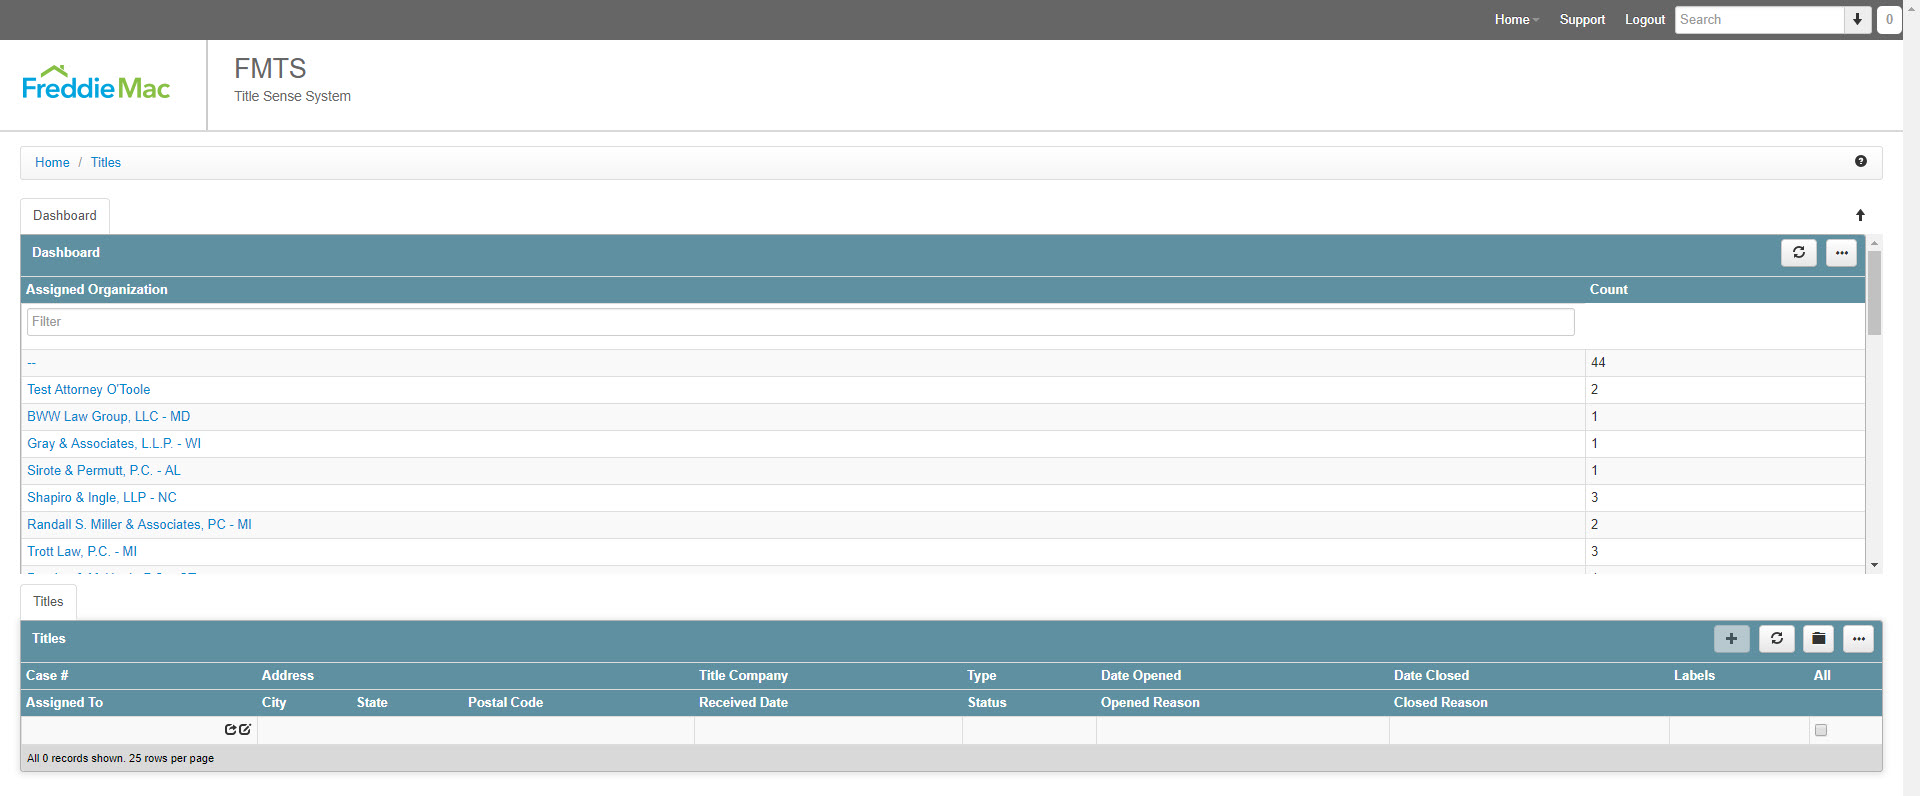
- The first panel displays the Title Dashboard, you can perform the following functions within this panel:
- View Count (listed under Count column) of Titles based on applied filter
Note: Select the ellipsis symbol on the right of the dashboard to filter criteria; In this example the Dashboard is filtered by “Assigned Organization”
- View Count (listed under Count column) of Titles based on applied filter
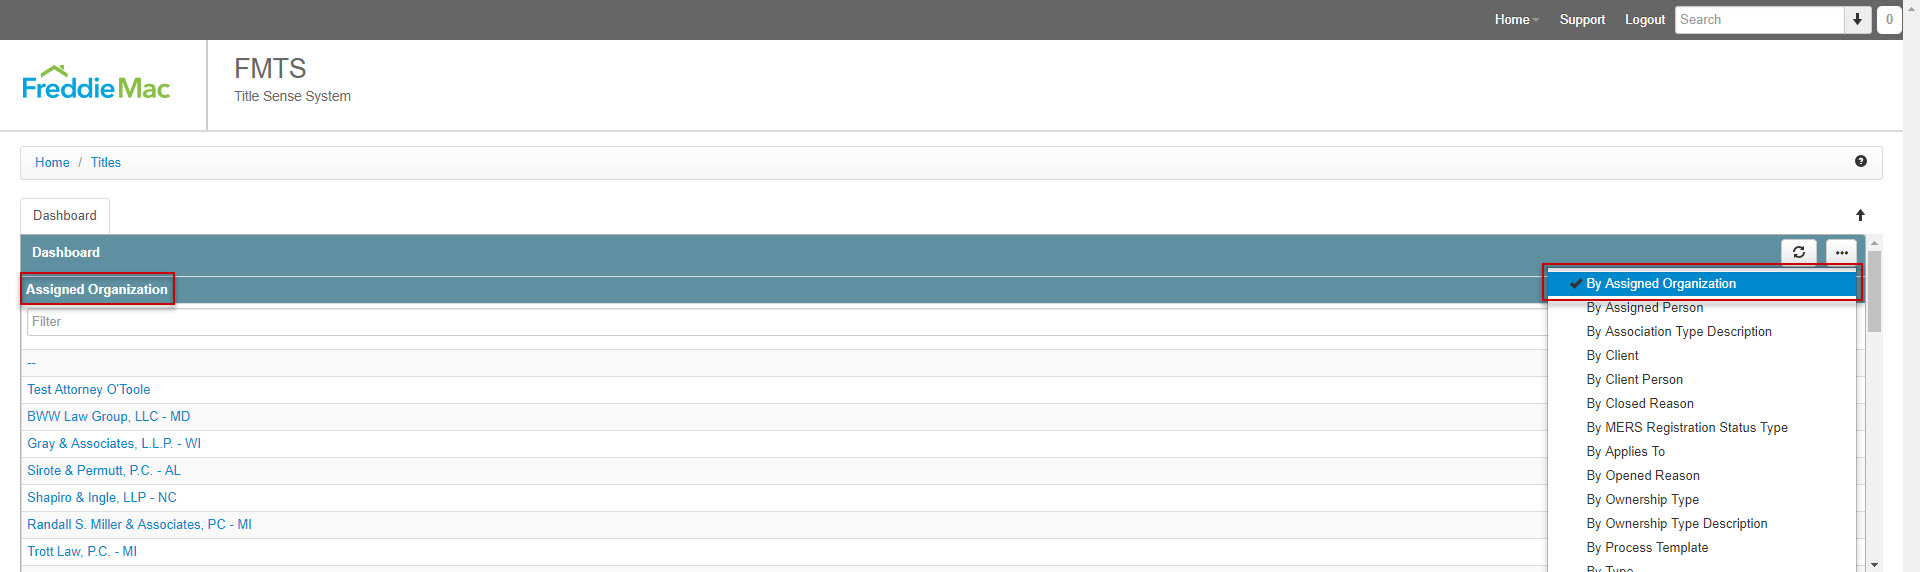
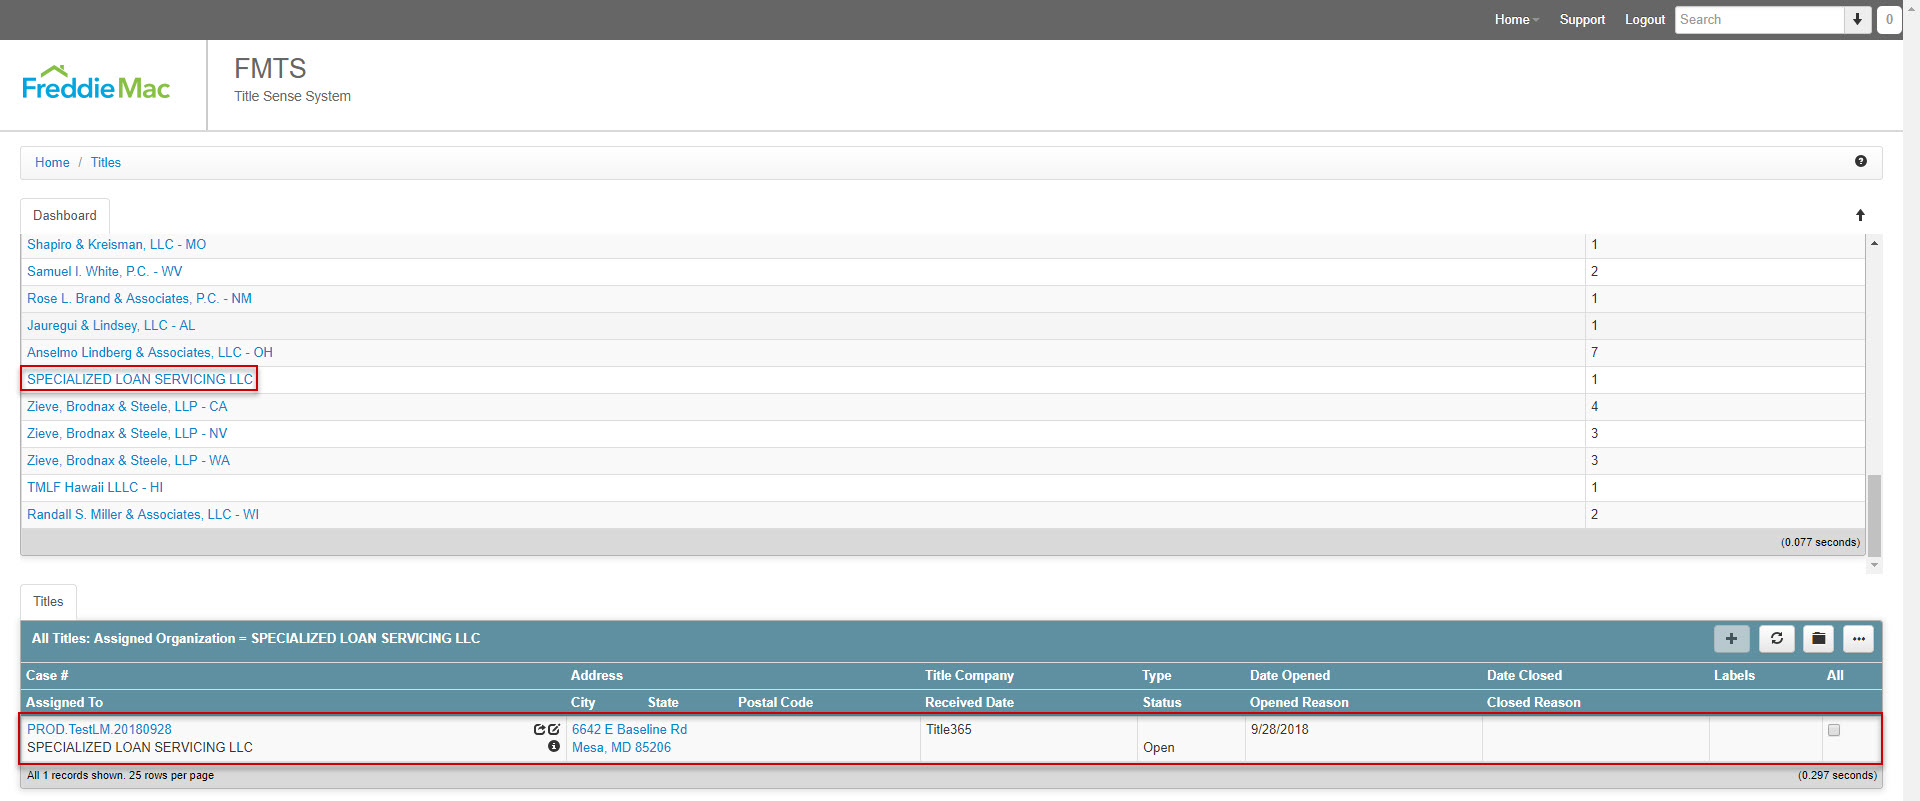
6.2 Title List
- Drill down to see list of Titles by selecting hyperlink, this list will appear within the Title List panel (e.g. Filter criteria set to “By Assigned Organization”, selected SPECIALIZED LOAN SERVICING LLC, list of Titles render in Title List panel).
6.3 Title Order Cancellation
Servicer can cancel a title order as outlined below:
- Navigate to the Summary Page for the Title that needs to be cancelled
- Scroll to the Tasks panel and select “+ New Task”

- Within the popup that is presented, select “Send Cancel Title Request” from the Task dropdown menu and click “Save”
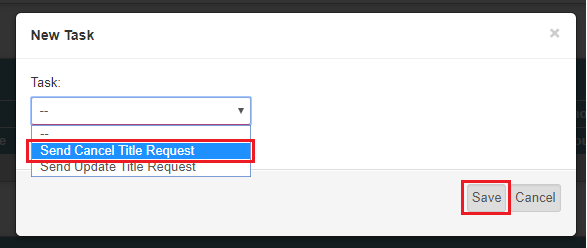
- You will be presented with a Task Edit screen, where you will need to choose a Closed Reason, and click “Save”. If it is determined the Cancellation request should not be sent at this time, click “Cancel”. The Task can be accessed at a later time to proceed with the Cancellation request.


*Note: Titles cannot be cancelled after Product has been received. If Product has already been received, it will be indicated within the Task Edit screen, and the user will only be able to click “Cancel”.

- Once saved, the Cancellation request will be sent to the Title Vendor, where a decision will be made to allow the Cancellation, and whether or not a charge will be assessed. Please contact the Title Vendors directly for billing questions and to obtain their allowable cancellation time frames.
6.3.1 Verify Cancellation of Title Order
Cancellations may take up to a day for the Title Vendors to process. Please contact the Title Vendor directly for an update if a response is not received within 24 hours of the Request being sent. Servicers can verify the cancellation of the Title Order using the following steps:
- If the cancellation request was approved, the Title’s Status will be “Canceled”, its Date Closed will be populated, and it will have “CANCEL/NO BILL” as its Closed Reason. These elements can be viewed in the list on the Title Home page and in the Titles tab of the Loan Summary page:

As well as on the Title Summary page:


- If the cancellation was denied, a Message indicating such will appear in the Messages panel of the Title Summary page. Message Bodies will vary between the Vendors, and some Vendors may provide additional information within the Body.

6.4 Title Summary Page
Listed below are the functions throughout the Title Summary page:
- View Title, Property, and Loan Summary panels

- View Activity Panel and perform the following functions for Public Records and Transactions
 : Add a new Public Record/Transaction
 : Refresh Public Records/Transactions panel
 : View Public Records/Transactions by various filters
 : Export details of Public Records/Transactions s to CSV or Excel

- View Workflow Panel and perform the following functions for Tasks and Holds
: Add a new Task/Hold
: Refresh Task/Hold panel
 : View Task/Hold by various filters
: Export details of Task/Hold to CSV or Excel

- View Messages Panel and perform the following functions
: Add New Message
: Refresh Message panel
 : View Messages by various filters
: Export details of Messages to CSV or Excel

- View Documents Panel and perform the following functions
Note: Once an order is fulfilled, the Title product is accessible through this panel
: Add New Document, New folder, or Bulk Upload
: Refresh Documents panel
 : View Documents by various filters; Zip and Email; Convert to PDF; Merge to Single PDF
: Export details of Documents to CSV or Excel

- View Processes Panel and perform the following functions
: Servicer does not have permission to add Related Processes
: Refresh Related Processes panel
 : View Related Processes by various filters
: Export details of Related Processes to CSV or Excel

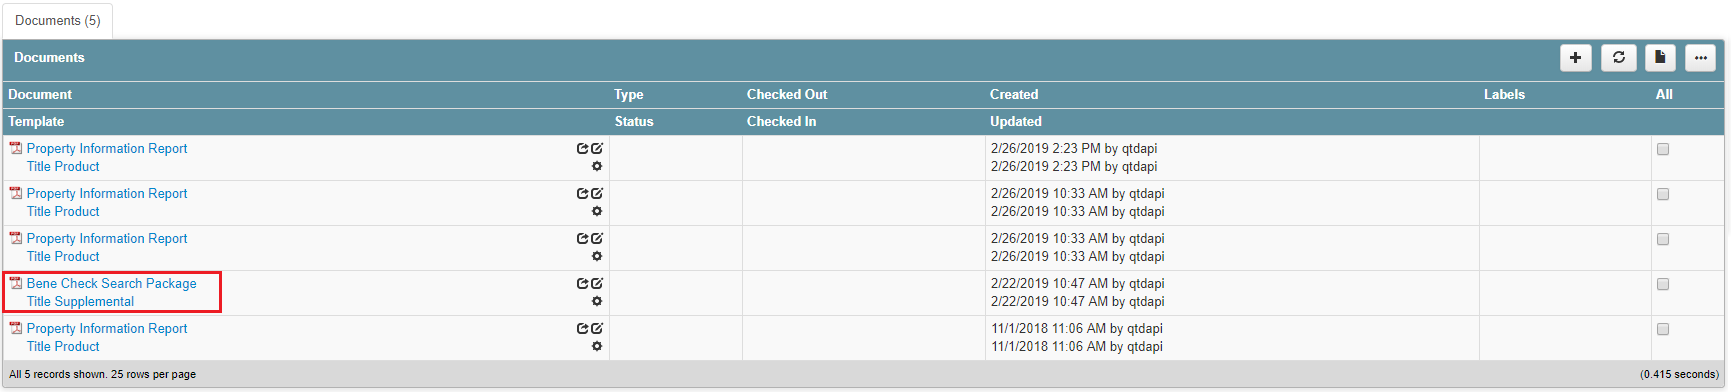
6.5 Title Product Retrieval
Title Product is retrieved through the Documents panel of the specific Title Summary page.
- Select hyperlink to download document

6.5.1 Beneficiary Check Document Retrieval
Title Vendors are expected to produce Beneficiary Checks (Bene-Checks) for all Foreclosure Title Orders in Trustee Sale Guarantee (TSG) states. The Bene-Check Product should be delivered within 24 hours of the Title being ordered. The Bene-Check document can be found in the same location as the Product documents, and will be appropriately labeled (labeling may vary between Title Vendors).
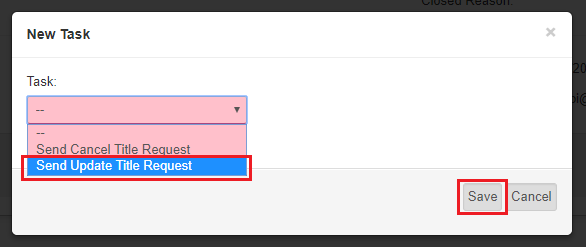
6.6 Title Update Requests
Once Title Product has been received, Updates can be ordered. The steps for doing this are as follows:
- Navigate to the Summary Page for the Title requiring an update
- Scroll to the Tasks panel and select “+ New Task”

- Within the popup that is presented, select “Send Update Title Request” from the Task dropdown menu and click “Save”
- Select an Update Type from the dropdown menu, then enter the Instructions for this Update, including the Good Through Date, if applicable, then click “Save”.
*Note: the Update Type list will vary between Trustee Sale Guarantee (TSG) and non-TSG states


- You may only request Updates after the Product has been received, and only on Foreclosure products. If you attempt to send an Update under an invalid condition, an error message will be displayed in the Task Edit panel, indicating why the Update cannot be ordered, and the user will be forced to click the “Cancel” button. For Foreclosure products, the Task can be accessed and saved if the Product is received at a later date.

*Note: The length of time for delivery, and the Product produced for Title Updates will vary between each Vendor. Please contact the Title Vendors using the Messages Panel (see section 12.7) for delivery delay inquiries and Product questions.
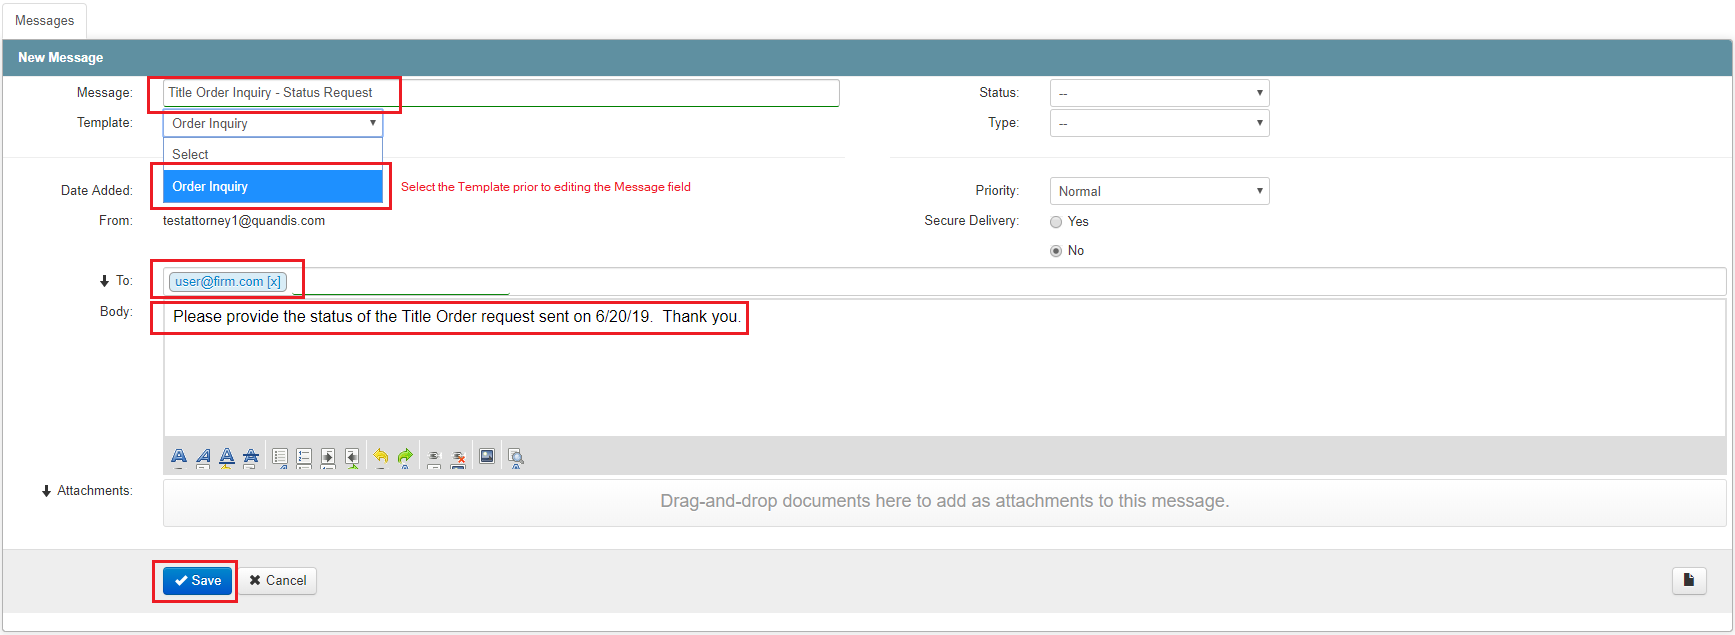
6.7 Title Order Inquiries
If any questions on the Title Order should arise, the Title Vendor assigned to the Order can be contacted by adding an Order Inquiry Message within the Messages Panel.
- Locate the Messages Panel on the Title Order and click the “+” button to add a new message.

- Select “Order Inquiry” from the Template dropdown, then enter/edit the Subject in the Message field. Enter the information you want sent to the Title Vendor in the Body field. You can opt to send the message as an email by entering recipient email addresses in the To field. Once all information is entered, click “Save”.
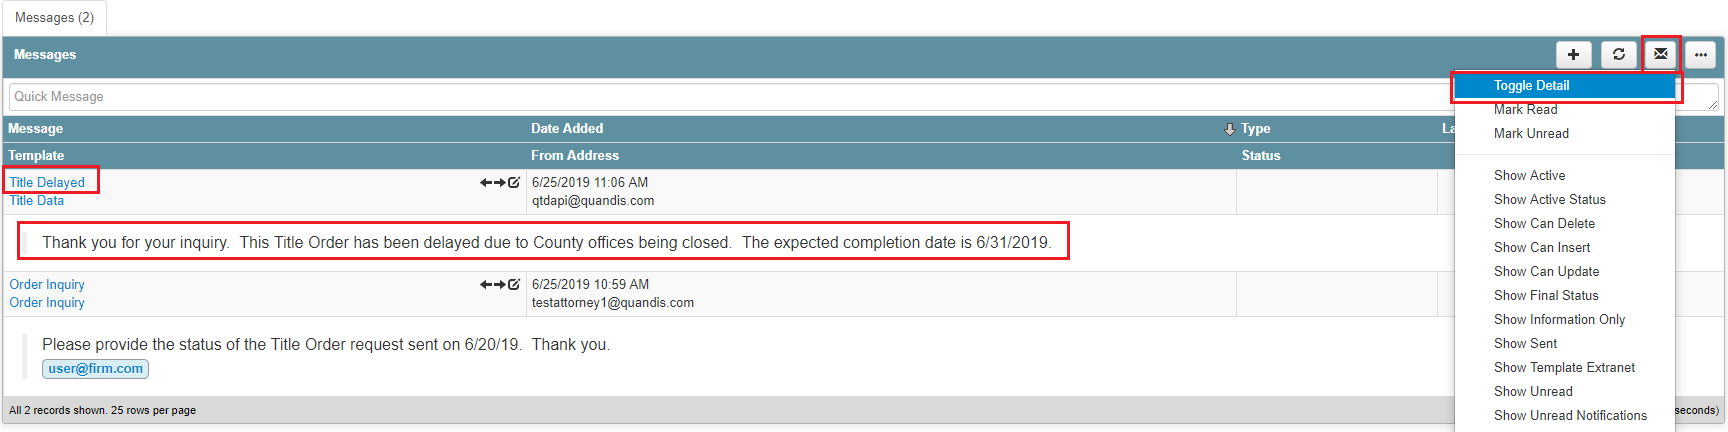
- The Message will be displayed in the Messages panel, and will be transmitted to the Title Vendor.

- Responses sent by the Vendor will appear in the Messages Panel. The full Message can be reviewed by clicking “Toggle Detail” from the envelope icon options menu.
7 Export List to Excel or CSV
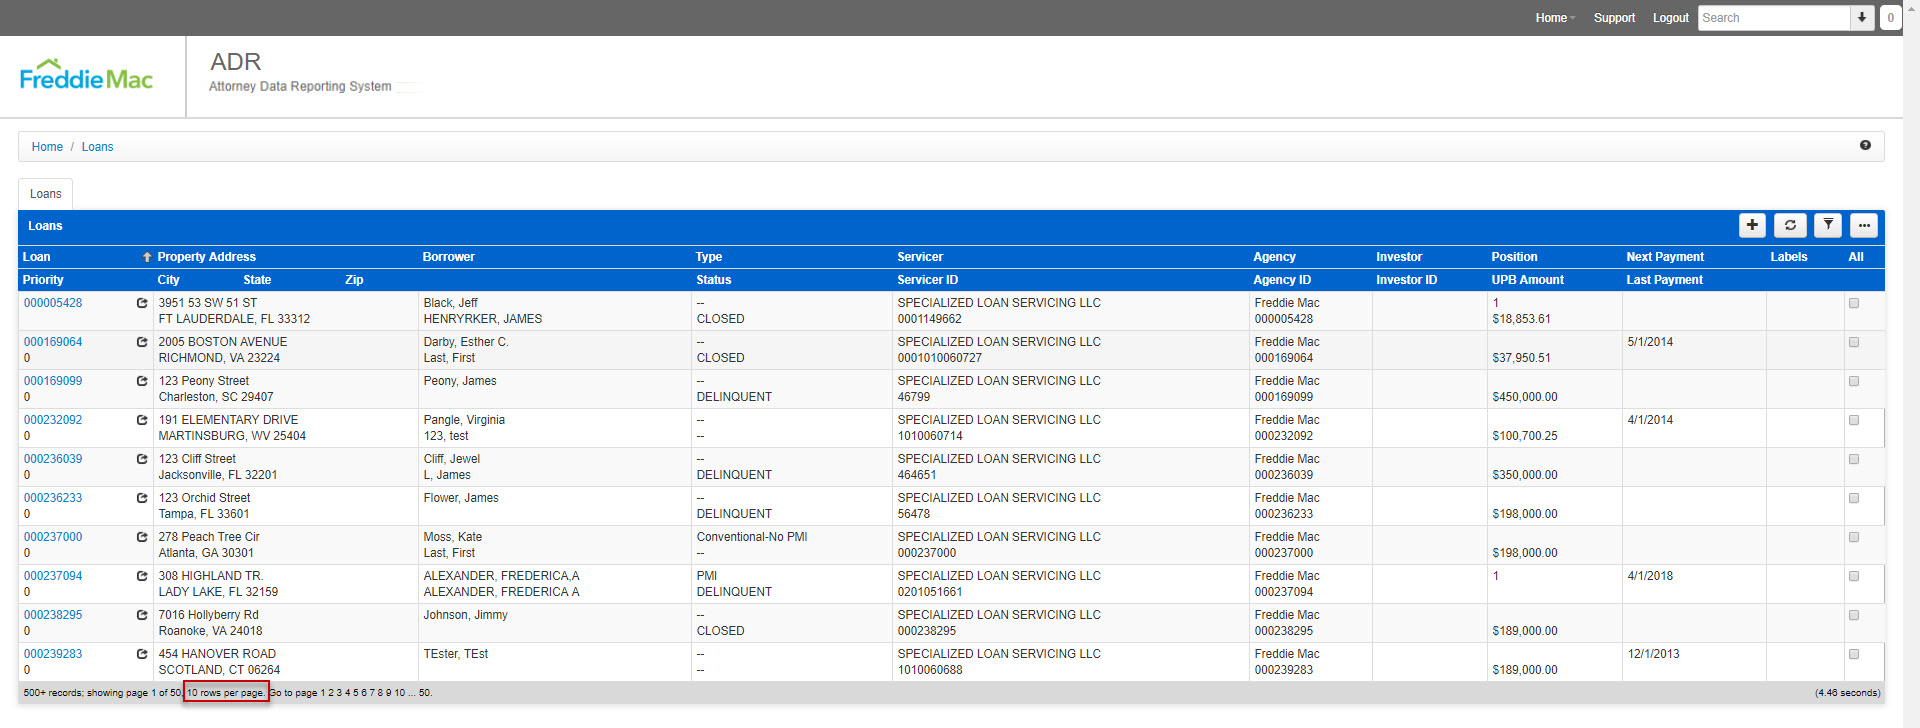
- You may export your results to Excel, along with any section that has an available list (Borrower Data, Bankruptcy files, Foreclosures, etc). The example below will be exporting a list of loans. Navigate to Home > Loans and update desired row count (25 rows per page by default) to view, this example was updated to ’10 rows per page’. Keep in mind that while this is only an example, many of your desired results will contain similarities which you can search by, using this logic and search formula.
- To export the results to CSV or Excel select ‘Export to CSV’ or ‘Export to Excel’ within the “…” dropdown.
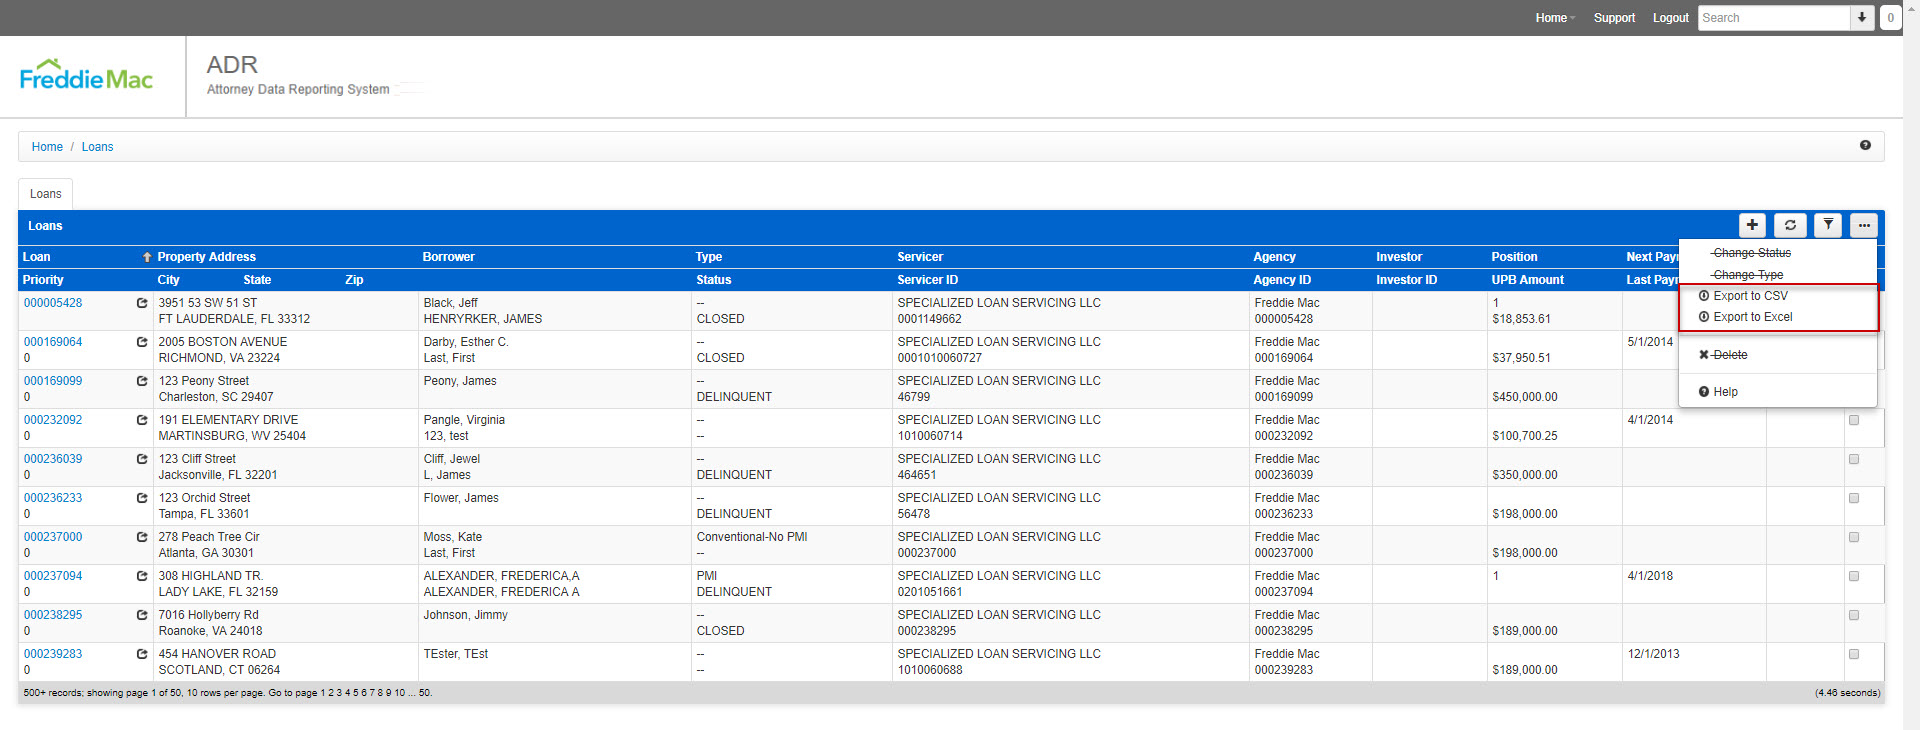
- Upon clicking’Export to CSV’ or ‘Export to Excel’, the result will be an Excel file that can be found in your Downloads folder by default (unless you have manually changed the destination of your Downloads).
8 State Workflow
| Process – State | Workflow Step |
| Foreclosure – AK
(Non Judicial) |
File Received |
| Notice of Default Recorded | |
| Publication/Posting of Sale
completed |
|
| Sale Scheduled | |
| Sale Held | |
| Deed Recorded | |
| Foreclosure – AK
(Judicial) |
File Received |
| Complaint Filed | |
| Service of Process Completed | |
| Judgment | |
| Sale Scheduled | |
| Sale Held | |
| Certificate of Sale Recorded | |
| Foreclosure – AL
(Non Judicial) |
File Received |
| Sale Scheduled | |
| Sale Held | |
| Deed Recorded | |
| Foreclosure – AL
(Judicial) |
File Received |
| Complaint Filed | |
| Service of Process Completed | |
| Judgment Filed | |
| Sale Scheduled | |
| Sale Held | |
| Foreclosure – AR
(Non Judicial) |
File Received |
| Notice of Default Filed | |
| Sale Scheduled | |
| Sale Held | |
| Deed Recorded | |
| Foreclosure – AR
(Judicial) |
File Received |
| Complaint Filed | |
| Service of Process Completed | |
| Court Decree/Judgment | |
| Sale Scheduled | |
| Sale Held | |
| Foreclosure – AZ
(Non Judicial) |
File Received |
| Record Notice of Trustee’s Sale | |
| Trustee Sale Scheduled | |
| Sale Held | |
| Foreclosure – AZ
(Judicial) |
File Received |
| Complaint Filed | |
| Service of Process Completed | |
| Sale Scheduled | |
| Sale Held | |
| Certificate of Sheriff’s Sale | |
| Deed Issued | |
| Foreclosure – CA
(Judicial) |
File Received |
| Complaint Filed | |
| Service of Process Completed | |
| Judgment Entered | |
| Sale Scheduled | |
| Sale Held | |
| Redemption Period Expires | |
| Deed Recorded | |
| Foreclosure – CA
(Non-Judicial) |
File Received |
| Record Notice of Default | |
| Posting and Publishing of Sale/NOS Mailings | |
| Sale Scheduled | |
| Sale Held | |
| Deed Recorded | |
| Foreclosure – CO
(Non-Judicial) |
File Received |
| Sale Scheduled/NED Recorded | |
| Notice of Election and Demand Sent to Public Trste | |
| Court Order Obtained Authorizing Sale | |
| Scheduled Sale Date | |
| Sale Held | |
| Foreclosure – CT
(Judicial) |
File Received |
| Service of Process Completed | |
| Complaint Filed | |
| Motion for Judgment of Foreclosure Filed | |
| Foreclosure by Sale Decree Entered | |
| Sale Held | |
| Deed Recorded | |
| Foreclosure – DC
(Non-Judicial) |
File Received |
| Sale Scheduled | |
| Sale Held | |
| Deed Recorded | |
| Foreclosure – DC
(Judicial) |
File Received |
| Complaint Filed | |
| Service of Process Completed | |
| Initial Scheduling Conference | |
| Foreclosure Mediation Program | |
| Status Conference | |
| Motion for Judgment of Foreclosure Filed | |
| Judgment Entered | |
| Sale Scheduled | |
| Sale Held | |
| Foreclosure – DE
(Judicial) |
File Received |
| Complaint Filed | |
| Service of Process Completed | |
| Motion for Judgment of Foreclosure Filed | |
| Sale Scheduled | |
| Sale Held | |
| Confirmation of Sale | |
| Deed Recorded | |
| Foreclosure – FL
(Judicial) |
File Received |
| Complaint Filed | |
| Service of Process Completed | |
| Motion for Summary Judgment Filed | |
| Judgment Entered | |
| Sale Scheduled Date (tied to Judgment) | |
| Sale Held | |
| Certificate of Title Issued | |
| Foreclosure – GA
(Non-Judicial) |
File Received |
| Sale Scheduled | |
| First Publication | |
| Mail Notice of Sale to Borrower | |
| Sale Held | |
| Deed Recorded | |
| Foreclosure – HI
(Non Judicial) |
File Received |
| Sale Scheduled | |
| Publication and Posting of Sale
Completed |
|
| Sale Held | |
| Foreclosure – HI
(Judicial) |
File Received |
| Complaint Filed | |
| Service of Process Completed | |
| Motion for Summary Judgment and Decree of Foreclosure Filed | |
| Confirmation of Sale | |
| Deed Recorded | |
| Foreclosure – IA
(Judicial) |
File Received |
| Complaint Filed | |
| Service of Process Completed | |
| Judgment Entered | |
| Sale Scheduled | |
| Sale Held | |
| Redemption Period Expires/Deed Recorded | |
| Foreclosure – ID
(Non-Judicial) |
File Received |
| File Notice of Default | |
| Sale Scheduled | |
| Publication/Posting on Property Completed | |
| Sale Held | |
| Deed Recorded | |
| Foreclosure – IL
(Judicial) |
File Received |
| Complaint Filed | |
| Service of Process Completed | |
| File Motion for Judgment of Foreclosure | |
| Judgment Entered | |
| Sale Scheduled | |
| Sale Held | |
| Deed Recorded | |
| Foreclosure – IN
(Judicial) |
File Received |
| Complaint Filed | |
| Service of Process Completed | |
| Judgment Entered | |
| Sale Scheduled | |
| Sale Held | |
| Deed Recorded | |
| Foreclosure – KS
(Judicial) |
File Received |
| Complaint Filed | |
| Service of Process Completed | |
| Judgment Entered | |
| Sale Scheduled | |
| Sale Held | |
| Foreclosure – KY
(Judicial) |
File Received |
| Complaint Filed | |
| Service of Process Completed | |
| Judgment and Order of Sale Entered | |
| Sale Scheduled | |
| Sale Held | |
| Confirmation of Sale | |
| Deed Recorded | |
| Foreclosure – LA
(Judicial by Executory Process) |
File Received |
| Petition for Seizure and Sale of Property Filed | |
| Writ of Seizure and Sale Issued | |
| Sheriff Seized Property | |
| Notice of Sale Publication started | |
| Foreclosure Sale Held | |
| Foreclosure – LA
(Judicial by Ordinary Process) |
File Received |
| Complaint Filed | |
| Service of Process Completed | |
| Motion for Default/Summary Judgment Filed (Writ of Fieri Facias) | |
| Sheriff Seized Property | |
| Sale Scheduled | |
| Sale Held | |
| Deed Recorded | |
| Foreclosure – MA
(Judicial) |
File Received |
| Complaint Filed | |
| Service of Process Completed | |
| Order of Notice Received from Land Court | |
| Sale Scheduled | |
| Sale Held | |
| Deed Recorded | |
| Foreclosure – MD
(Judicial) |
File Received |
| Complaint (Order to Docket) Filed | |
| Service of Process Completed | |
| Sale Scheduled | |
| Sale Held | |
| Motion for Final Ratification of Sale Filed | |
| Foreclosure – ME
(Judicial) |
File Received |
| Complaint Filed | |
| Service of Process Completed | |
| Judgment Entered | |
| Period of Redemption Expires | |
| Sale Scheduled | |
| Sale Held | |
| Deed Recorded | |
| Foreclosure – MI
(Judicial) |
File Received |
| Complaint Filed | |
| Service of Process Completed | |
| Publication of the Notice of Foreclosure | |
| Sale Scheduled | |
| Sale Held | |
| Confirmation of Sale | |
| Foreclosure – MI
(Non-Judicial) |
File Received |
| Sale Scheduled | |
| Publication Complete | |
| Sale Held | |
| Deed Recorded | |
| Foreclosure-MI (Non-Judicial: Pre 7/16/2013) | File Received |
| *NOTE: This applies to all files activated before | First and Second Notice Prepared |
| 7/16/2013* | Notice Mailed and Pub Sent to Legal Newspaper |
| Publication Starts | |
| Publication Completed | |
| MCL 600 3208 is Mailed to the Borrower | |
| MCL 600 3208 Foreclosure Notice Posted | |
| Sale Scheduled | |
| Sale Held | |
| Deed Recorded | |
| Foreclosure – MN
(Non Judicial) |
File Received |
| Notice of Pendency Filed | |
| Sale Scheduled | |
| Sale Held | |
| Foreclosure – MN
(Judicial) |
File Received |
| Complaint Filed | |
| Service of Process Completed | |
| Sale Scheduled | |
| Sale Held | |
| Foreclosure – MO
(Non-Judicial) |
File Received |
| Sale Scheduled | |
| Sale Held | |
| Deed Recorded | |
| Foreclosure – MS
(Judicial) |
File Received |
| Complaint Filed | |
| Service of Process Completed | |
| Judgment Entered | |
| Sale Scheduled | |
| Sale Held | |
| Foreclosure – MS
(Non-Judicial) |
File Received |
| Notice of Default Sent to Borrower | |
| Substitution of Trustee Executed and Recorded | |
| Sale Scheduled | |
| Sale Held | |
| Deed Recorded | |
| Foreclosure – MT
(Non Judicial) |
File Received |
| Sale Scheduled | |
| Notice of Trustee’s Sale Served by Certified Mail | |
| Affidavits of Notice of Sale Compliance Filed | |
| Sale Held | |
| Deed Recorded | |
| Foreclosure – MT
(Judicial) |
File Received |
| Complaint Filed | |
| Service of Process Completed | |
| Judgment Entered | |
| Sale Scheduled | |
| Sale Held | |
| Foreclosure – NC
(Non-Judicial) |
File Received |
| Notice of Hearing Filed | |
| Notice of Hearing Service Completed | |
| Foreclosure Hearing Held | |
| Sale Scheduled | |
| Sale Held | |
| Deed Recorded | |
| Foreclosure – ND
(Judicial) |
File Received |
| Complaint Filed | |
| Service of Process Completed | |
| Judgment Entered | |
| Sale Scheduled | |
| Sale Held | |
| Deed Recorded | |
| Foreclosure – NE
(Judicial) |
File Received |
| Complaint Filed | |
| Service of Process Completed | |
| Sale Scheduled | |
| Sale Held | |
| Confirmation of Sale | |
| Deed Recorded | |
| Foreclosure – NE
(Non Judicial) |
File Received |
| Notice of Default Recorded | |
| Sale Scheduled | |
| Foreclosure Sale Held | |
| Deed Recorded | |
| Foreclosure – NH
(Non-Judicial) |
File Received |
| Sale Scheduled | |
| Sale Held | |
| Deed Recorded | |
| Foreclosure – NJ
(Judicial) |
File Received |
| Complaint Filed | |
| Service of Process Completed | |
| Default Filed | |
| Judgment Entered / Writ of Execution | |
| Sale Scheduled | |
| Foreclosure Sale Held | |
| Deed Recorded | |
| Foreclosure – NM
(Judicial) |
File Received |
| Complaint Filed | |
| Service of Process Completed | |
| Judgment Entered | |
| Sale Scheduled | |
| Sale Held | |
| Deed Recorded | |
| Foreclosure – NV
(Non Judicial) |
File Received |
| Record Notice of Default | |
| Sale Scheduled | |
| Sale Held | |
| Deed Recorded | |
| Foreclosure – NV
(Judicial) |
File Received |
| Complaint Filed | |
| Service of Process Completed | |
| Notice of Sheriff’s Sale and Posting of Sale | |
| Sale Held | |
| Deed Recorded | |
| Foreclosure – NY
(Co-op Foreclosure) |
File Received |
| Title Report Received | |
| Preliminary Title Clear | |
| NOD Letter Mailed | |
| First Publication | |
| Sale Scheduled | |
| Final Title Clear | |
| Sale Held | |
| Foreclosure – NY
(Judicial) |
File Received |
| Complaint Filed | |
| Service Complete | |
| Affidavit of Service, Request for Judicial Intervention, and Attorney Affirmation Filed | |
| Mandatory Settlement Conference Completed | |
| Motion to Appoint Referee to Compute Filed | |
| Judgment of Foreclosure and Sale Entered | |
| Sale Scheduled | |
| Sale Held | |
| Foreclosure – OH
(Judicial) |
File Received |
| Complaint Filed | |
| Service of Process Completed | |
| Motion for Judgment Filed | |
| Judgment Entered | |
| Sale Scheduled | |
| Sale Held | |
| Order of Confirmation Issued | |
| Deed Recorded | |
| Foreclosure – OK
(Judicial) |
File Received |
| Complaint Filed | |
| Service of Process Completed | |
| Judgment Entered | |
| Sale Scheduled | |
| Sale Held | |
| Sale Confirmed | |
| Deed Recorded | |
| Foreclosure – OR
(Judicial) |
File Received |
| Complaint Filed | |
| Service of Process Completed | |
| Judgment Entered | |
| Sale Scheduled | |
| Sale Held | |
| Deed Recorded | |
| Foreclosure – OR
(Non-Judicial) |
File Received |
| Sale Scheduled and Notice of Default Sent | |
| Publication and Posting of Sale Completed | |
| Sale Held | |
| Deed Recorded | |
| Foreclosure – PA
(Judicial) |
File Received |
| Complaint Filed | |
| Service of Process Completed | |
| Judgment Entered | |
| Sale Scheduled | |
| Sale Held | |
| Deed Recorded | |
| Foreclosure – RI
(Non-Judicial) |
File Received |
| Expiration of 30 Day Statutory Notice Period | |
| Publish Notice of Foreclosure Sale | |
| Sale Scheduled | |
| Sale Held | |
| Deed Recorded | |
| Foreclosure – SC
(Judicial) |
File Received |
| Complaint Filed | |
| Service of Process Completed | |
| Order of Reference Entered and Hearing Scheduled | |
| Judgment Entered | |
| Sale Complete | |
| Redemption Period Expires | |
| Deed Recorded | |
| Foreclosure – SD
(Judicial) |
File Received |
| Complaint Filed | |
| Service of Process Completed | |
| Judgment Entered | |
| Sale Scheduled | |
| Sale Held | |
| Redemption Period Expires | |
| Deed Recorded | |
| Foreclosure – TN
(Non-Judicial) |
File Received |
| Sale Scheduled | |
| Substitution of Trustee Recorded | |
| Sale Held | |
| Deed Recorded | |
| Foreclosure – TX
(Non-Judicial) |
File Received |
| Post Notice of Sale | |
| File Foreclosure Notice with County Clerk | |
| Sale Scheduled | |
| Sale Held | |
| Deed Recorded | |
| Foreclosure – TX
(Home Equity Foreclosure) |
File Received |
| Application for Expedited Order to Allow Foreclosure Filed | |
| Foreclosure Order and Affidavit | |
| Signed Order Received | |
| Posting to Sale Held | |
| Foreclosure Sale Held | |
| Foreclosure – UT
(Non-Judicial) |
File Received |
| Expiration of 3 Month Reinstatement Period | |
| Sale Scheduled | |
| Sale Held | |
| Deed Recorded | |
| Foreclosure – VA
(Non-Judicial) |
File Received |
| Sale Scheduled | |
| Publication and Posting of Sale Completed | |
| Sale Held | |
| Deed Recorded | |
| Foreclosure – VT
(Judicial) |
File Received |
| Complaint Filed | |
| Service of Process Completed | |
| Motion for Summary Judgment Filed | |
| Judgment Entered | |
| Sale Scheduled | |
| Sale Held | |
| Sale Confirmed | |
| Deed Recorded | |
| Foreclosure – WA
(Non-Judicial) |
File Received |
| Notice of Sale Recorded | |
| Sale Scheduled | |
| Sale Held | |
| Deed Recorded | |
| Foreclosure – WA
(Judicial) |
File Received |
| Complaint Filed | |
| Service of Process Completed | |
| Judgment Entered | |
| Sale Scheduled | |
| Foreclosure Sale Held | |
| Deed Recorded | |
| Redemption Period Expires | |
| Foreclosure – WI
(Judicial) |
File Received |
| Complaint Filed | |
| Service of Process Completed | |
| Judgment Entered | |
| Redemption Period Expires | |
| Sale Scheduled | |
| Sale Held | |
| Confirmation of Sale | |
| Deed Recorded | |
| Foreclosure – WV
(Non-Judicial) |
File Received |
| Schedule Trustee Sale | |
| Notice of Sale Mailed | |
| Sale Held | |
| Deed Recorded | |
| Foreclosure – WY
(Non-Judicial) |
File Received |
| Sale Scheduled | |
| Sale Held | |
| Certificate of Sale Recorded | |
| Redemption Period Expires | |
| Foreclosure – PR
(Judicial) |
File Received |
| Complaint Filed | |
| Service of Process Completed | |
| Motion for Summary Judgment Filed | |
| Judgment Entered | |
| Writ of Execution | |
| Notice of Sale | |
| Foreclosure Sale Held | |
| Sale Deed Executed | |
| Foreclosure – VI
(Judicial) |
File Received |
| Complaint Filed | |
| Service of Process Completed | |
| Motion for Summary Judgment Filed | |
| Judgment Entered | |
| Writ of Execution | |
| Notice of Sale | |
| Foreclosure Sale Held | |
| Sale Deed Executed | |
| Bankruptcy – Motion
For Relief |
File Received |
| Relief from Stay/Discharge | |
| Bankruptcy – Proof Of
Claim |
File Received |
| POC Filed | |
| Plan Confirmed | |